When working with Cloud Native applications on top of Kubernetes, you might need to make some tough decisions about where to run the services and infrastructure that your applications need, which will directly impact your maintenance costs. Figuring out how to consume a remote service, or if you can host the service inside your Kubernetes Clusters, is key to estimating how many resources you will need.
Process Automation tools have been traditionally installed and maintained inside the organization. This means everyone involved, from developers to operations teams, understand the requirements and how to efficiently run these tools. But with the rise of Cloud Services, having a fully fledged Process Automation suite in the Cloud is now possible. So what are the main considerations that we need to have when connecting to remote services?
When developers need to interact with a remote service, a whole new set of considerations are needed, such as authentication with the remote service and how we will interact with it. Most cloud platforms will provide some kind of SDK or client to interact with their public APIs (usually REST Endpoints). And this is the case for Camunda Cloud.
If you haven’t tried Camunda Cloud yet, you can create an account here: https://signup.camunda.com/accounts
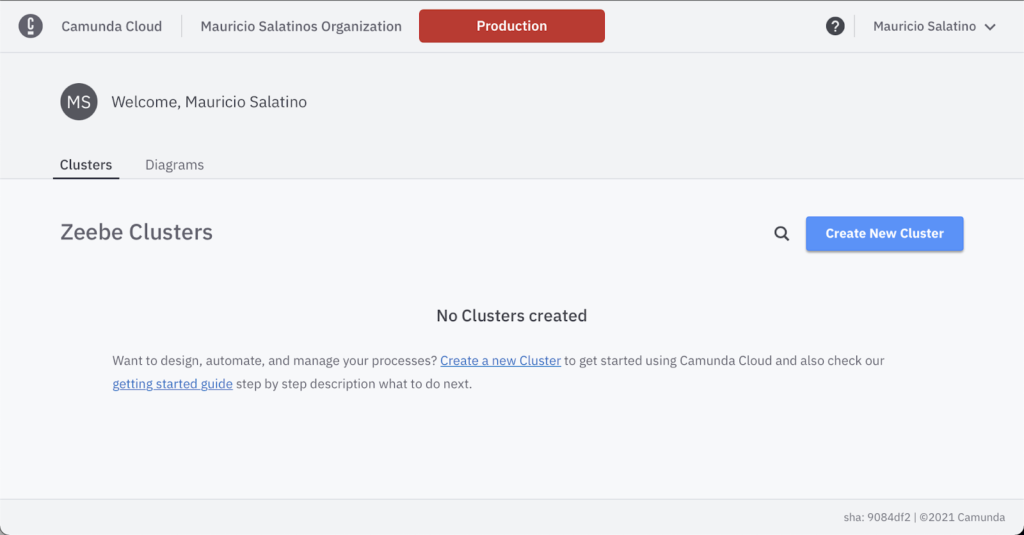
If you login into your account, you will be able to provision Zeebe Clusters (Process Automation engine) which also provision an instance of Operate (operation dashboard) and Task List (human interaction within our Process Automation).

If you are building a simple project or a Proof of Concept (PoC) to test the service, it’s easy to do all these actions from the Camunda Cloud web console. But as soon as you want to create multiple Zeebe Clusters — maybe to separate your development teams from your production workloads, or maybe because you want to have different teams working with different clusters — you need more advanced tools, and relying on the User Interface is no longer an option.
This blog post describes a component created specifically for Kubernetes that will help you automate the operation of resources inside Camunda Cloud the: Camunda Cloud Zeebe Operator.
Kubernetes Operator for Camunda Cloud
Kubernetes Operators are extensions to Kubernetes APIs that allow us to simplify the operational burden of custom domain-specific components that our applications will need. Usually, Kubernetes Operators are considered installers that run inside your Kubernetes Clusters. Once you install an Operator, you can submit a request to the Kubernetes API with a declarative representation of what you want to provision. In Camunda Cloud, that will be a Zeebe Cluster. There are Kubernetes Operators that install components locally, such as databases or message brokers, and Operators that create remote resources — this is the case for the Camunda Cloud Zeebe Operator.
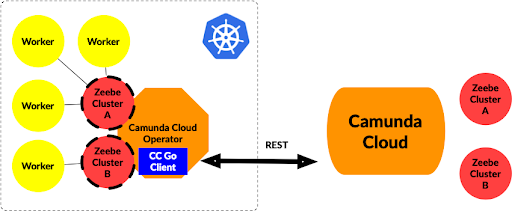
The Camunda Cloud Zeebe Operator uses the Camunda Cloud Console Go Client to interact with your Camunda Cloud account and allows you to define declaratively what needs to be provisioned using a Custom Resource Definition (CRD) called ZeebeCluster. This allows application developers to have a local resource in their cluster to, for example, fetch programmatically the connection URLs and the client credentials.
The Camunda Cloud Zeebe Operator is in charge of connecting to the Camunda Cloud account (which you need to configure) and keeping sync between the remote Zeebe Clusters created inside Camunda Cloud and the local cluster. It controls where new Kubernetes resources will be created in the local cluster, meaning that users interacting with the Kubernetes API or Kubernetes Tooling such as ‘kubectl’ will be able to interact with these objects.

To install the Camunda Cloud Zeebe Operator you can use Helm (a Kubernetes package manager)
$> helm repo add zeebe http://helm.zeebe.io
$> helm repo update
Now before installing the chart, let’s create a Kubernetes Secret with our Camunda Cloud Management API Client Credentials:
$> kubectl create secret generic camunda-cloud-credentials
--from-literal=cc-client-id=<CC_CLIENT_ID>
--from-literal=cc-client-secret=<CC_CLIENT_SECRET>
You can obtain the <CC_CLIENT_ID> and <CC_CLIENT_SECRET> from your Camunda Cloud Account.
This secret is going to be injected into the Camunda Cloud Zeebe Operator to interact with your Camunda Cloud account.
$> helm install cc zeebe/zeebe-operator-ccOnce the operator is installed, you can check with kubectl get pods to see if the Operator Pod is running:
$> kubectl get pods
NAME                                READY   STATUS      RESTARTS   AGE
cc-zeebe-operator-cc-..             1/1     Running     0        2m49s
If it is running, then you can start using `kubectl` to query your running ZeebeClusters or to create new ones.
For example, to query your existing ZeebeClusters you can run:
$> kubectl get zeebeclusters.zeebe.io.zeebe
No resources found in default namespace.
If you want to create a new ZeebeCluster, you can do it in a Kubernetes Native way by creating a YAML file that will describe the characteristics of your ZeebeCluster. To mimic what we did with the `cc-ctl` command-line tool, you can create the following YAML file:
apiVersion: zeebe.io.zeebe/v1
kind: ZeebeCluster
metadata:
  name: from-k8s
spec:
  planName: "Development"
  channelName: "Stable"
  region: "Europe West 1D"
And then you can apply with `kubectl apply -f <filename.yaml>` The operator will be notified about this new resource and will provision a new ZeebeCluster with the name `from-k8s`.
Now run again:
$> kubectl get zeebeclusters.zeebe.io.zeebe
NAME       STATUS     CLUSTER ID   PLAN         CHANNEL   GENERATION     REGION
from-k8s   Unhealthy  8a57f8ec-..  Development  Stable    Zeebe 0.26.1   Europe West 1D
Once you have created a cluster, the next step is to create a client credential to connect your own components with Camunda Cloud. Most of the time you will be designing a Zeebe Worker (Service Task Implementation) or a Client that will be able to start new process instances or send events to your active instances. For creating Client Credentials declaratively, you can define the following Custom Resource Definition called ZeebeClient:
apiVersion: zeebe.io.zeebe/v1
kind: ZeebeClient
metadata:
  name: my-zeebeclient
spec:
  clusterId: 8a57f8ec-.. <- Cluster ID from previously created cluster
  clientName: cc-client
The Operator will automatically create new ZeebeClient credentials linked to the ZeebeCluster specified in `spec.clusterId`. Make sure to set the `clusterId` from your previously created cluster. As soon as the Client Credentials are created inside Camunda Cloud, two new resources will be created inside your Kubernetes clusters– a ConfigMap called `cc-client-configmap` and a Secret called `cc-client-secret`.
You can find out the name of the created resources by describing the newly created ZeebeClient with:
$> kubctl describe zeebeclients.zeebe.io.zeebe zeebeclient-sample
Name:         zeebeclient-sample
Namespace:    default
API Version:  zeebe.io.zeebe/v1
Kind:         ZeebeClient
Metadata:
  UID:               5ad2f13e-ac8b-4277-9c82-b4c9d1520049
Spec:
 <strong> Client Id:        UGP_4-75XFzYyKeozLvxsw8Z.3urmsnC
  Client Name:      cc-client
  Cluster Id:       8a57f8ec-9f4d-4b8e-8370-c502878e62a5
  Config Map Name:  cc-client-configmap
  Secret Name:      cc-client-secret</strong>
Events:             <none>
To get the Secret and the ConfigMap, you can run:
$> kubectl get cm
NAME                  DATA   AGE
<strong>cc-client-configmap   3      2m46s</strong>
$> kubectl get secret
NAME TYPE DATA AGE
camunda-cloud-credentials Opaque 2 3d23h
<strong>cc-client-secret Opaque 1 4m15s</strong>Your developers can now inject this ConfigMap and Secret in their pods by making references to these resources like this:
env:
  - name: ZEEBE_CLIENT_BROKER_CONTACTPOINT
    valueFrom:
     configMapKeyRef:
       name: <strong>cc-client-configmap</strong>
       key: ZEEBE_ADDRESS
  - name: ZEEBE_CLIENT_ID
    valueFrom:
     configMapKeyRef:
       key: ZEEBE_CLIENT_ID
       name: <strong>cc-client-configmap</strong>
  - name: ZEEBE_AUTHORIZATION_SERVER_URL
    valueFrom:
     configMapKeyRef:
       key: ZEEBE_AUTHORIZATION_SERVER_URL
       name: <strong>cc-client-configmap</strong>
  - name: ZEEBE_CLIENT_SECRET
    valueFrom:
     secretKeyRef:
       key: ZEEBE_CLIENT_SECRET
       name: <strong>cc-client-secret</strong>
  - name: ZEEBE_CLIENT_SECURITY_PLAINTEXT
    value: "false"
By injecting both configuration and the secret to your worker/client pods, you avoid copying credentials for each of your workers and keep your deployments free of sensitive data.
Notice that you can repeat the process if you want each of your workers to have a different set of credentials, the only thing that will change is the name of the client configmaps and secrets.
The Operator is designed to have bi-directional sync with the resources created inside Camunda Cloud, which means that if the operator starts and sees that there are some clusters created in your account, it will automatically create ZeebeCluster resources in your local cluster. If you delete these resources, the remote clusters will be deleted as well. Future iterations might provide more options to only remove locally.
For people doing GitOps, that means creating an infrastructure based on the content of a git repository for their development, testing, QA and production environments with native Kubernetes Resources. This allows them to dynamically provision their Zebee Clusters, for example, to test their applications and when the tests are done the cluster can be automatically shut down.
Video Example

Sum up
The Kubernetes Camunda Cloud Zeebe Operator provides the first steps to automating the operational side of Camunda Cloud remote Zeebe Clusters when working with Kubernetes. By having a new Kubernetes Operator, you can manage Zebee Clusters using well-known Kubernetes tools such as kubectl and helm, and tools that rely on YAML resources to provision infrastructure. The project is in early stages, and there are a lot of rough edges to polish. I welcome anyone who is interested in helping — reach out via Twitter or by drop a message on any of the existing issues: https://github.com/camunda-community-hub/zeebe-operator-cc/issues
Getting Started
Getting started on Camunda is easy thanks to our robust documentation and tutorials

