If you’re thinking you can export BPMN from IBM expecting to be able to open it in Camunda Modeler you might be in for a surprise. As has been discovered, IBM BPMN exports do not include diagram information that tools like Camunda Modeler use to render a diagram. In this tutorial we’ll step you through two approaches taking advantage of utilities developed by our consulting team to help you create a complete diagram that can be opened and viewed not only in Camunda Modeler but in any BPMN compliant design tool.
The Camunda Consulting team has created a set of freely available tools for migrating IBM process flows. You’ll notice there are currently two tools available for IBM. One is a BPMN converter and the other is a Teamworks file, aka .twx, converter. We’ll go through the BPMN converter tutorial first and then we’ll step through the .twx converter.
BPMN converter tutorial
The BPMN Converter is a Maven project which can be opened in just about any integrated development environment. Eclipse and Intellij are two of the more popular IDEs. But first you’ll need to clone or download the migration tools repository.
For this tutorial we’ll use Eclipse as our IDE.
- Once you’ve cloned or downloaded the Git repository, copy the contents of the IBM BPMN export converter tool repository into a fresh workspace. If, for example, your Git repository is at C:gitRepos then you’ll find the IBM BPMN converter at C:gitReposmigrate-to-camunda-toolsIBMcreate diagram from exported BPMN.
- Copy the entire folder to the workspace of your choice.
- Next, start Eclipse and select the workspace you just copied the contents into. Once Eclipse has started, navigate to File > Import > General > Projects from Folder or Archive.
- Click on Next. In the dialog box that appears click on Directory and navigate to the folder you just copied into your workspace. Your screen should look something like this (see below)
- Click on Finish.

The project will be imported into your workspace. You may want to update any Java compiler differences between the provided code and your environment but it should work as is.
Next we’ll create a Run configuration to allow you to run the converter in Eclipse:
- Right click on the root project folder and select Run As > Run Configurations…
- In the dialog box that appears double click on Java Application to create a new configuration. The project name is already filled out in the dialog box. You can give this configuration a new name if you want.
- Next, you’ll need to select a main class. Click on the Search button and you should only see one class available – BPMNDiagramGenerator. Select it and click on OK.
- Your screen should look something like this:

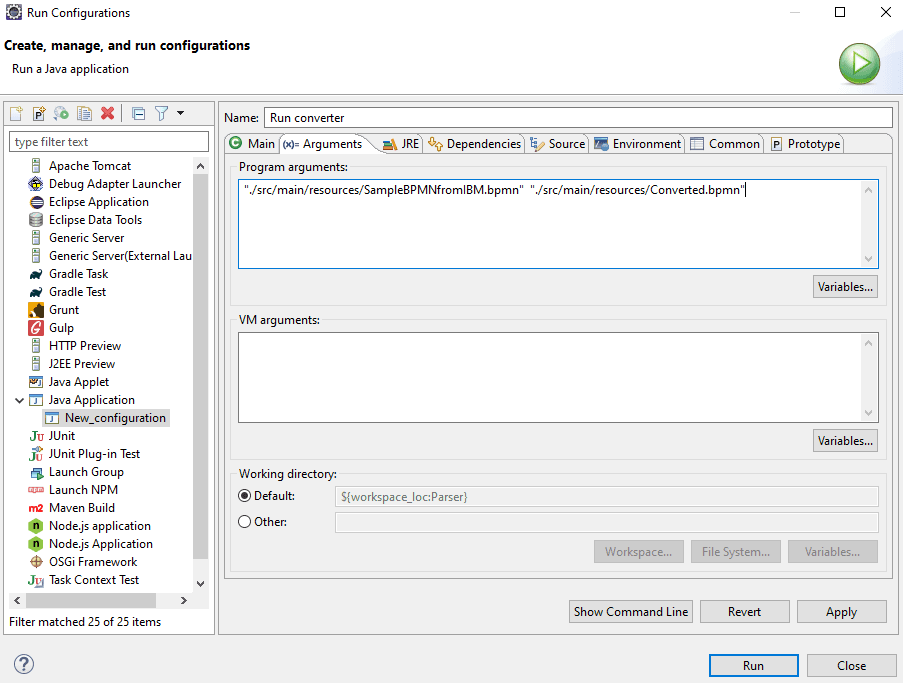
Now you’ll need to provide two arguments, the first one being the BPMN export from IBM and the second being the name of the converted file. Enter the path and file names in the Program arguments section of the Arguments tab enclosed by quotation marks, just in case. There is a provided sample BPMN file to get you started. To use this sample enter the following for the input and output files:
“./src/main/resources/SampleBPMNfromIBM.bpmn”
“./src/main/resources/Converted.bpmn”
Your screen should look something like this:

Click on Run. A console window should open and you should see the following in the console:
BPMN diagram generated
Diagram ./src/main/resources/SampleBPMNfromIBM.bpmn converted from IBM BPMN and can be found at ./src/main/resources/Converted.bpmn
Using Camunda Modeler, open Converted.bpmn file and among the things you’ll notice is the ‘swimlane’, now a ‘pool’ in Camunda BPMN, does not quite fit as you might expect.
The algorithm just sets arbitrary values for height and width and you’ll need to adjust the size of the lane accordingly. Other things you’ll notice is that the converted diagram will look nothing like the original. This is expected as there is nothing in the exported BPMN to indicate any coordinates. That will be addressed in the next section. Lastly, you’ll notice the sequence flows are not your typical rectilinear lines but rather simple point to point lines that will change to the more familiar rectilinear lines as you move objects around.
Here is an example of a process created in Blueworks Live and exported as BPMN:

And here is the process in Camunda Modeler after the missing diagram has been generated and pool has been adjusted accordingly:

In the next section you’ll step through another tool that uses another IBM BPM export format which will retain the fidelity of the original diagram.
Converting IBM BPM .twx file exports
If diagram fidelity is desired and you can export your processes in a .twx (aka Teamworks) format, the .twx migration tool is the way to go. A .twx file is a project interchange format for IBM BPM which contains diagram information in its zipped xml files. The xml files that describe the processes are BPMN-like but most certainly aren’t BPMN. The project we’ll be working with does contain a sample xml file but we’ll step you through how you can extract the required files from your own twx file.
If you’ve already cloned/downloaded the git repository just repeat the steps detailed earlier to copy and open the project in an Eclipse workspace. You can even use the workspace you created earlier in the tutorial. Just make sure the .twx tool is copied into a separate directory.
Next, we’ll create a Run configuration for the sample included in the project. Again, right click on the project root folder and select Run As > Run Configurations….
Double click on Java Applications among the choices given in the dialog box. If you’re using the same workspace from before, be sure that create BPMN from TWX export has been selected as the project.
Search for the main class, though this time you may see more than one choice. Be sure to select BPMNGenFromTWX as your main class.
Next, we’ll need to provide two arguments for the class, one for the input and one for the output like before.
“./src/main/resources/TWXOriginal.xml” “./src/main/resources/TWXConverted.bpmn”
Click on Run. A console window should open and you should see the following in the console:
BPMN diagram generated
Diagram ./src/main/resources/TWXOriginal.xml converted from IBM .twx export and can be found at ./src/main/resources/TWXConverted.bpmn
The resources folder contains a PNG file (PictureOfProcess.PNG) of the original process in IBM and it will look like this:

Using Modeler, open the TWXConverted.bpmn and it should look like this:

As you can see, by using the .twx export approach you can maintain the original diagram fidelity since the .twx export contains the pertinent diagram information, though not in a BPMN-compliant form. There will be slight differences due to the default shape scaling in IBM and Camunda.
Your own processes in IBM BPM
Next, we’ll discuss how you can extract your process xmls from a .twx file and use those extracts as inputs to the tool. The .twx file is just a zip and the easiest way to unzip it is to change the extension from .twx to .zip and, using your favorite zip utility, extract the contents to a folder.
Once the contents have been extracted, navigate to the root folder and then continue to navigate to the /objects folder. As you’ll see it contains a number of xml files which will include processes along with coach flows. Typically, processes are the largest files and the name will start with ”25.” following by a long string of alphanumeric characters. Open these candidate files in your favorite text editor. At the very beginning of the file you’ll see something like:

Search for the process you’d like to convert and make a copy of the file using an easier name to remember and use that as the input for another run in the tool. You may also want to change the name of the output file as well. Happy converting!
Creating a jar file
If you’d like to simply create a jar file of either utility, you have some options:
- One would be to right click on the pom.xml file and select Run As > Maven install.
- Another would be to right click on the root folder and select Show in Local Terminal and issue the following Maven command: mvn clean package install.
In either case (or using your own preferred method) you should get a jar file in your /target folder. Copy that jar wherever you’d like and issue the following command in a terminal:
java -jar yourGeneratedJarFile.jar “your input file” “your output file”
That’s it! Please feel free to provide feedback in our forum and watch this Git repository for additional converters as they become available.
Plus, if you’re new to Camunda and want to get hands-on with our product stack for setting up and running processes, join our Camunda Code Studio on May 19th. This free, hands-on online workshop will get you up and running in just three hours, focusing on a Java and Spring Boot use case.


