When you open the Camunda User Guide, you’ll see that there are many screenshots explaining the different functions and options the product offers. We hope that you, as a user, find those screenshots helpful. But for us as developers, creating and keeping those screenshots up to date has always been a pain.

https://unsplash.com/photos/dDppsuM_UpE
At the time of writing, the user guide for Camunda Optimize contained 94 screenshots. And with every release we add more functionality, which means the number of screenshots continuously grows. When we change the look of buttons or add a new section to the header, we need to update every screenshot that has a button or header in it. In practice, this meant we were manually recreating every screenshot for every release. With almost 100 screenshots, most of which show quite complex situations, simply updating the user guide would take us a day or two.
As developers, and especially as developers of workflow automation tools, we were eager to automate this time-consuming task.
End-to-end Tests to the Rescue
As part of our commitment to deliver high-quality and stable software, all our products are automatically tested. In Optimize, in addition to unit and integration tests, we also use end-to-end testing to ensure that the functionality we describe in the user guide works.
End-to-end testing means that an automated program interacts with the browser in the way a normal user would interact with the site. Clicking on buttons, entering text, navigating around, making sure everything works as expected.
To run those automated tests, we use a library called testcafe. If you look at the “Interact with the Page” section of their documentation, you’ll find all the actions you would expect from such a testing framework. Beside clicking, pressing keys, entering text, there is also a “Take Screenshot” action. This is often used to get a snapshot of the page in case any test fails, so you can see what was going on.
But we were wondering: Could we use this screenshot functionality to escape the realm of testing and help us with the documentation too?

Forming a Plan
We figured out that we can make screenshots of the page while we run the end-to-end tests. But that does not mean that those screenshots are useful for the user guide documentation.
In the user guide, the screenshots have to fit the scenario described in the text. So if we want to automatically create them, we must make sure that the test that produces them is related to the text on the user guide. Our end-to-end tests need to serve two purposes: Testing that the product works as expected, while at the same time creating scenarios that can be used to take screenshots for the user guide.
At this point we pragmatically thought: “Well, by writing features in the documentation we guarantee that these work, so we should have those features covered in end-to-end tests anyway”.
So we took the existing documentation as a guide to go over our existing end-to-end tests and adjust and extend them so they reflect the features described in the user guide documentation. After that, the only thing left to do was to take screenshots at the right moment in the test and put them in the documentation.
Custom Annotations
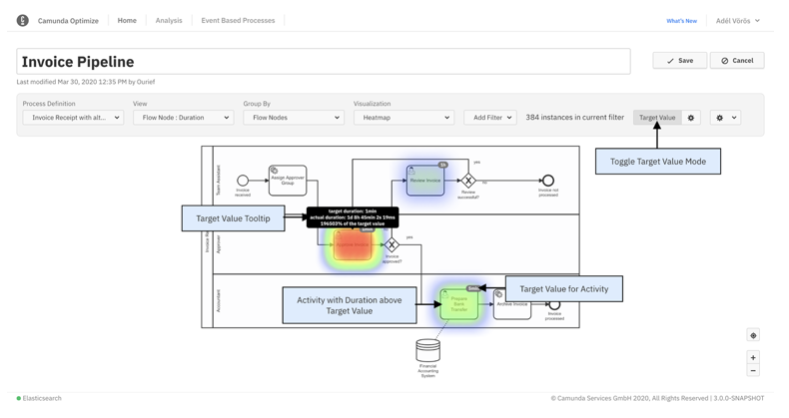
Sometimes you need more than just a screenshot. You might have UI elements that need more explanation, like in this example:

We wanted to have a way to add annotations to the screenshot.
The first idea we had was to just create a transparent png and put it above the generated screenshot. This, however, would cause problems if an update changes the position of the elements we want to annotate.
We needed a way to create the annotations with the contextual information of the page. Ideally, the annotation is there when the screenshot is being taken, so it has to be part of the tested code.
Testcafe offers the ability to run a function on the “client-side”, which means in the browser that is running the test. This is meant to get information from the browser, such as the window location or the document URI. But this is just some Javascript that is injected into the tested page and can be triggered by the test code.
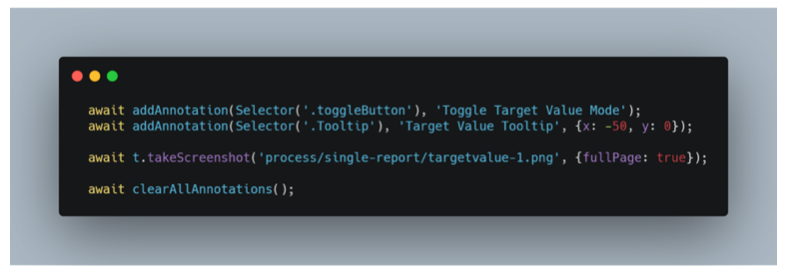
So we wrote a snippet that takes an annotation text and css selector for the element to annotate. It then creates a div container and puts it on the page. In the test code it would look like this:

With that, we are able to dynamically add annotations wherever we want and can put the resulting screenshots directly into our documentation without any manual adjustments.
What are the limitations?
While we were able to automate the generation of a majority of the screenshots, some still need to be updated manually. For Optimize this affects primarily dashboards, as the drag and drop operation is poorly supported by testcafe. There is an open issue to improve that.
If the testcafe team implements this, we might come back to this topic once more. For now we enjoy the time we save every release not having to worry about screenshots as much.

