Camunda in its current version is perfectly suited to run BPM in cloud infrastructures. From Spring Boot integration to the External Task Pattern and other features you have a lot of freedom to design your BPM architecture the way you want. Is anything missing? Hardly.
Except one thing: Identity management in the cloud often differs from classical approaches. Neither the integrated Identity Management nor the optional LDAP Identity Provider fit. That’s why we have been looking for a way to better integrate Camunda’s Identity Management into such environments.
Author
What is Keycloak?

Keycloak™ is an Open Source Identity and Access Management platform including advanced features such as User Federation, Identity Brokering and Social Login.
Among other features it supports
- Single-Sign On
- Standard Protocols like OpenID Connect, OAuth 2.0 and SAML 2.0
- Connections to LDAP and Active Directory infrastructures
- Social Login
- Centralized Management for Admin and Users
Keycloak™ integrates very well in cloud architectures and is widely used to manage identities in such environments. For details got to https://www.keycloak.org/.
Why this plugin?
Camunda already provides a generic sample for Single Sign On when using Spring Boot. See https://github.com/camunda-consulting/code/tree/master/snippets/springboot-security-sso. Of course, these principles can be applied to Keycloak as well.
From my point of view this is a good starting point, but SSO is only half of the story. If one needs to use IdentityService APIs or wants to see actual Users and Groups show up in Cockpit, then you just can’t get any further. But why should I stop using the Camunda Identity Service just because we have moved to the cloud? Why would I even invest valuable time thinking about what is possible and what restrictions may apply? As an architect I want to integrate with Keycloak in the same way I used to with LDAP in older days and have a fully integrated solution. This would make life much easier. So here we are – we’ve written a Keycloak Identity Provider Plugin.
The Keycloak Identity Provider Plugin is a Community Extension and can be found here: https://github.com/camunda/camunda-bpm-identity-keycloak
Features:
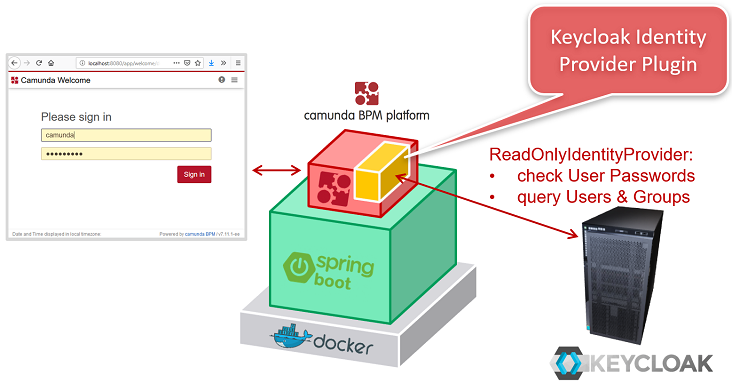
- ReadOnlyIdentityProvider
- Broad support for user and group queries
- Compatible with Spring Boot OAuth2 SSO
Usage Scenario: Centralized Managment Only
Let’s start with the simplest possible integration scenario:
- Connect Camunda’s Identity Service to Keycloak
- No SSO yet – keep using Camunda’s Login Page

For this scenario you have to add a dependency …
<dependency>
    <groupId>org.camunda.bpm.extension</groupId>
    <artifactId>camunda-bpm-identity-keycloak</artifactId>
    <version>1.0.0</version>
</dependency>
… activate the Keycloak Identity Provider Plugin …
package <your-package>;

import org.springframework.boot.context.properties.ConfigurationProperties;
import org.springframework.stereotype.Component;
import org.camunda.bpm.extension.keycloak.plugin.KeycloakIdentityProviderPlugin;

@Component
@ConfigurationProperties(prefix="plugin.identity.keycloak")
public class KeycloakIdentityProvider extends KeycloakIdentityProviderPlugin {
}
… and finally configure the plugin in your application.yaml:
plugin.identity.keycloak:
  keycloakIssuerUrl: https://<your-keycloak-server>/auth/realms/<realm-name>
  keycloakAdminUrl: https://<your-keycloak-server>/auth/admin/realms/<realm-name>
  clientId: camunda-identity-service
  clientSecret: 42aa42bb-1234-4242-a24a-42a2b420cde0
  useEmailAsCamundaUserId: true
  administratorGroupName: camunda-admin
Simple enough? For more details have a look at the configuration options.
Usage Scenario: Single Sign On
Let’s now come to a somewhat more complex scenario: we add single sign-on.
- Keep connecting Camunda’s Identity Service to Keycloak
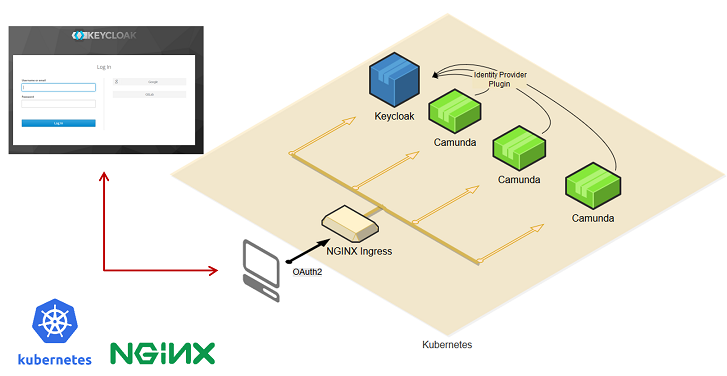
- Get rid of Camunda’s Login Page and use SSO including Social Login etc.

For this scenario we simply use everything that Spring Security and e.g. the OAuth2 integration offers. Good readings are:
- https://spring.io/guides/tutorials/spring-boot-oauth2
- https://www.baeldung.com/sso-spring-security-oauth2
Assuming you have added spring-boot-starter-security and spring-security-oauth2-autoconfigure to your dependencies, the main point is that you have to write a KeycloakAuthenticationProvider similar to the following one:
/**
 * OAuth2 Authentication Provider for usage with KeycloakIdentityProviderPlugin.
 */
public class KeycloakAuthenticationProvider
    extends ContainerBasedAuthenticationProvider {

    @Override
    public AuthenticationResult extractAuthenticatedUser(HttpServletRequest request,
                                                         ProcessEngine engine) {

        // Extract authentication details
        OAuth2Authentication authentication = (OAuth2Authentication)
            SecurityContextHolder.getContext().getAuthentication();
        if (authentication == null) {
            return AuthenticationResult.unsuccessful();
        }
        Authentication userAuthentication = authentication.getUserAuthentication();
        if (userAuthentication == null || userAuthentication.getDetails() == null) {
            return AuthenticationResult.unsuccessful();
        }

        // Extract user ID from Keycloak authentication result
        // depending on plugin configuration
        String userId = ((HashMap<String, String>) userAuthentication.getDetails())
            .get("email");              // useEmailAsCamundaUserId = true
        //  .get("preferred_username"); // useUsernameAsCamundaUserId = true
        //  .get("sub");                // use internal ID

        // Authentication successful
        AuthenticationResult authenticationResult =
            new AuthenticationResult(userId, true);
        authenticationResult.setGroups(getUserGroups(userId, engine));

        return authenticationResult;
    }

    private List<String> getUserGroups(String userId, ProcessEngine engine){
        List<String> groupIds = new ArrayList<>();
        // query groups using KeycloakIdentityProvider plugin
        engine.getIdentityService().createGroupQuery().groupMember(userId).list()
            .forEach( g -> groupIds.add(g.getId()));
        return groupIds;
    }

}
Of course there are different approaches of doing that. The above example is just one them. Important is that the extraction of the userId must match the configuration of the Keycloak Identity Provider Plugin (either use Keycloak’s email, username or internal ID as Camunda User ID). That’s all.
A suitable application.yaml configuration could look similar to the following:
security:
  oauth2:
    client:
      client-id: camunda-identity-service
      client-secret: 42aa42bb-1234-4242-a24a-42a2b420cde0
      accessTokenUri: https://<your-keycloak-server>/auth/realms/<realm-name>/protocol/openid-connect/token
      userAuthorizationUri: https://<your-keycloak-server>/auth/realms/<realm-name>/protocol/openid-connect/auth
      scope: openid profile email
    resource:
      userInfoUri: https://<your-keycloak-server>/auth/realms/<realm-name>/protocol/openid-connect/userinfo
For more details on the overall SSO setup go to the examples directory of the extension’s GitHub repository. It contains a fully integrated SSO showcase including a setup for Kubernetes as well. This should be perfect for you to play around and start your own solution. See SSO-Kubernetes-Example.
Within the Camunda Consulting Snippets you’ll find further examples for SSO, even with using the keycloak-spring-boot-starter package.
As you can see, the choice is yours. Which brings us back to an important principle: a BPM solution should integrate itself into the customer’s infrastructure. Not the other way around. The Camunda Keycloak Identity Provider Plugin contributes to this.

Camunda Developer Community
Join Camunda’s global community of developers sharing code, advice, and meaningful experiences
