*This blog post is a community contribution from David Knapp, president at Apex Process Consultants.
Camunda? Low-code? Why not both?!
Camunda Platform 7 is a powerful and flexible BPM engine, but developing a custom app around a process involves many steps that can be complex for citizen developers — and time-consuming for expert developers.
From setting up an Angular app and a Java or Node.js server app to establishing the development environment and coordinating builds and pushes, the entire project often requires a considerable amount of resources and time.
Pairing Camunda Platform 7 with a low-code tool to create task user interfaces, data models, and system integrations can help avoid these challenges. We know because we’ve done it. This post will give you a look under the hood to see how we integrated Camunda Platform 7 with our low-code platform, Apex Designer, to make it easier to build processes.
How we got here
Apex Designer is a powerful low-code tool for developing full-stack web applications run on an open source stack. It allows you to create an information model, user interfaces, and REST API with underlying persistence. But it was missing a key component — process capabilities to support long-running business transactions.
Camunda Platform 7 was the missing piece to round out the stack. As long-time BPM consultants, we have a pretty good sense of what citizen developers like to do and what they prefer not to do. We integrated Camunda Platform 7 into Apex Designer so people can build a process along with the associated user interfaces and server-side logic, and deploy it in just a few simple steps, regardless of coding experience. Now, developers can use Apex Designer to build process-based applications faster than ever.
Apex Designer integrated with Camunda lets you:
- Create and manage BPMN process models as Apex Designer artifacts.
- Manage and synchronize process data using the externalized process context pattern.
- Generate a fully functional (and customizable) task page when a user task is added to the process model.
- Simplify service task implementation using the external task pattern.
- Automatically deploy the process definition to the runtime server.
- Coordinate the release of the user interface, process model, and server-side logic to source control as a single integrated application.
The rest of this blog post will cover how we did it (or you can go here to see it in action if you don’t want to see how the sausage is made).
BPMN process models
The first step was to include BPMN processes as artifacts in Apex Designer. We used the Camunda bpmn-js modeler to edit the process diagram:
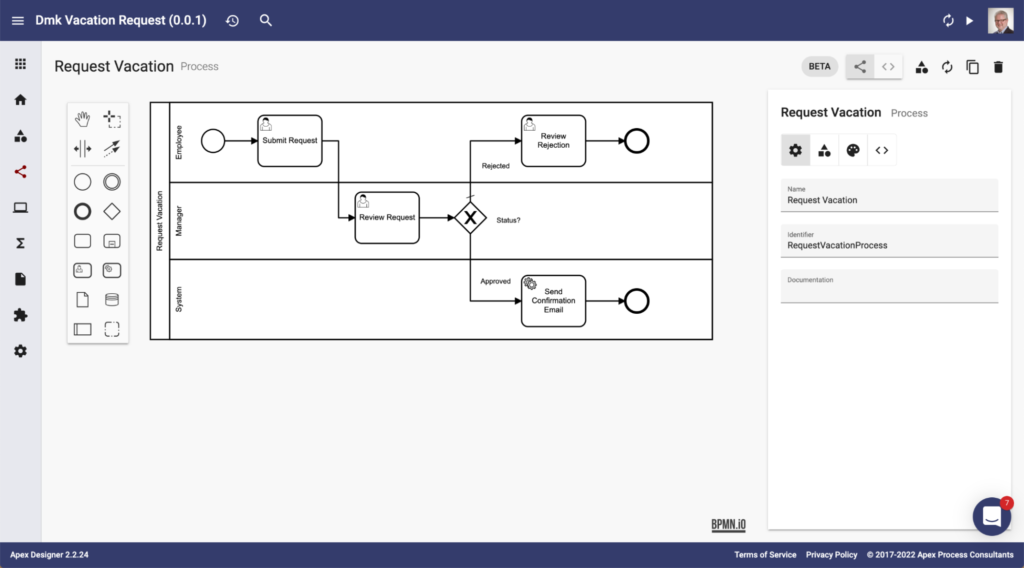
It has all the editing features that you are used to, plus a few additions to make things faster and easier:
- Activity names are automatically changed to title case.
- Identifiers are automatically set using Camunda best practices. (“RequestVacationProcess” in the example above.)
- There are two extra contextual menus for adding user tasks and service tasks with one click.
You can also view/edit the XML directly by clicking the < > icon button:
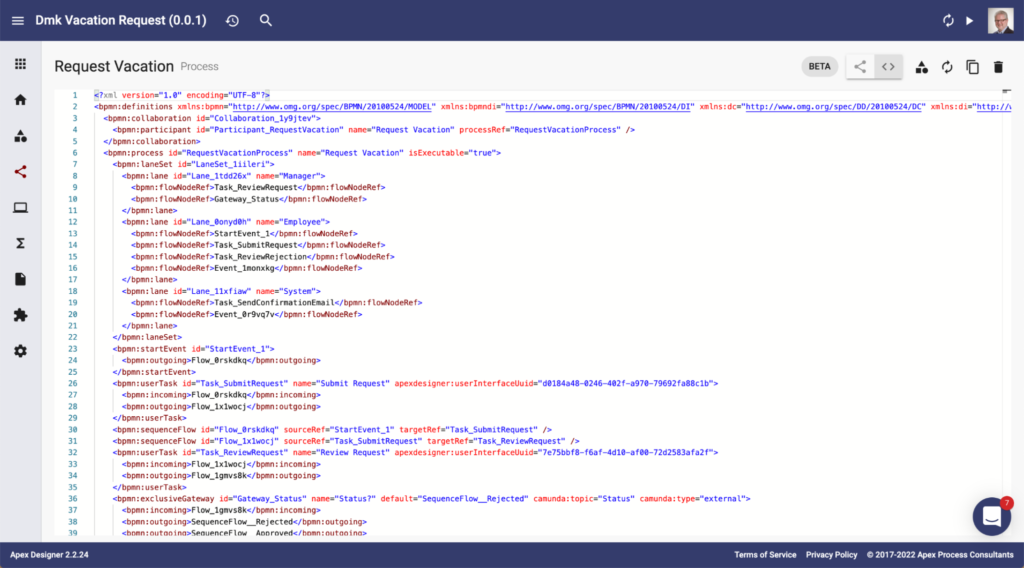
The process BPMN is stored along with the other design artifacts in the Apex Designer project.
Managing and synchronizing process data
Camunda best practices highlight the advantages of externalized process context and the additional requirement of a relational database and code to handle it.
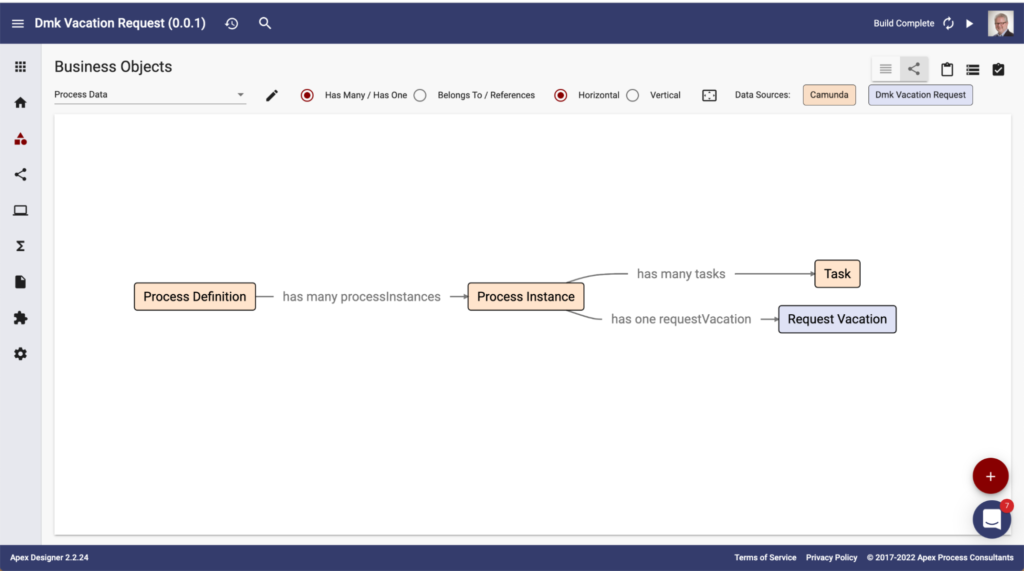
Apex Designer makes it easy to manage externalized process context. When a process is created in Apex Designer, it also creates a Process Business Object that is linked to the Process Instance Model:
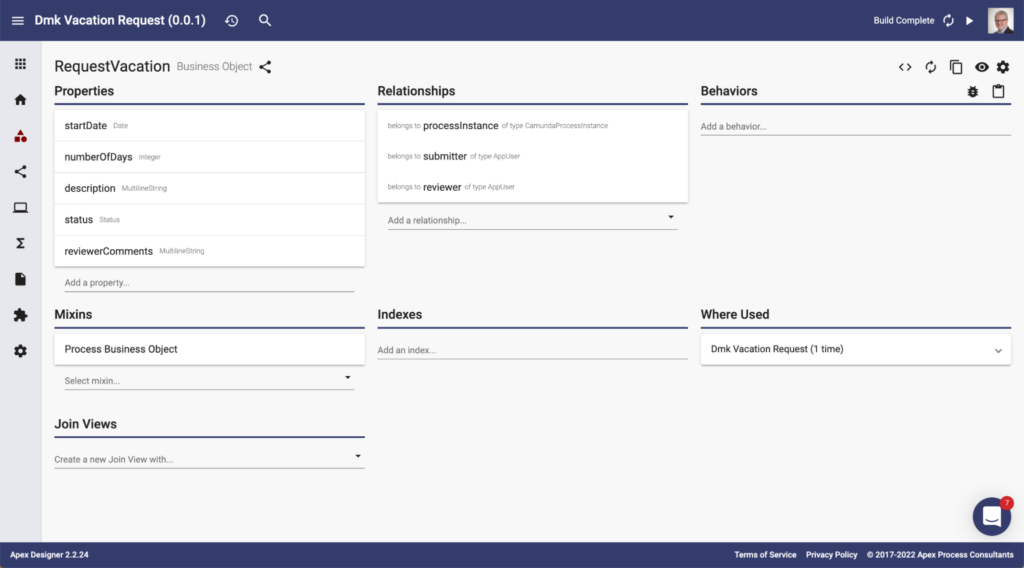
You can define strongly typed properties on the Process Business Object as well as relationships to other business objects in the application:
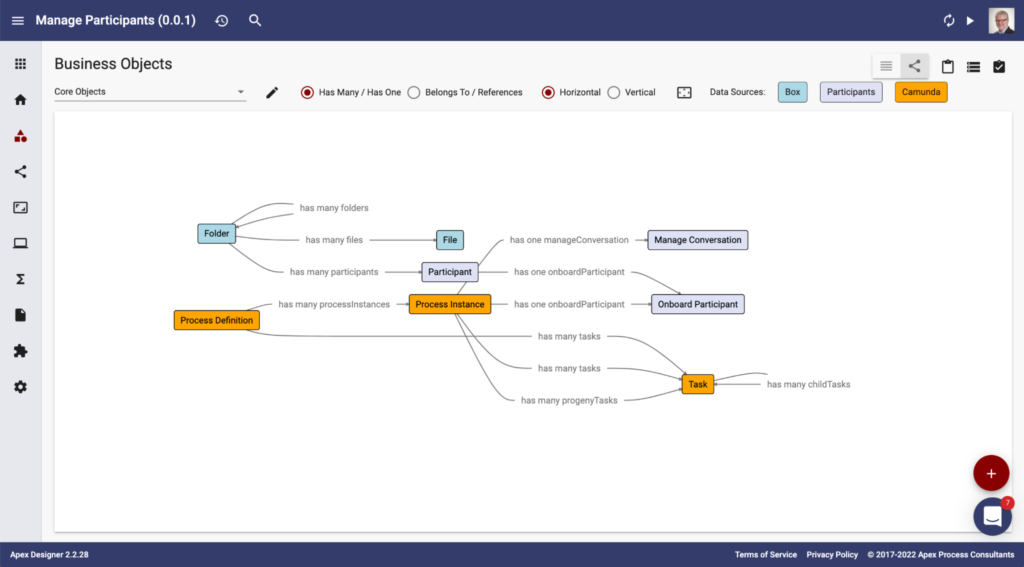
The app can include business objects from multiple data sources and access them as if they were all in the same one. This example includes Camunda, Box, and a Postgres database:
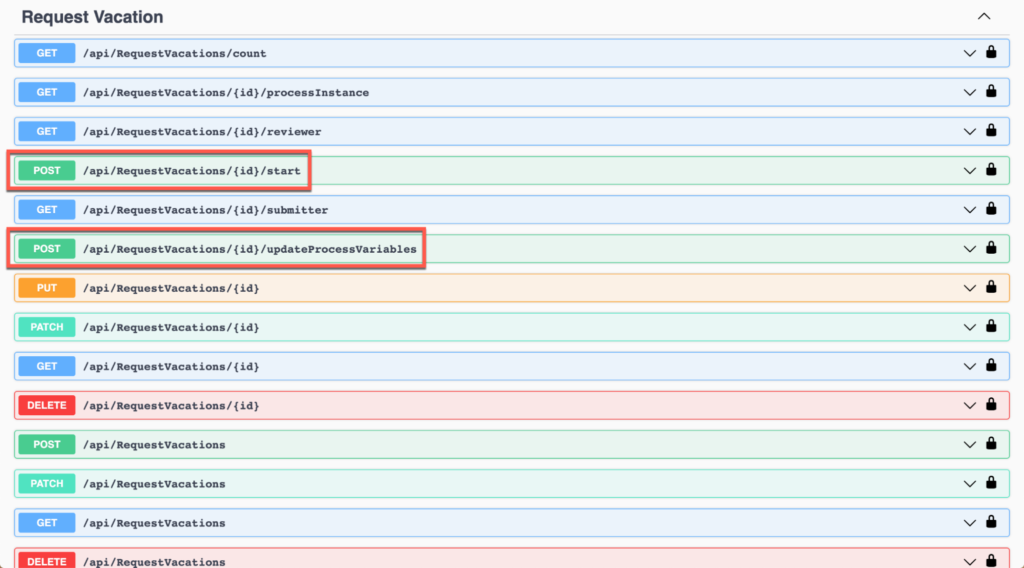
The Process Business Object Mixin is automatically added to the business object. This adds the start process instance behavior as well as the updateProcessVariables behavior:
Even if you manage the information outside of the process instance, you will need some subset to drive task assignments and decision gateways. The Process Business Object Mixin configuration lets you define what subset of the process information is exposed as process variables:
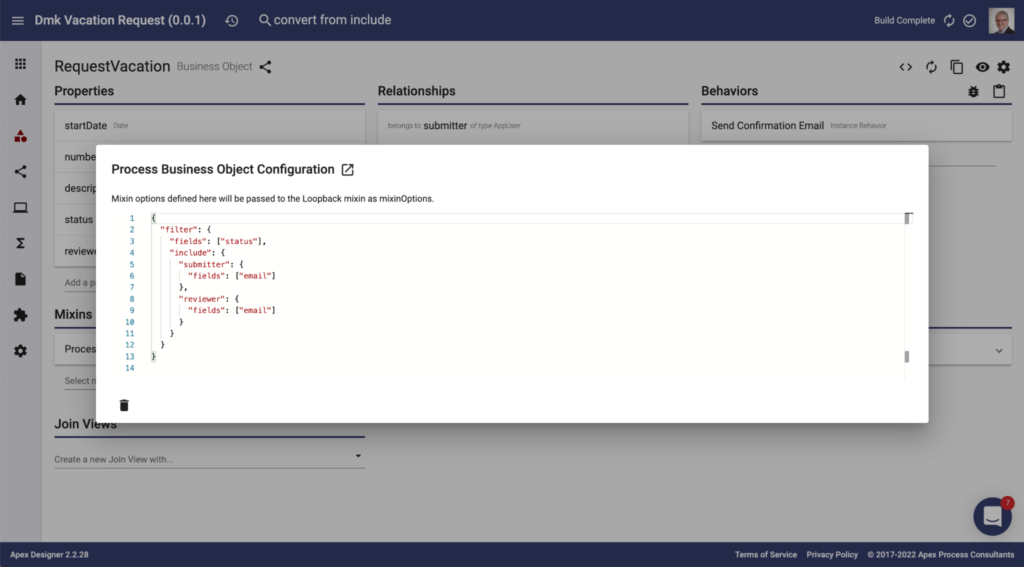
The example above exposes the status property as well as the email of the submitter and reviewer.
Pages for user tasks
When a user task is added to the diagram, Apex Designer automatically creates a User Task Page for the activity. In addition, there is an icon button in the User Task Pane to open the User Task Page:
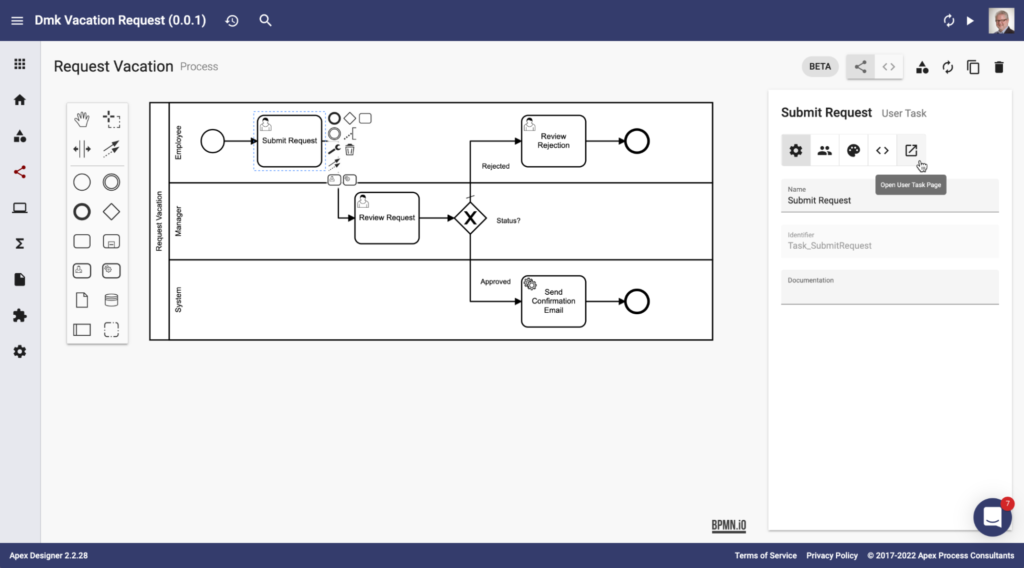
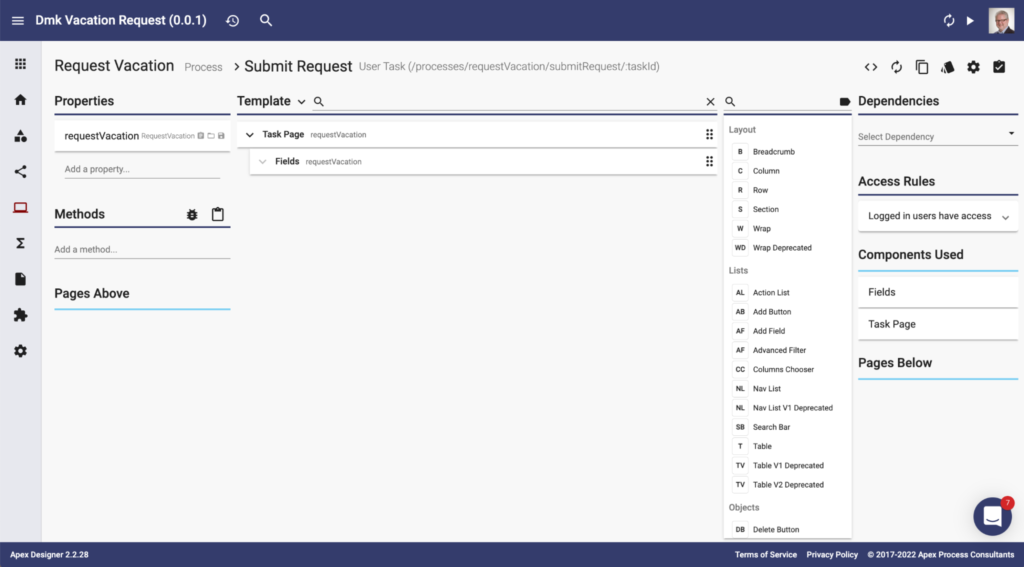
The design view of the page is shown below. If you are not familiar with Apex Designer pages, here are the key points:
- The breadcrumb along the top has a link back to the process as well as the name and path of the User Task Page (“/processes/requestVacation/submitRequest/:taskId” in this example).
- The requestVacation property (top left) is set to retrieve and save the Process Business Object automatically.
- The Task Page component (from the Camunda Library) automatically handles actions like retrieving the task information and saving or completing the task.
- The Fields component automatically displays the properties of the Process Business Object.
The fully functional page can playback the process flow to end users:
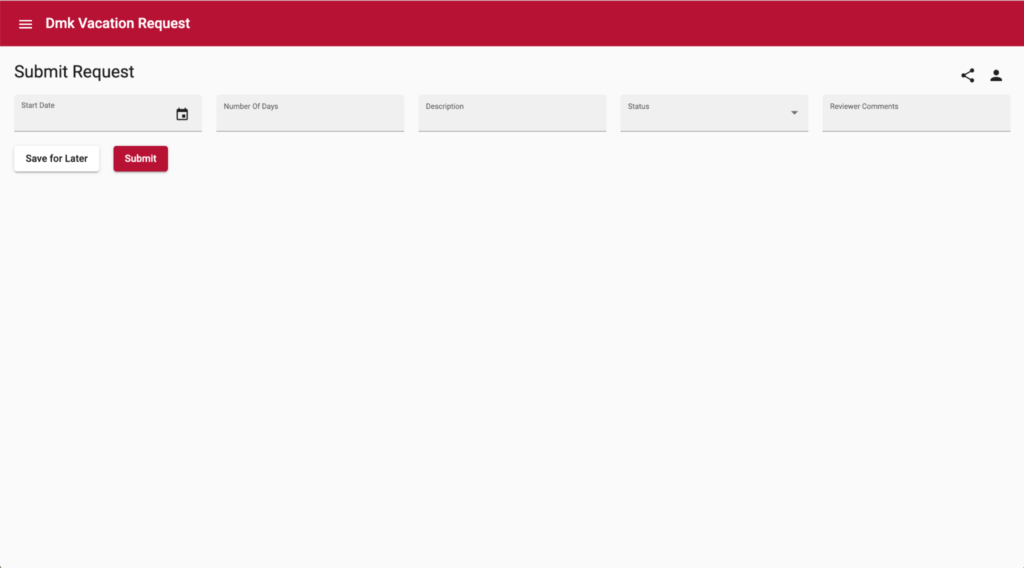
This fully customizable starter page has the power of Angular (anything you can do in Angular can be done here) and the simplicity of low-code. You can read more about user interfaces in Apex Designer here.
Implementing the external task pattern
The Camunda external task pattern is a great way to implement service tasks when working with a Node.js application. Apex Designer makes implementing this pattern super easy.
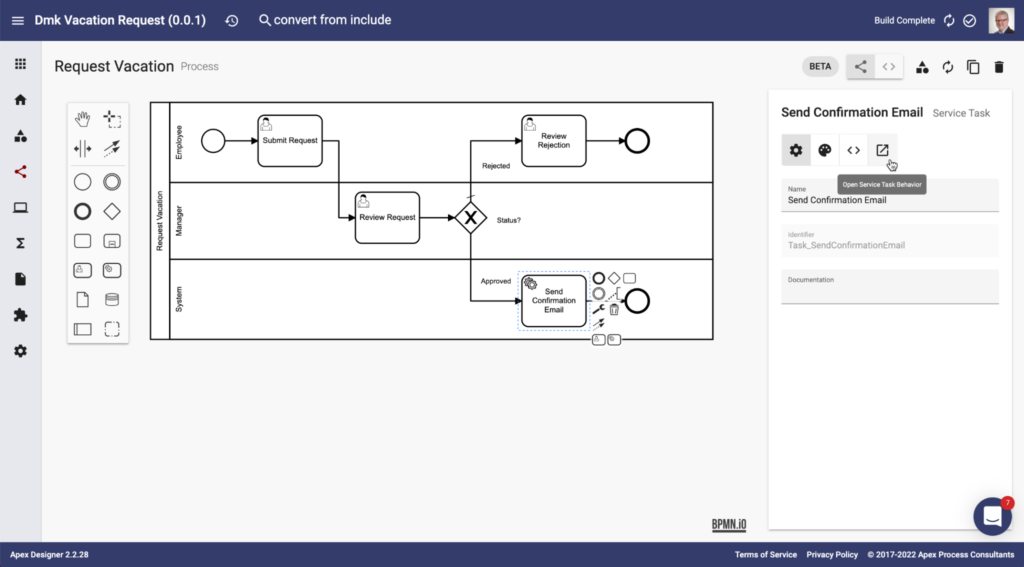
When a service task is added to the diagram, Apex Designer automatically creates a server-side behavior for the activity on the Process Business Object. There is an icon button in the Service Task Pane to open the behavior:
The behavior that is created is an async/await TypeScript function that has the Process Business Object and external task information as inputs. It can access information about the task, read or update Process Business Object information, access other business objects, or use any NPM package designed to be used in Node.js:
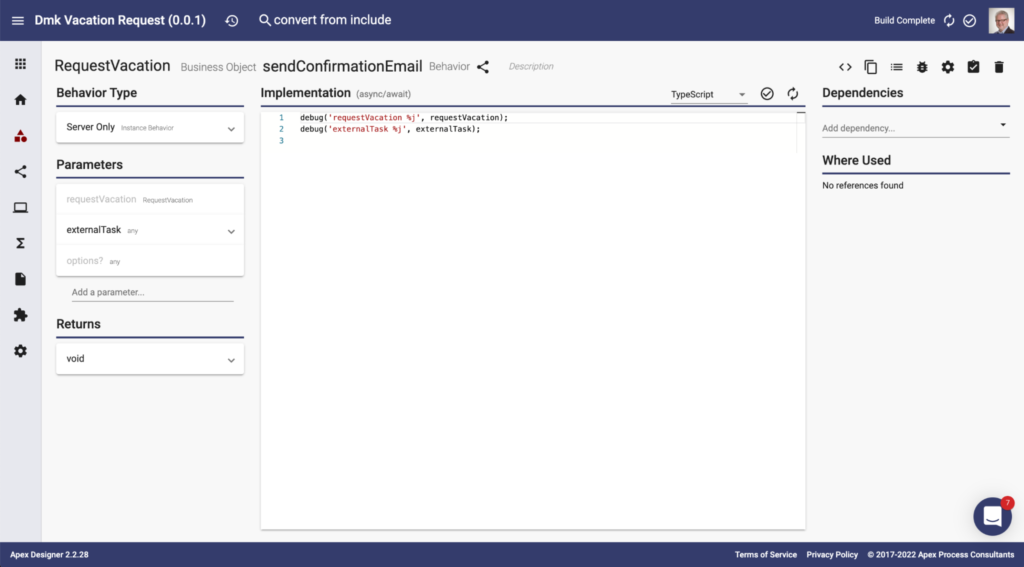
When the app starts, the Process Business Object Mixin automatically starts an external task worker to fetch tasks, call the behavior, and complete the service task.
Automatic coordinated process deployment
Camunda Platform 7 is the perfect process engine component of a larger solution. This pattern is sometimes described as “headless BPM.” One of the key challenges of headless BPM is coordinating the deployment of process and app changes.
Apex Designer takes an app-led approach to this coordination. As shown above, the process models are part of the application project. Each time the app starts, it automatically deploys the current process design to the Camunda engine using the Camunda REST API. If there are no changes to the process, Camunda wisely ignores the request and continues running the previous version of the process.
During development, adding an activity to the process automatically creates a User Task Page, creates and updates Angular source files, synchronizes them to App Manager (the dynamic build run environment), triggers an incremental Angular build, and deploys the updated process to Camunda Platform 7. All of this takes less than 30 seconds. The result is real-time, incremental development of a complete process solution.
When it is time to deploy to testing and production, Apex Designer pushes the metadata and source files (including the client source, server source, and process models) to source control. Your normal CI/CD pipeline takes over and deploys the process solution as one coordinated app.
Running multiple app versions simultaneously
One of the hidden challenges with process-based applications is what to do when the process changes (and an agile business will change it often). Since the processes are long-running business transactions, you need a clear strategy for handling this. Two common patterns are migrate inflight instances and drain out inflight instances.
Camunda Platform 7 provides REST APIs that can be incorporated into your Apex Designer app to migrate existing instances when the app is deployed. This works well when the changes are fairly straightforward (activities are added or updated). The externalized process context also makes this easier.
The drain out pattern is simpler to implement, easier to test, and more robust to deploy. The problem is that you need to be able to run more than one version of the app at the same time. It turns out that running multiple versions at the same time is also critical during development (two developers working on different branches at the same time) and testing (overlapping test cycles for versions n+1 and n+2).
Apex Designer uses two patterns to make running multiple versions of an app easy. First, Apex Designer apps are typically built and deployed as containerized apps. This makes it easy to run two different versions on separate subdomains or paths. Apex Designer includes special logic to make a single Angular build run on different paths at runtime.
Second, the Apex Designer-Camunda Connector leverages the Camunda multi-tenant capabilities. When the connector calls the Camunda REST API, it includes a machine-to-machine JWT token that identifies the app that is calling the REST API. It also includes the user’s identity and group memberships as headers. A custom authentication filter in the Camunda engine (similar to this one) validates the JWT token. It asserts the app’s identity as the tenant ID along with the user’s ID and the user’s group memberships. As a result, you have complete flexibility in your Camunda engine deployment, running as many or as few instances as you like — partitioning them by the environment, app, or any combination.
A faster and easier way
Now, you know how we’ve integrated Camunda Platform 7 with Apex Designer. We have walked through the seamless integration with the bpmn-js modeler, automatic task UI generation, easy management and synchronization of process data, and the use of the external task pattern for system activities. We also went through how we support running multiple versions of a process.
Camunda is ideally suited to be the process engine in a custom Angular application, and our automated process deployment keeps the process and the application code synchronized for easy management. Altogether, we think we have a fast and easy way to build custom applications underpinned by Camunda processes.
We’re excited about potentially using Camunda process automation in more of our projects. We hope this deep dive has given you some inspiration for integration techniques and usage patterns in your own projects. Let us know what you think in the comments.
Full documentation for Camunda process integration in Apex Designer is available here. If you’d like to try it for yourself, watch these videos to get familiar with the design and functionality of various parts of the app.

