Directory services are an effective way to manage an organization’s users, groups, printers, devices, and more. Most organizations accomplish this using Active Directory, Apache Directory, Oracle Internet Directory, or other similar tools. Recently I worked with a customer who wanted to see how he could secure the Camunda 8 Platform and process applications with such a directory.
Their requirements consisted of:
- Allowing Directory users to access Camunda applications (Tasklist, Operate, Optimize)
- Accessing secured Tasklist & Operate APIs from our custom project
- Securing the custom project
In this article, I’ll briefly explain the 3 easy steps taken to fulfill their requirements which include:
- Federate users from the Directory service into Keycloak
- Declare an application in Identity to access Camunda APIs
- Configure Keycloak adapter in our custom Spring Boot project
If you’re interested in seeing a fuller picture, you can find a project with a complete documentation on github.
Before we start, I’d like to reintroduce some general concepts about Camunda 8 and Keycloak.
Camunda 8 and Keycloak overview
Camunda 8 is composed of:
- Zeebe, Camunda 8 fault tolerant and scalable engine
- Tasklist, an application and API to manage human tasks
- Operate, a robust application and API which provides real-time visibility into running processes and tools to troubleshoot incidents
- Optimize, a self-service operational BI application

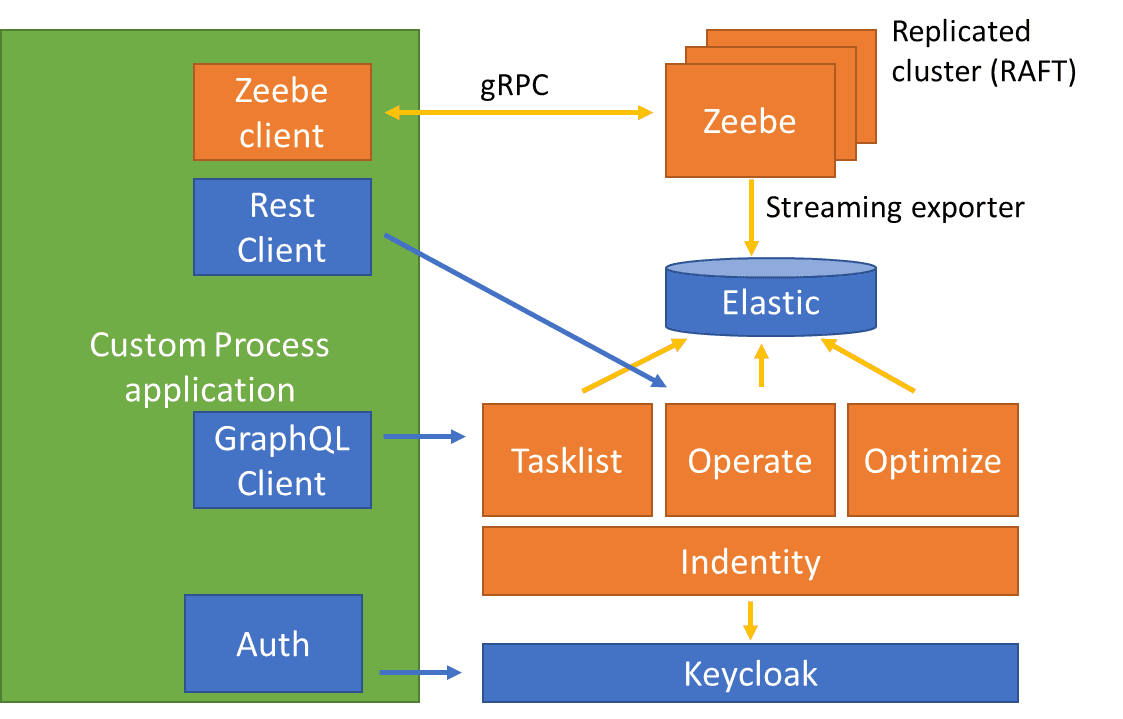
On the right side of the schema, we find the Camunda 8 components previously mentioned as well as three others : Elastic, Identity and Keycloak.
All these components are shipped with Camunda 8 self-managed (using Helm Charts or Docker Compose). Keycloak is an Identity and Access Management (IAM) solution used to secure the access to Tasklist, Operate and Optimize. Identity is a Camunda component that will allow us to add “applications” that will consume Tasklist, Operate and Optimize APIs.
On the left side of this schema, we have our custom application that is used to instantiate processes (Zeebe client), retrieve process instance information (through Operate Rest API) and act on human tasks (through TaskList API). As mentioned earlier, this application should also be secured via Keycloak against the Directory service.
As far as Keycloak concepts, it’s important to understand clients, users, and roles. Basically, a user is a person that may authenticate to access some resources. Roles are associated with the user and when they attempt to access a resource, this resource should check that the authenticated user has sufficient privileges (the right role). A client is an entity that can request Keycloak to authenticate a user and get the authenticated user. And just to clarify, an “application” in identity is equivalent to a Keycloak client (and will be created as such).
Federate users from the Directory service into Keycloak
We could manage a direct ldap integration between all our components and our Directory, but, rather than repeating our configurations multiple times, we will make use of one of Keycloak features: user federation.
With just a few configurations, you can sync your Directory users into Keycloak so when users will be updated in your Directory, they will also be updated in Keycloak.
Once your synchronization is managed, you just must give you users roles: Tasklist, Operate, Optimize. You can use hardcoded-ldap-role-mapper or dynamic ones that will add the roles to your users depending on some attributes they have in the Directory organization.
This means that if you already have meaningful roles or groups in your directory for specifying access to the Camunda applications, you can map this via keycloak to Camunda roles and hence, your directory remains the single source of truth.
And that’s it! You can now access Tasklist, Operate and Optimize with users as they are defined into your Directory service.
One interesting note here, Keycloak also offers a Kerberos federation that could be more interesting in most organizations.
Declare an application in Identity to access Camunda APIs
To access Tasklist and Operate APIs from our custom application, we will need to obtain a token from keycloak. This token should come with sufficient permissions. We could certainly do a lot of configurations in Keycloak but Camunda is providing us with a nice and easy tool called Identity that will take the burden out of us.
The first step is to create an “application” (here named java) in Identity and to give it a few permissions (to read and/or write Tasklist and Operate APIs).

And from the application page, we can copy the clientId (java) and the clientSecret generated by identity.
And inside our process application, we will negotiate a jwt token with Keycloak with these clientId and clientSecret.
curl --location --request POST <br>'http://localhost:18080/auth/realms/camunda-platform/protocol/openid-connect/token' \<br>--header 'Content-Type: application/x-www-form-urlencoded' \<br>--data-urlencode 'client_id=java' \<br>--data-urlencode 'client_secret=theClientSecretIGotFromIdentity' \<br>--data-urlencode 'grant_type=client_credentials'If you want to make the process easier on yourself, I would recommend using CamundaTaskListClient and CamundaOperateClient.
You then just need to create the client and use it :
sma = new SelfManagedAuthentication().clientId(clientId).clientSecret(clientSec);<br>client = new CamundaTaskListClient.Builder().taskListUrl(tasklistUrl).authentication(sma).build();<br>client.getTask(taskId);You can find a complete example here.
Configure Keycloak adapter in our custom Spring Boot project
Now that our Camunda applications are correctly configured, we want to apply the same security strategy to our custom application. The first thing to do will be to create a new client in Keycloak (I called it SpringBootClient).
As we built a Spring Boot application, we just need to add the keycloak-spring-boot-starter dependency and configure Keycloak auth inside our application.yaml file (if you use the KeycloakSpringBootConfigResolver bean) : Keycloak auth server url, realm (camunda-platform), resource (our client name : SpringBootClient) and a few others.
You can now define a KeycloakConfiguration in your project, extending KeycloakWebSecurityConfigurerAdapter and that’s it.
Conclusion
As you’ve seen, in just 3 steps, you can secure your Camunda platform and custom applications with Keycloak and your Directory. If you want a step-by-step guide, you can have a look at the documentation folder of the Git Repository.
If you take a closer look at that project, you will note that I also added a spring-security dependency in the project because I wanted to manage authorization annotations on top of my Rest endpoints. This is achieved within the EnableGlobalMethodSecurity annotation on my KeycloakWebSecurityConfigurerAdapter.
Hopefully this guide should give you the information you needed and you can check the step-by-step documentation to clarify any question you may have.


