One of the more common questions I receive from developers at conferences and meetups is: “Can you walk me through how I would move an existing workflow in my application to Camunda?” It can be challenging to answer without knowing how their application works; instead, we talk through high-level concepts and how things like service tasks and Connectors work as integration points. With this blog post, I hope to show a real-world but basic end-to-end migration of an existing workflow.
The demo application and the workflow
I’ve created a very simple application to simulate a loan origination process. You can find it on GitHub here. It uses an in-memory database, so it is only useful for testing and has no external dependencies. The application exposes some API endpoints (more on those later) that would allow a front-end application to check the status of each loan application. Internally, the application uses a simple CQRS implementation to mimic an event-driven architecture.
There is a set of requirements for the workflow within the application. The workflow is triggered when a new loan application is submitted, and must move the loan application through a series of steps:
- The application must be validated to ensure it is for a loan supported by the financial institution. If the application is invalid, a rejection notice must be sent.
- A credit report needs to be pulled, and a risk assessment is performed.
- If the risk assessment passes, then the collateral needs to be validated.
- If everything passes the automated checks, it goes to an underwriter for a manual review. This step cannot be automated and requires a person to perform it.
- After the underwriter signs off, all the paperwork needs to be signed and the funds can be disbursed.
- If any of the checks fail, then a rejection notice is sent.
Of course, this is a pared-down version of what many financial institutions perform for every loan application, but I think it demonstrates a real-world process that is hardcoded into an application and would benefit from a process orchestration platform like Camunda!
Creating the model
There are many different ways to model this process. If you are feeling up for a challenge, try to model your own solution before reading any further! Even better, share your models in the comments!
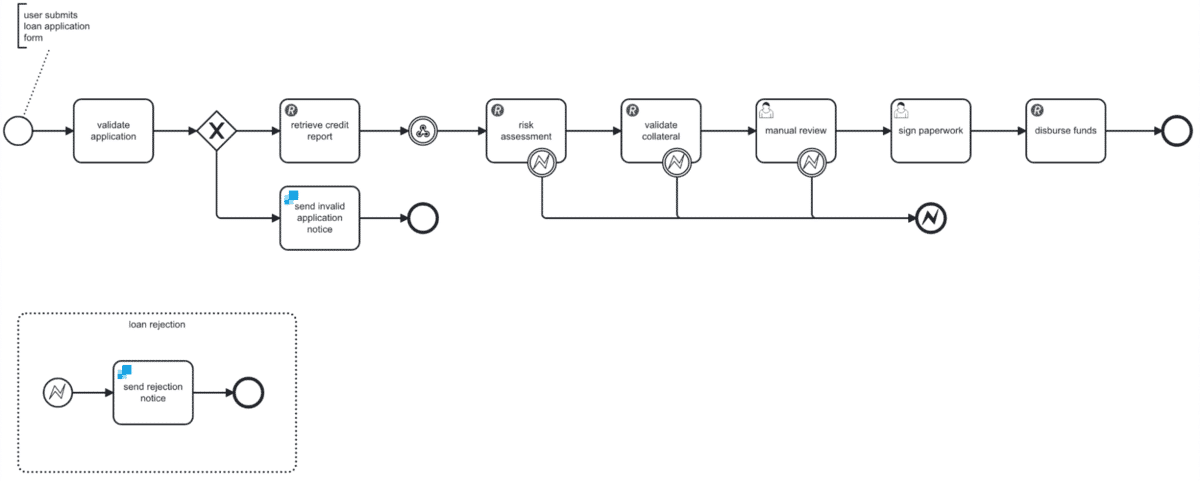
I chose to experiment with error events for this process and came up with the following solution:
(If you’d like to learn more about BPMN, and using event subprocesses and handling errors, please check out our BPMN documentation as well as our excellent BPMN course in Camunda Academy.)
There is also room to add DMN tables to the model. For instance, one of the process requirements is that any loan applications with a credit score below 500 are automatic rejections, and those with a score above 800 are automatic approvals. This could be implemented in a DMN table rather than hard-coding the logic into the web application!
Connecting the model to the application
Because the demo application exposes a set of RESTful API endpoints, we can quickly connect our model to the application using the REST Connector.
The REST Connector enables the engine to make a RESTful call to our web application. It supports various types of authentication (OAuth/OIDC, bearer token, and basic), and all the major HTTP verbs. We can define a JSON body and any required query string parameters for every request, then we can parse the response for the data needed to move the process forward.
Before we look at how to implement the REST Connector, I think it’s important to consider some best practices when handling data—especially sensitive data—in your processes. Data will always be needed for decisions, gateways, and tasks within your process. It is important to be purposeful about what data is needed.
With our fictional loan origination application, there is the potential for personally identifiable information (PII) to be exposed. Variables are logged and are searchable via Camunda’s APIs, for instance. However, no PII is required for this process to complete. We simply need to track the application ID, the ID of the person applying for the loan (applicant ID), and some anonymous details about the loan itself, such as the loan amount and the type of loan.
One last important note: if you are running the demo application locally (either with Maven or Docker), you must use a local Self-Managed instance of Camunda. The cloud does not know how to connect to “localhost” on your workstation! If you want to test this using the cloud, you will need to deploy the application somewhere that is accessible by Camunda.
Using the REST Connector
After the user has submitted the application, it is stored in a database and given an ID. That ID, along with the ID of the applicant, is sent to the process when it is started. The first step in the process is to validate the application: did the user fill out the form correctly and provide all the required information?
The API exposes an endpoint for validating the application: /api/loanApplications/{id}/validate. The id value is the ID of the loan application in the database, provided in the start event. If the ID of the application is “123”, then the URL would be /api/loanApplications/123/validate. The API returns a JSON object as the response:
{
  “loanApplicationId”: 123,
  “isValid”: false,
  “message”: “Why the validation failed.”
}
Let’s look at how that is implemented with the REST Connector:


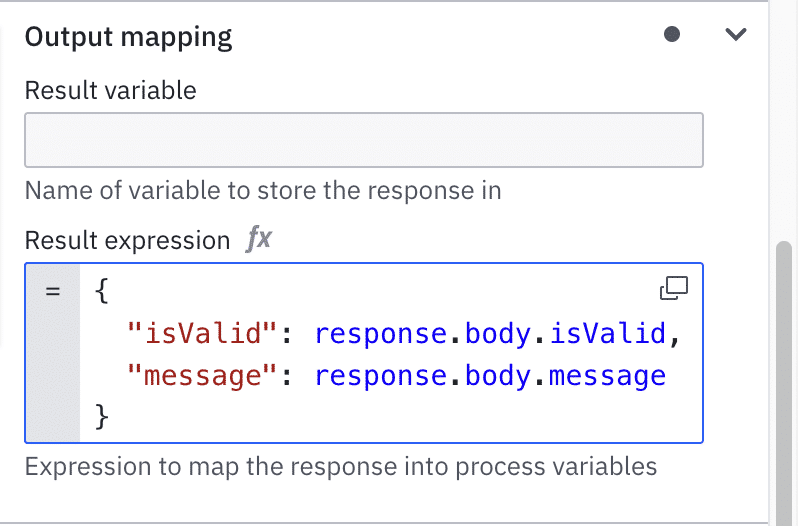
We are using FEEL to build the proper URL to call. This particular endpoint is an HTTP GET request (we will look at a POST request next), so we don’t need to provide a body, and it doesn’t require any special headers or query parameters. The “Result expression” maps parts of the response to new process variables. By explicitly mapping these values, rather than using the whole response object, we avoid accidentally exposing data we did not intend to.
The next step in the process I modeled is an exclusive gateway. If the loan application is invalid, it sends a rejection message and ends the process; otherwise, it continues down the happy path. We can use the isValid variable in the gateway by setting the condition expression to =not(isValid) and =isValid respectively.
Making a POST request
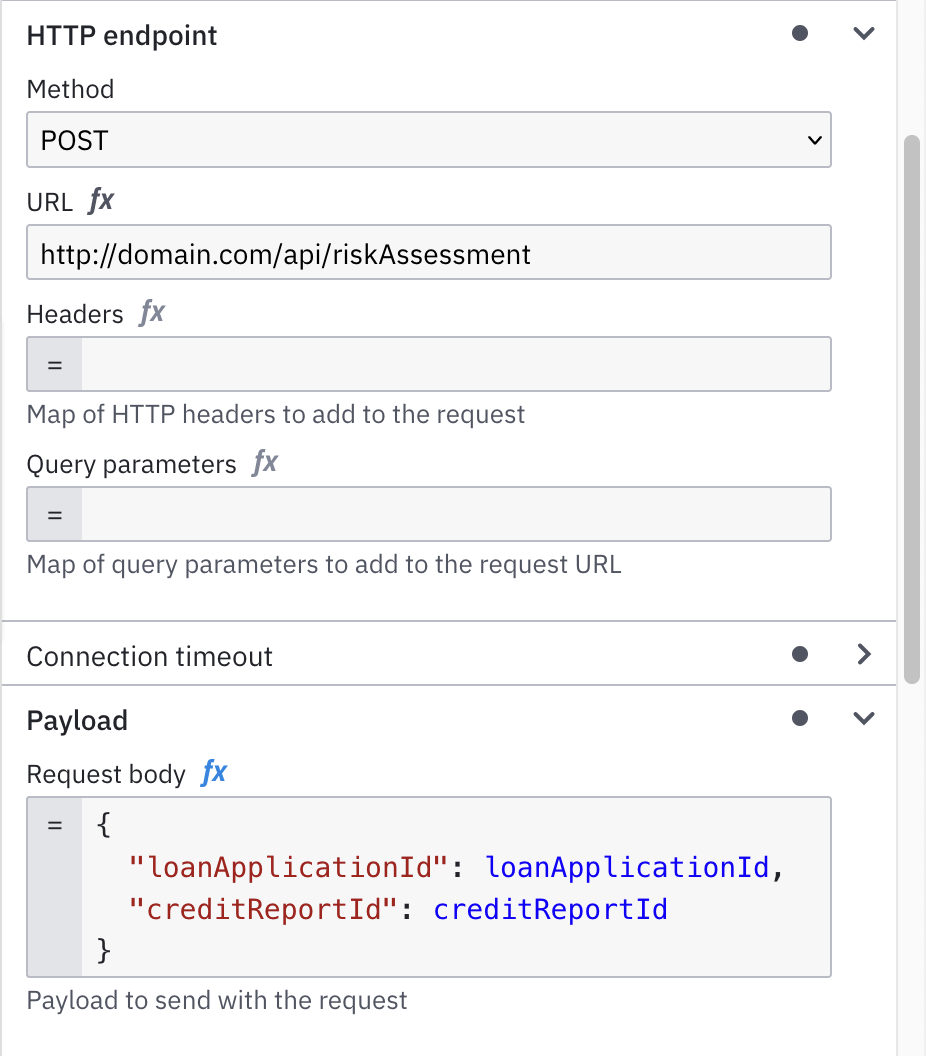
Skipping ahead in the process, after the credit report is retrieved, the next step is to perform a risk assessment. The API has an endpoint for this, of course: /api/riskAssessment. However, it is an HTTP POST request, which means it requires a body.

Using the values from previous tasks, we can build the JSON body using FEEL. We can use the “Result expression” like before, to map only the data we want from the response to the process.
What’s next?
First, congratulations! You’ve successfully migrated a hard-coded process to a new business process built with BPMN and executed by Camunda. You can now remove all the logic that connected those services within your application! (For the demo application, it means you can remove all the CQRS commands and handlers!) Each API call becomes an atomic request, and the state of each loan application is managed by the process engine rather than the application.
So, what did we accomplish by moving the process state to the engine? Several things:
- Your application is simplified and decoupled. Each service no longer needs to know what the next step in the process is, which allows for faster iterations with fewer complications.
- The process is now well described with visual documentation that doesn’t require translation. In other words, the process model you review with your stakeholders is the same process that is executed by the engine. This reduces the chances of errors during development.
- If your application is currently a monolith and you would like to migrate to a microservices architecture, it is now far easier to accomplish because your services are already decoupled. Each API endpoint could be its own microservice and the only thing you need to change is the URL the REST Connector is calling!
- If you implemented business rule tasks with DMN in your process, it is now easier to implement additional rules as the business requirements change. Imagine sitting in a room with your stakeholders, making changes to the rules, and deploying them without writing any additional lines of code!
If you’re new to Camunda and process orchestration, I recommend heading to Camunda Academy to learn more about BPMN, DMN, process orchestration, and using Camunda. If you’re ready to experiment with your own processes and applications, sign up for a free account or log in at https://camunda.io/. I also recommend you join our community forum and join other developers as they explore Camunda and its ecosystem.
Happy coding!


Start the discussion at forum.camunda.io