When creating a sustainable microservice architecture you always need to collaborate. Therefore, two things are needed: a choreographed event-based style, and an orchestrated command-based style, depending on the situation at hand. With a clever mix of both you can reach the level of decoupling you aim for. To learn more about when to use which collaboration style, visit this blog post by Bernd Ruecker, our co-founder and Chief Technologist.
By adding an Amazon SQS, SNS, and Lambda Connector, as well as a Kafka and RabbitMQ Connector, we bring the world of choreography and orchestration even closer together. This further boosts developer productivity in microservice orchestration.
Let’s take a closer look at how you can get started using these Connectors.
Table of Contents
- Produce Kafka messages
- Send messages to RabbitMQ
- Invoke an AWS Lambda function
- Send messages to an SQS queue
- Send messages to a SNS topic
- Learn more
Produce Kafka messages
Apache Kafka is a real-time data streaming technology available under an open source license. Over the past decade, it became an industry standard for working with data in motion. Kafka is now leveraged by over 80% of the Fortune 100 companies and there are many common use-cases and customer stories where the tool is used with Camunda to get the best of both worlds: choreography and orchestration.
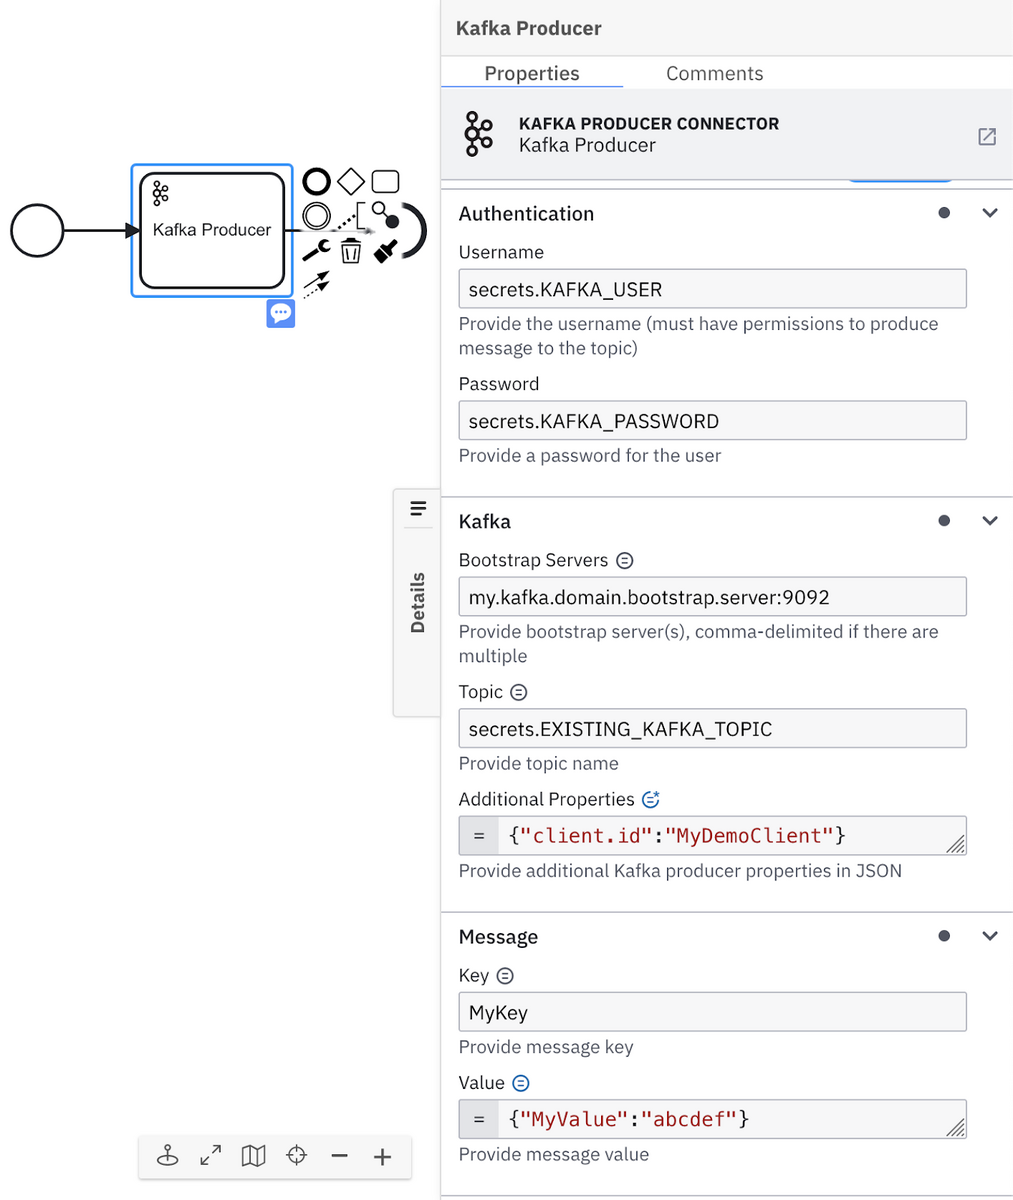
Adding the Kafka producer Connector to a BPMN activity can connect with Kafka and publish messages. To use the Connector, you need to have a Kafka instance with a configured bootstrap server at hand.
To set up the Kafka connector:
- Log in to Camunda Platform 8.
- In Camunda Platform 8, launch Web Modeler and create a new BPMN diagram or open an existing one.
- Click an element in the diagram and click the Append Connector context menu item to add a Connector task. Type Kafka in the search box to filter the list of Connectors, or just scroll down and select the Kafka Producer Connector. Follow our guide on using Connectors to learn more.
- Set the relevant credentials in the Authentication section of your cluster. For example,
secrets.MY_KAFKA_USERNAME. - In the Kafka section:
- Set the URL of bootstrap server(s); comma-separated if more than one server is required.
- Set the topic name.
- Fill out the Additional properties field to set producer configuration values. See the list of supported configurations at the official Kafka documentation page.
- In the Message section, set the Key and the Value that will be sent to Kafka topic.
More information on how to configure the Kafka Connector can be found in our documentation. You can find the Connector response as well as an FAQ there.
Send messages to RabbitMQ
RabbitMQ is a widely deployed open source message broker. It can be found in startups as well as large enterprises. RabbitMQ itself is lightweight and easy to deploy on your own premises and in the cloud. It is very comparable to Kafka or Amazon SQS. Let’s take a closer look at how we can make use of this Connector in an activity in Camunda Platform 8.
To use this connector, you need to have installed a RabbitMQ server and created the relevant credentials. Once complete, we can continue in Camunda Platform 8.
To set up the RabbitMQ connector:
- Log in to Camunda Platform 8.
- In Camunda Platform 8, launch Web Modeler and create a new BPMN diagram or open an existing one.
- Click an element in the diagram and click the Append Connector context menu item to add a Connector task. Type RabbitMQ in the search box to filter the list of Connectors, or just scroll down and select the RabbitMQ Connector. Follow our guide on using Connectors to learn more.
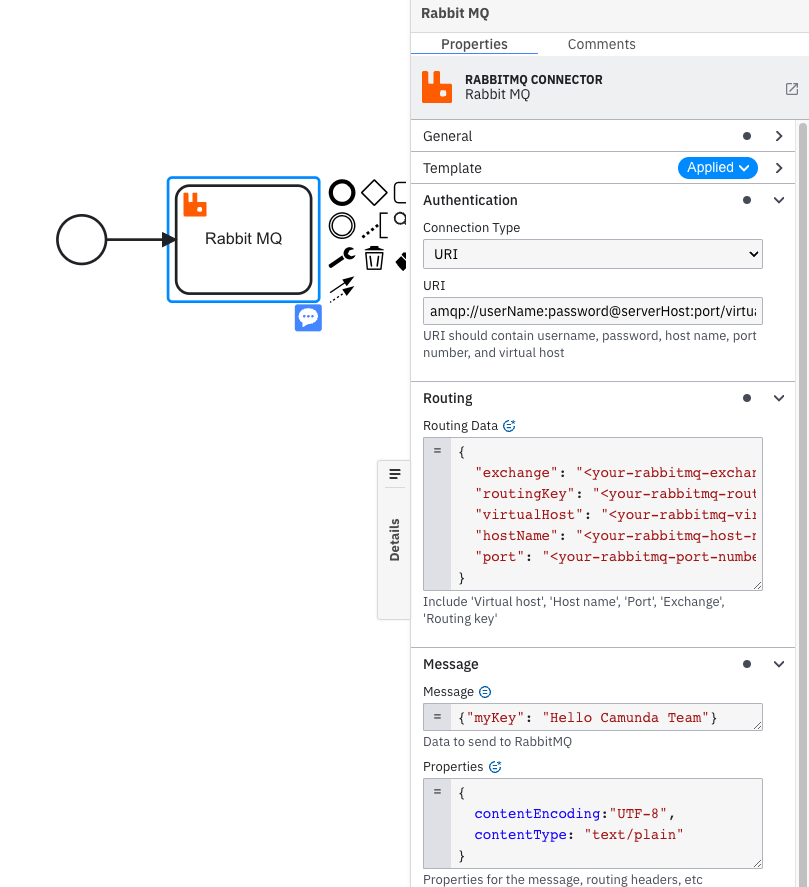
- Choose either the URI or credentials type connection in the Authentication section:
- URI type connection: The URI must contain RabbitMQ username, password, host name, port number, and virtual host.
For example, amqp://userName:password@serverHost:port/virtualHost. Follow the RabbitMQ URI specification to learn more. - Credentials type connection: set the username and password of the user in your RabbitMQ instance. For that purpose, you could also make use of a secret.
- URI type connection: The URI must contain RabbitMQ username, password, host name, port number, and virtual host.
- In the Routing section you must set the routing data attributes (you can either use JSON or a FEEL expression). For a URI type connection, the required fields are
exchangeandroutingKey. For a Credentials type connection, the required fields are exchange, routingKey, virtualHost, hostName, and port. - In the Message section:
- Insert the Message payload as text or JSON.
- In the Properties section, insert the message properties in JSON or as a FEEL expression. This is an optional field.
To learn more about the Connector and its response visit our RabbitMQ Connector documentation.
Invoke an AWS Lambda function
AWS Lambda is an event-driven compute service which allows you to run code without provisioning infrastructure. Additionally, it can automatically respond to code execution requests. Lambda can be triggered from over 200 AWS services and SaaS applications. To make these functions available to users, we added an out-of-the-box Connector to Camunda Platform 8.
To use the Connector, you need to have an AWS Lambda Function, IAM key, and secret pair with permission for executing this function. Once you’ve retrieved this information from your AWS account, you are ready to get started setting up this Connector in Camunda Platform 8.
To set up the AWS Lambda Connector:
- Log in to Camunda Platform 8.
- In Camunda Platform 8, launch Web Modeler and create a new BPMN diagram or open an existing one.
- Click an element in the diagram and click the Append Connector context menu item to add a Connector task. Type AWS in the search box to filter the list of Connectors, or just scroll down and select the AWS Lambda Connector. Follow our guide on using Connectors to learn more.
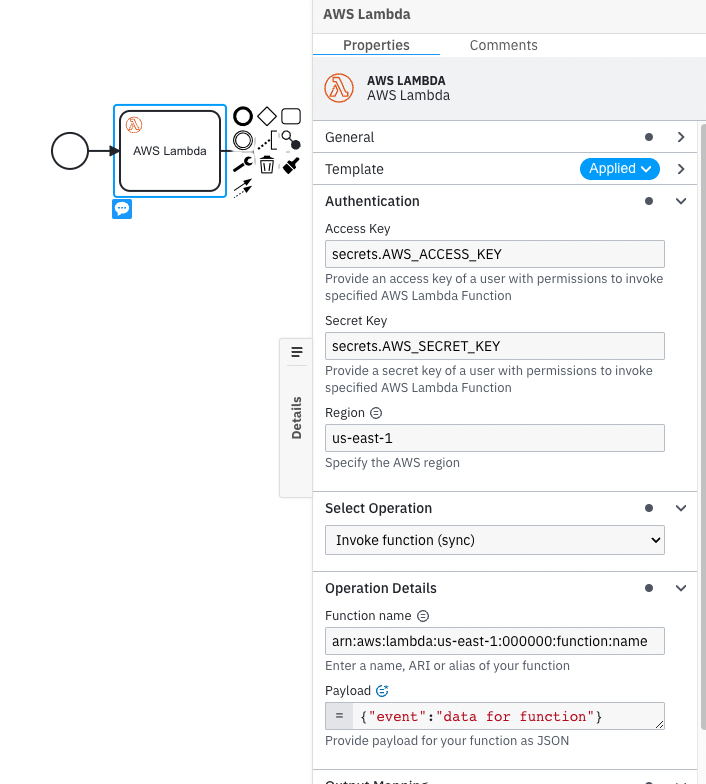
- Set the relevant IAM key and secret pair in the Authentication section. For example,
secrets.MY_AWS_ACCESS_KEY. The value can be plain text, but this is not recommended due to security concerns. - Set the relevant AWS region in the Authentication section. See the Regions and Zones to learn more.
- In the Operation Details section:
- Fill out the field Function name. This field can be a function URL, function ARN, function name, or alias.
- The Payload field is optional. This field requires FEEL input. Payload must be in JSON format as this is the data that will be processed by your Lambda function.
For further information, like an FAQ and the Connector response, visit the documentation of the AWS Lambda Connector.
Send messages to an SQS queue
The Amazon SQS service provides a fully managed message queue for microservices and distributed systems in general. The simple message queue service (SQS) lets you send, store, and receive messages between various software components. It is very comparable to Kafka and RabbitMQ.
To use this Connector, you need to have an SQS, Queue, IAM key, and secret pair which allows you to send a message. Once you’ve obtained this information from your AWS account, you can set up this Connector in Camunda Platform 8.
To set up the Amazon SQL connector:
- Log in to Camunda Platform 8.
- In Camunda Platform 8, launch Web Modeler and create a new BPMN diagram or open an existing one.
- Click an element in the diagram and click the Append Connector context menu item to add a Connector task. Type SQS in the search box to filter the list of Connectors, or just scroll down and select the Amazon SQS Connector. Follow our guide on using Connectors to learn more.
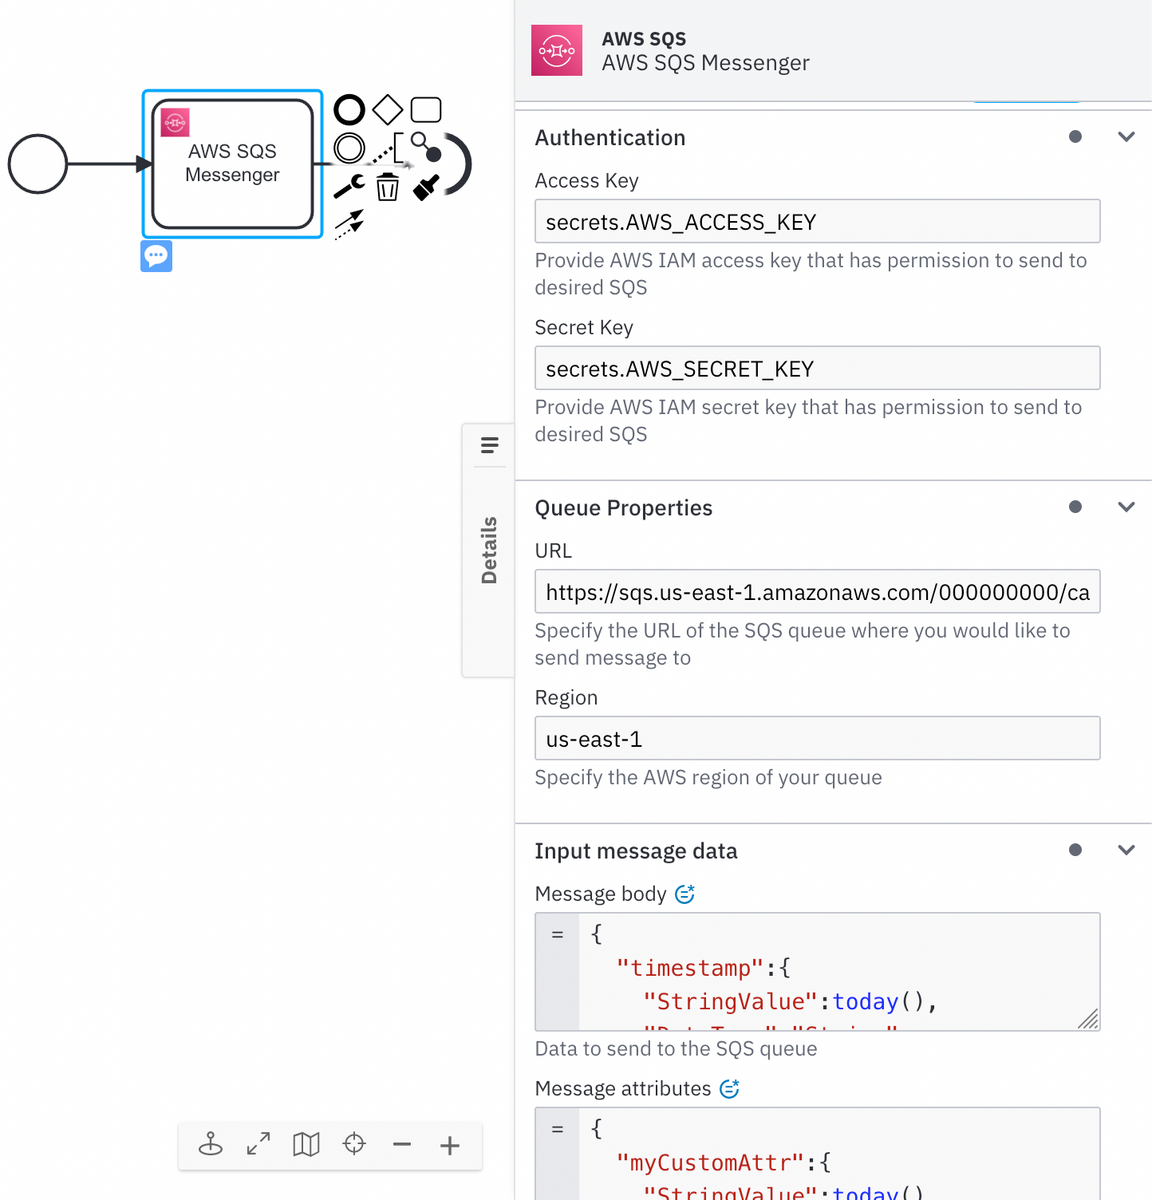
- Set the relevant IAM key and secret pair in the Authentication section. For example,
secrets.MY_AWS_ACCESS_KEY. The value can be plain text, but this is not recommended due to security concerns. - In the Queue Properties section, set the URL of your SQS queue as well as its region.
- In the Input message data section:
- Fill out the field Message body with the data you would like to submit to the queue. The field requires FEEL input.
- Fill out the field Message attributes to set optional message metadata.
Learn more about the Connector response and frequently asked questions in the documentation.
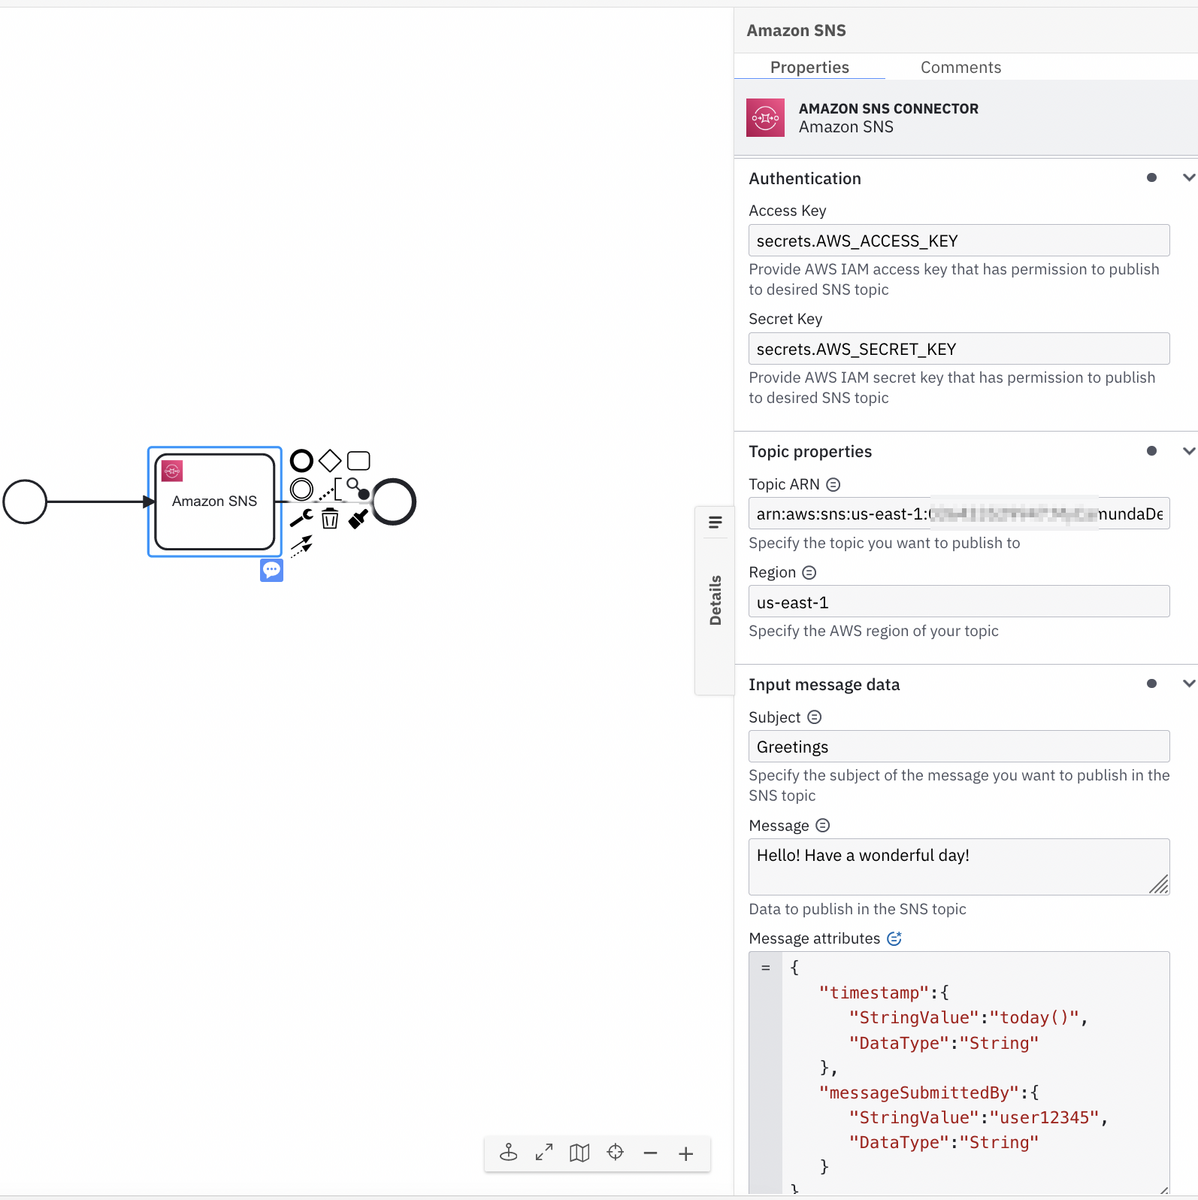
Send messages to an SNS topic
The Amazon simple notification service (SNS) provides a fully managed Pub/Sub service for application to person (A2P) or application to application (A2A) messaging. A2A provides high-throughput, push-based, many to many messaging between microservices and distributed systems in general. To make this integration easier, we brought the Connector to Camunda Platform 8.
To use the SNS connector, you need to have an SNS Topic, IAM key, and secret pair which is authorized to publish messages. Once you’ve obtained this information from your AWS account, you can set up this Connector in Camunda Platform 8.
To set up the Amazon SNS Connector:
- Log in to Camunda Platform 8.
- In Camunda Platform 8, launch Web Modeler and create a new BPMN diagram or open an existing one.
- Click an element in the diagram and click the Append Connector context menu item to add a Connector task. Type SNS in the search box to filter the list of Connectors, or just scroll down and select the Amazon SNS Connector. Follow our guide on using Connectors to learn more.
- Set the relevant IAM key and secret pair in the Authentication section. For example,
secrets.MY_AWS_ACCESS_KEY. The value can be plain text, but this is not recommended due to security concerns. - In the Topic Properties section, set the topic ARN of your SNS topic as well as its region.
- In the Input message data section:
- Fill out the field Message with the data you would like to publish to the topic. The field requires FEEL input.
- Fill out the field Message attributes to set optional message metadata. This field requires FEEL input as well. This is an optional field.
- Fill out the field Subject to set optional message subject either via FEEL or text. Keep in mind that the length must be less than 100 characters.
Learn more about the SNS Connector response and frequently asked questions in the documentation.
Learn more
To learn more about Connectors or Camunda Platform 8, check out our documentation or other articles from our blog. If you’re not already using Camunda Platform 8, sign up for a free trial to start modeling processes with Connectors to boost your microservice architecture.


