Since the dawn of history, Camunda Platform 8 developers have had to consider multiple API surface areas and protocols.
Today, that all changes with the release of the unified Camunda Platform 8 SDK for Node.js: “One API to Rule Them All”.
Introducing the Camunda Platform 8 SDK for Node.js
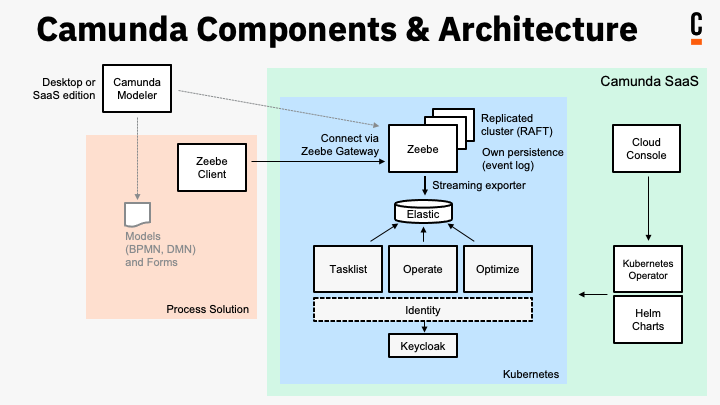
The Camunda Platform 8 SDK for Node.js provides a single high-level application programming interface to interact with the following components of Camunda Platform 8:
- The Zeebe Workflow Engine
- Operate
- Optimize
- Tasklist
- Web Console

With the unified SDK application, developers do not need to think about or learn to use the underlying protocols of gRPC, GraphQL, or REST. Instead, they can use a single dependency and idiomatic JavaScript (or TypeScript).
The SDK builds on the popular and mature Node.js Zeebe client (over 7000 downloads / week, and four years of development), extending it to add clients for the other components in the platform.
The source code for the Camunda Platform 8 SDK for Node.js is hosted in the Camunda Community Hub, and the API documentation is available via GitHub Pages here.
Table of Contents
Trying the SDK
Prerequisites
You need Node.js installed on your machine. Node Version Manager (NVM) is an open source way to install and manage multiple versions of Node on the same machine, and easily switch between them.
The SDK is written in TypeScript, which is JavaScript with syntax for types. When used with a TypeScript-aware editor, such as VSCode, this gives us developer ergonomic features like autocompletion and documentation in the IDE.
To try out the SDK, you’ll need a Camunda Platform 8 SaaS account. Get a trial account if you don’t already have one here.
The SDK has been tested and all components work with the hosted SaaS version of Camunda Platform 8. Your mileage may vary at this point with the Self-Managed version of Camunda Platform 8. Zeebe works, but the others may not, depending on your authentication configuration.
You will need API credentials set as environment variables. There are two different sets that you need, depending on which API(s) you are interacting with:
To use the Console API, which allows you to create new members and new clusters in your organization, you will need Console API credentials. See the documentation for details on how to create a Console API client credential set. Set the credentials in the environment via environment variables.
To use the other APIs (Zeebe, Optimize, Operate, Tasklist), you need a Public API client credential set. Set the credentials in the environment via environment variables.
Configure the project
The SDK is distributed as an NPM package, so installing it to try it out is as simple as creating a new project, and installing it as a dependency, like this:
mkdir c8-sdk-demo
cd c8-sdk-demo
npm init -y
npm i camunda-8-sdk typescript
npx tsc –init
Edit the tsconfig.json file to configure the project:
{
 "compilerOptions": {
   "target": "es2016",
   "module": "commonjs",
   "rootDir": "./src",
   "outDir": "./dist",
   "esModuleInterop": true,
   "forceConsistentCasingInFileNames": true,
   "strict": true,
   "skipLibCheck": true
 }
}
Then, edit package.json to configure the project:
{
 "name": "c8-sdk-demo",
 "version": "1.0.0",
 "description": "",
 "main": "dist/index.js",
 "scripts": {
   "test": "echo \"Where we're going, we don't need tests\" && exit 0",
   "build": "tsc"
 },
 "keywords": [],
 "author": "",
 "license": "ISC",
 "dependencies": {
   "camunda-8-sdk": "^0.9.7",
   "typescript": "^5.0.4"
 }
}
Import the SDK
Now, create a src/index.ts file.
In this file, we first import the C8 object from the camunda-8-sdk package:
import {C8} from 'camunda-8-sdk'The C8 object contains the API Clients for the various Camunda Platform 8 components.

Managing credential secrets
You can set the credential secrets in the environment where you run the application, but a better way of managing the credentials is to use dotenv.
To do this, create a file .env in your project, and put the credentials secrets in there. For example, for a Console API credential set, your .env file content would look like this:
export CAMUNDA_CONSOLE_CLIENT_ID='AkJK…'
export CAMUNDA_CONSOLE_CLIENT_SECRET='5LMCT…
export CAMUNDA_OAUTH_URL='https://login.cloud.camunda.io/oauth/token'
export CAMUNDA_CONSOLE_BASE_URL='https://api.cloud.camunda.io'
export CAMUNDA_CONSOLE_OAUTH_AUDIENCE='api.cloud.camunda.io'
Now, install the dotenv package to your project with the following command:
npm i dotenvAnd import it in your project:
import {C8} from 'camunda-8-sdk'
import {config} from 'dotenv'

config()
This will read the .env file and set the credentials in the environment of your running application.
Interacting with the Console API
The Console API is a REST API that allows you to provision and interact with Camunda Platform 8 clusters in Camunda SaaS. It is a control plane for the K8s infrastructure.
Let’s first ask for the parameters to create a new cluster. Create a Console API client credential set, and put the credential environment variables in the `.env` file.
Now, modify your src/index.ts file to the following:
import {C8} from 'camunda-8-sdk'
import {config} from 'dotenv'

config()

const con = new C8.ConsoleApiClient()

async function main() {
    const res = await con.getParameters()
    console.log(res)
}

main()
Here, we are calling the getParameters method of the Console API. This returns the acceptable parameters for a create new cluster request.
Running the application
To run this, you have two options. The first is to transpile the TypeScript to JavaScript using the command npm run build. This will invoke the TypeScript compiler and output plain JavaScript to the dist directory. You can then run that with the command node dist/index.js.
We’re going to take a different approach. The package ts-node provides a Node.js execution environment with a TypeScript transpilation step baked in. This allows you to “directly execute” your TypeScript files during development, shortening the REPL lifecycle.
Run the following command to install ts-node to the project:
npm i -D ts-nodeThen, modify the package.json file to add the following key to the scripts key:
{
…
   “scripts”: {
      …
      “start”: “ts-node src/index.ts”
   }
}
Now, you can run your application with the command:
npm startWhen you do this, you should see something like the following output:
{
  channels: [
    {
      uuid: '6bdf0d1c-3d5a-4df6-8d03-762682964d85',
      name: 'Stable',
      defaultGeneration: [Object],
      allowedGenerations: [Array]
    },
    {
      uuid: 'c767585c-eccc-4762-be78-3bfcd562ee1e',
      name: 'Alpha',
      defaultGeneration: [Object],
      allowedGenerations: [Array]
    }
  ],
  clusterPlanTypes: [
    {
      uuid: '37b564b6-3ce8-4f98-a64e-96a64b38d06b',
      name: 'Trial Cluster'
    }
  ],
  regions: [
    {
      uuid: 'f5f90399-923c-47d2-beca-75fae2fa6229',
      name: 'Sydney, Australia (australia-southeast1)'
    },
    {
      uuid: '67836c51-4b5a-462c-91ca-fcccd792007f',
      name: 'Toronto, North America (northamerica-northeast2)'
    },
    {
      uuid: 'b3edd197-ca5a-4074-9e64-5a0b1c5e2838',
      name: 'South Carolina, North America (us-east1)'
    },
    {
      uuid: '5650a1f9-8eae-496a-a781-3292ef24fa18',
      name: 'Iowa, North America (us-central1)'
    },
    {
      uuid: '2f6470f9-77ec-4be5-9cdc-3231caf683ec',
      name: 'Belgium, Europe (europe-west1)'
    }
  ]
}
These are the allowable parameters for a CreateCluster API request body. We need to expand the object to see all of the subkeys, so we modify our code to use JSON.stringify to output everything, like so:
async function main() {
    const res = await con.getParameters()
    console.log(JSON.stringify(res, null, 2))
    con.createCluster
}
Create a new cluster
Let’s now modify our program to create a new cluster in our organization.
Please note that if you have a trial organization, you can only have one cluster at a time, so if you already have a cluster in your account, you won’t be able to create a new one.
Pick the values from the allowed parameters that you want to use, then modify your program like the following:
async function main() {
    const res = await con.createCluster({
        channelId: '6bdf0d1c-3d5a-4df6-8d03-762682964d85' // Stable,
        generationId: '9a91e023-a3c0-4949-90c5-809ff06a4dfc', // Zeebe 8.2.2
        name: 'My Test Cluster',
        planTypeId: '37b564b6-3ce8-4f98-a64e-96a64b38d06b', // Trial Cluster
        regionId: 'f5f90399-923c-47d2-beca-75fae2fa6229' // Australia SE-1
    })
    console.log(JSON.stringify(res, null, 2))
}
Here, I am creating a Zeebe 8.2.2 cluster in the Australia South-East zone on the Trial Cluster plan.
When you run your application, using the command npm start, you will see output similar to the following:
{
  "clusterId": "5c34c0a7-7f29-4424-8414-125615f7a9b9"
}
This is the unique identifier for the newly created cluster.
You can retrieve the information about the cluster by modifying your main function like this:
async function main() {
    const clusterUuid = '5c34c0a7-7f29-4424-8414-125615f7a9b9'
    console.log(await con.getCluster(clusterUuid))
}
Create Client Credentials for Public API
We can now use the Console API to create credentials to access the public APIs on our newly created cluster.
Change the main function in the program like this:
async function main() {
    const clusterUuid = '5c34c0a7-7f29-4424-8414-125615f7a9b9'
    const res = await con.createClient({
        clusterUuid,
        clientName: 'test',
        permissions: ['Zeebe', 'Operate', 'Optimize', 'Tasklist']
    })
    console.log(res)
}
When you run this program, you will get back a credential set for the public API.
Currently, the credentials returned by the API are not in the format needed to be used by the other components of the SDK. There is an open issue for this, and it will change shortly in the SDK or the API endpoint itself.
In the meantime, for the next part of the tour of the SDK, we’ll need to get the Public API credentials from the Web Console.
Interacting with the Zeebe workflow engine
To interact with the components of Camunda Platform 8, including the Zeebe workflow engine, you will need to create a credential set in the Web Console. Download the credentials as environment variables, and set them in the environment to allow your application to connect to Camunda Platform 8.
The following program queries the gateway for the status of the cluster:
import {C8} from 'camunda-8-sdk'

const zbc = new C8.ZBClient()

async function main() {
    const res = await zbc.topology()
    console.log(JSON.stringify(res, null, 2))
}

main()
Interacting with All The Things!
Here is a program that uses Zeebe, Operate, and Tasklist. The entire project is available on GitHub, with instructions on setting it up and running here.
import {C8, Tasklist} from 'camunda-8-sdk'

import chalk from 'chalk'
import * as path from 'path'
import { config } from 'dotenv'
config()

const zbc = new C8.ZBClient()
const operate = new C8.OperateApiClient()
const optimize = new C8.OptimizeApiClient()
const tasklist = new C8.TasklistApiClient()

const getLogger = (prefix: string, color: chalk.Chalk) => (msg: string) => console.log(color(`[${prefix}] ${msg}`))

async function main() {

    const log = getLogger('Zeebe', chalk.greenBright)
    const res = await zbc.deployProcess(path.join(process.cwd(), 'resources', 'c8-sdk-demo.bpmn'))
    log(`Deployed process ${res.key}`)

    const p = await zbc.createProcessInstanceWithResult(`c8-sdk-demo`, {
        humanTaskStatus: 'Needs doing'
    })
    log(`Finished Process Instance ${p.processInstanceKey}`)
    log(`humanTaskStatus is "${p.variables.humanTaskStatus}"`)

    const bpmn = await operate.getProcessDefinitionXML(parseInt(p.processDefinitionKey,10))
    log(chalk.redBright('\n[Operate] BPMN XML:', bpmn))
}

console.log(`Creating worker...`)
zbc.createWorker({
    taskType: 'service-task',
    taskHandler: job => {
        const log = getLogger('Zeebe Worker', chalk.blueBright)
        log(`handling job ${job.bpmnProcessId}`)
        return job.complete()
    }
})

console.log(`Starting human task poller...`)
setInterval(async () => {
    const log = getLogger('Tasklist', chalk.yellowBright)
    const res = await tasklist.getTasks({
        state: Tasklist.TaskState.CREATED
    })
    if (res.tasks.length > 0) {
        log(`fetched ${res.tasks.length} human tasks`)
        res.tasks.forEach(async task => {
            log(`claiming task ${task.id} from process ${task.processInstanceId}`)
            const {claimTask: t} = await tasklist.claimTask(task.id, 'demobot', true)
            log(`servicing human task ${t.id} from process ${t.processInstanceId}`)
            await tasklist.completeTask(t.id, {
                humanTaskStatus: 'Got done'
            })
        })
    }
}, 5000)

main()
The application deploys a BPMN process model to the cluster, then starts an instance. A task worker services the first task. These operations use the Zeebe API.
The next task in the process model is a human task. The Tasklist API is used to claim, then complete the task. This is accomplished by a “human task worker” that polls every three seconds.
Finally, the Operate API is used to retrieve the XML of the process model.
Here, we see the unified SDK experience. All components are accessed through a single API, although the component boundaries still exist.
Future development
This is a technology preview, and a proof of concept. We’d love your feedback as we continue to develop it. Share it with us on the Camunda Platform 8 Slack or the Camunda Forums.
Learn more at Camunda Community Summit
I started developing this SDK around the same time Chat-GPT3 appeared on the scene. Naturally, this raised the question: Why not let the robots do the work? Join me for a session at our Community Summit where I’ll talk about my early experiences using GPT3 to understand and document Camunda code, and a preview of the resulting SDK itself. You can check out my session here, or sign up for Summit at the link below.
Camunda Community Summit runs 5/10-5/11 (yes, that’s tomorrow), but if you can’t catch it live, stay tuned for the recordings to come soon.


