If you haven’t read it yet, of course go read “Camunda Self-Managed for Absolute Beginners.” You wouldn’t start reading a book series by skipping the first book would you? (If you would, I have a lot of questions I’d like to ask you!)
After the first post was published, I received a lot of amazing feedback and questions from Camunda users who were new to containers and Kubernetes. The most common question I was asked was “How do I connect to the services I just installed?!”
You asked, Camunda answers! In this post we will add an “ingress” and secure it with a certificate.
Port forwarding
If you followed the steps in the previous post, you probably noticed that you couldn’t connect to any of the services. Port forwarding was briefly mentioned in the previous post (and ingress controllers mentioned in the discussion thread, if you followed that), but it wasn’t explained in any detail. Let’s remedy that first!
It’s important to think about your cluster as a separate network, even though it’s installed on your local workstation rather than in the cloud. Whether you start a single Docker container, or you build a local Kubernetes cluster, the effect is the same: that containerized service will be running on a virtual network. You need to tell both the cluster and your workstation how they can talk to one another.
There are two ways of doing this with Kubernetes: port forwarding, and using an ingress controller.
Port forwarding, sometimes referred to as “port mapping,” is the most basic solution. Keen eyed users may have noticed the output of the helm install command contains this:

If you want to access one of those services, simply copy and paste the command! Let’s use this command for Operate as an example: kubectl port-forward svc/camunda-platform-operate 8081:80. The Operate service is listening on port 80 (the port is configurable in the Helm values.yaml file if you wish to change it). Behind the scenes, kubectl is telling Kubernetes to listen on the first port (“8081”) and send the network traffic to the second port (“80”) inside the cluster.
It’s as simple as that! There is one important thing to remember when using the kubectl port-forward command: the command doesn’t return, which means your terminal will not return to a prompt. If you want to forward multiple ports, you will need to open multiple terminal windows or write a custom script.
But don’t worry, there are better options! Port forwarding is great for testing single ports, or if you need quick access to a single pod to test something. But it’s not a very robust solution when you need to work with multiple ports and services, and it isn’t scalable for a production environment.
Ingress controllers
I think Nginx provides the best short definition of an ingress controller: “An Ingress controller abstracts away the complexity of Kubernetes application traffic routing and provides a bridge between Kubernetes services and external ones.”
In other words, instead of manually configuring all the routes needed for your inbound traffic to get to the right services inside your cluster, the ingress controller handles it automatically. Ingress controllers also act as load balancers, routing traffic evenly across your distributed services. (When working with a local deployment, which these blog posts have focused on so far, the benefit of an ingress controller is in the routing capabilities; the load balancing matters much more with a cloud environment deployment.)
There are several different ingress controllers you can choose for your local deployment. Which one you choose depends on a number of factors, including the environment you are deploying it to. This blog series uses kind, which has existing configuration for three different ingress controllers. We will be using the ingress-nginx package for this example.
If you are getting ready to deploy to the cloud or a different Kubernetes environment, be sure to check their documentation. Many cloud providers offer their own ingress controllers that are better suited and easier to configure for those environments.
kind requires a small amount of additional configuration to make the ingress work. When creating your cluster you need to provide a configuration file. If you have already created a cluster from the previous blog post, you will need to delete it using the kind delete cluster --name camunda-platform command.
First, create a new file name kind.config with the following contents:
kind: Cluster
apiVersion: kind.x-k8s.io/v1alpha4
nodes:
- role: control-plane
  kubeadmConfigPatches:
  - |
    kind: InitConfiguration
    nodeRegistration:
      kubeletExtraArgs:
        node-labels: "ingress-ready=true"
  extraPortMappings:
  - containerPort: 80
    hostPort: 80
  - containerPort: 443
    hostPort: 443
  - containerPort: 26500
    hostPort: 26500
Then, recreate the cluster using kind create cluster --name camunda-local --config kind.config, then deploy the Helm charts again with the same helm install camunda-platform camunda/camunda-platform -f camunda-values.yaml from the previous blog post.
Finally, run the following command to install the ingress controller: kubectl apply -f https://raw.githubusercontent.com/kubernetes/ingress-nginx/main/deploy/static/provider/kind/deploy.yaml. (For more information about using kind with ingress controllers, refer to their documentation!)
Now that we have an ingress controller we need to configure Camunda’s services to work with the ingress. (More specifically, we need to configure the pods the services are running in to work with the ingress.)
Combined or separated ingress?
There are two ways to configure the ingress: combined or separated.
A combined ingress configuration uses the same domain for all the services, and routes based on the path. For instance, Identity would be available at https://domain.com/identity, Operate would be available at https://domain.com/operate, and so on. When using a separated ingress, each service is available on its own domain. For instance, Identity would be available at http://identity.domain.com/, Operate would be available at https://operate.domain.com/, and so on.
For this demo we will use the combined configuration. However, there is one quirk with this particular setup to be aware of! Zeebe Gateway uses gRPC, which uses HTTP/2. This means that Zeebe Gateway cannot be on a path. (Explaining computer networking is far outside the scope of this post, but the reason is because the URL https://domain.com/zeebe-gateway/ uses HTTP and not HTTP/2.)
Note: If you’re interested in using a separated setup, you can review our guide in the docs!
With that in mind, let’s look at the changes new values.yaml file:
global:
  ingress:
    enabled: true
    className: nginx
    host: "camunda.local"

operate:
  contextPath: "/operate"

tasklist:
  contextPath: "/tasklist"

zeebe-gateway:
  ingress:
    enabled: true
    className: nginx
    host: "zeebe.camunda.local"
Note: These are only the changes from the previous blog post, not the complete file! The complete file will be included at the bottom of this post.
The changes are pretty straightforward. Globally, we enable the ingress and give it a className of “nginx” because we are using the ingress-nginx controller. (If you are using a different controller, the className may be different, check the controllers documentation!) We also define the host: this is the domain that all the paths will use. For this example, I am using “camunda.local”, but you can use any domain name that doesn’t conflict with any other domain name. For Operate and Tasklist, we define what the path is. Last, for Zeebe Gateway, we define separate ingress using the subdomain “zeebe.camunda.local”.
The domain “camunda.local” doesn’t exist, which means that your workstation doesn’t know how to connect to it. You will need to add two entries to your workstation’s hosts file that resolve “camunda.local” and “zeebe.camunda.local” (or whatever domain you chose) to the IP address “127.0.0.1”. How you do this depends on your operating system, and you can follow this guide to edit your hosts file.
Configuring TLS/SSL
The last step to get everything working is to generate a certificate and secure the ingress with it. While Camunda does not require TLS to work, Nginx does require a certificate for HTTP/2. There are many ways to generate a certificate, but for simplicity we will use a self-signed certificate. (Learn more about self-signed vs CA-signed certificates.)
Note: Generating a self-signed certificate requires OpenSSL; if you don’t have OpenSSL, refer to their documentation for how to install it.
To generate a certificate, execute the following command. You will be asked a series of questions to configure the certificate: for this example, the values you enter do not matter, but refer to the OpenSSL documentation for more information on these values.
openssl req -x509 -newkey rsa:4096 -keyout key.pem -out cert.pem -sha256 -days 365 --nodes -addext 'subjectAltName=DNS:camunda.local'I won’t cover all the parameters here, but there are four important values:
- The
-daysparameter sets how long the certificate is valid for; in this example, it will expire in 1 year. - The
-keyoutparameter configures the file name of the private key file that the certificate is signed with. You will need this key to install the certificate. - The
-outparameter configures the file name of the certificate itself. - The
-addextparameter configures the domain that this certificate is valid for. Because I configured our ingress to use “camunda.local”, that is the domain used for this certificate.
However, we had to configure a separate ingress for Zeebe Gateway, which needs its own certificate. The command is nearly the same: just change the file names and the domain!
openssl req -x509 -newkey rsa:4096 -keyout key-zeebe.pem -out cert-zeebe.pem -sha256 -days 365 --nodes -addext 'subjectAltName=DNS:zeebe.camunda.local'Next, we need to add the certificates to our Kubernetes clusters as Secrets. Secrets are how Kuberenetes saves sensitive information that shouldn’t be available in plaintext files like the values.yaml file. Instead, the values.yaml file references the secret name and Kuberenetes handles the rest. We will need to create two secrets, one for each certificate:
kubectl create secret tls tls-secret --cert=cert.pem --key=key.pem
kubectl create secret tls tls-secret-zeebe --cert=cert-zeebe.pem --key=key-zeebe.pem
Finally, we need to configure TLS in our values.yaml file, using the secret names we just created. The complete file, with the combined ingress and TLS configured, looks like this:
global:
  ingress:
    enabled: true
    className: nginx
    host: "camunda.local"
    tls:
      enabled: true
      secretName: "tls-secret"
  identity:
    auth:
      # Disable Identity authentication for local development
      # it will fall back to basic-auth: demo/demo as default user
      enabled: false

# Disable Identity for local development
identity:
  enabled: false

# Disable Optimize
optimize:
  enabled: false

operate:
  contextPath: "/operate"

tasklist:
  contextPath: "/tasklist"

# Reduce resource usage for Zeebe and Zeebe-Gateway
zeebe:
  clusterSize: 1
  partitionCount: 1
  replicationFactor: 1
  pvcSize: 10Gi
  resources: {}
  initResources: {}

zeebe-gateway:
  replicas: 1
  ingress:
    enabled: true
    className: nginx
    host: "zeebe.camunda.local"
    tls:
      enabled: true
      secretName: "tls-secret-zeebe"

# Enable Outbound Connectors only
connectors:
  enabled: true
  inbound:
    mode: "disabled"

# Configure Elasticsearch to make it running for local development
elasticsearch:
  resources: {}
  initResources: {}
  replicas: 1
  minimumMasterNodes: 1
  # Allow no backup for single node setups
  clusterHealthCheckParams: "wait_for_status=yellow&timeout=1s"

  # Request smaller persistent volumes.
  volumeClaimTemplate:
    accessModes: [ "ReadWriteOnce" ]
    storageClassName: "standard"
    resources:
      requests:
        storage: 15Gi
Install and test
That’s all of the configuration needed. Now you need to upgrade your Helm deployment with the newest configuration values. (If you are starting from scratch, just use the helm install command from the previous post!) To upgrade your Helm deployment, run the following command:
helm upgrade --install camunda-platform camunda/camunda-platform -f kind-combined-ingress.yamlThat’s it! Now it’s time to test! The first thing you can do is open https://camunda.local/operate or https://camunda.local/tasklist to make sure those applications open. Because we used a self-signed certificate, your browser may give a warning about not being able to verify the certificate. That is expected, you can click through the warning to get to the site. If you use a CA-signed certificate you will not see a warning.
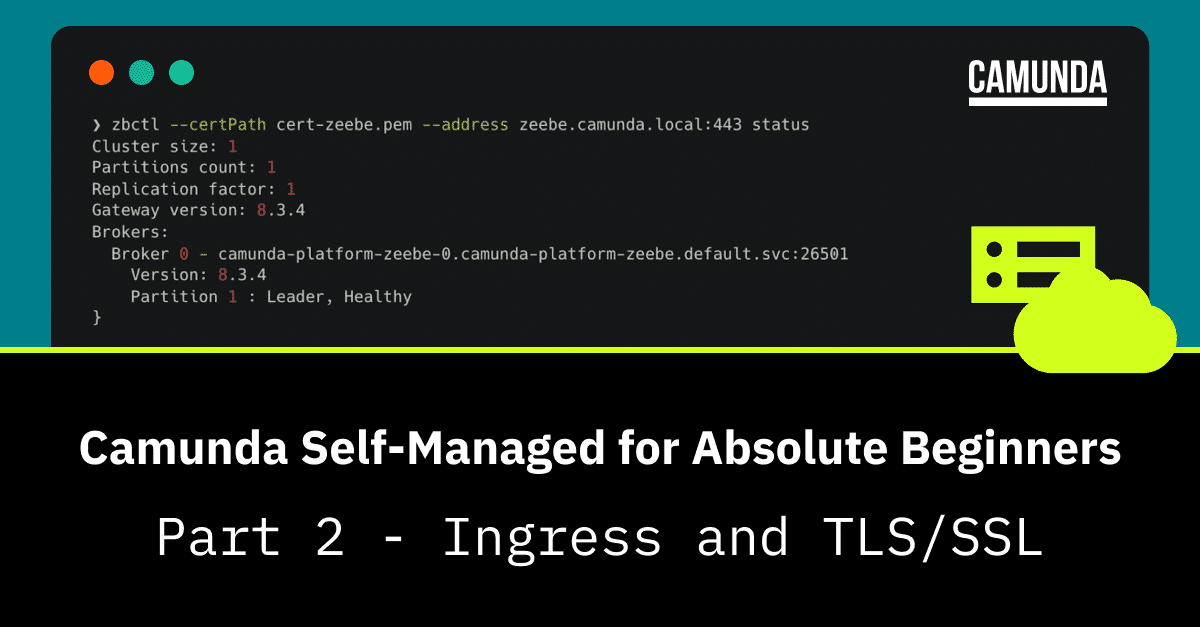
The last thing to test is the gRPC connection to Zeebe Gateway. There are different ways to test this, but for this post I am going to use the zbctl command line utility. Follow the instructions in the documentation to install it, then run the following command:
zbctl status --certPath cert-zeebe.pem --address zeebe.camunda.local:443We are providing the self-signed certificate to zbctl because without it, zbctl wouldn’t be able to validate the certificate and would fail with a warning similar to what you saw in your browser. We are also providing the address and port that we configured for the ingress, and the ingress controller is automatically routing that port to the gRPC port 26500 internally. If everything is set up correctly, you should see something similar to this:

What’s Next?
Congratulations! ???? Not only do you have Camunda Self-Managed running locally, it is now secured behind a certificate with a working ingress!
Here are some ideas for what to challenge yourself with next:
- Add Identity and Optimize, configure the ingress, and test the authentication with
zbctl - Enable Inbound Connectors
- Deploy to a cloud provider such as AWS, GCP, OpenShift, or Azure
Challenge yourself! Leave a comment about this blog on our forum and let us know what you’d like to see next in the series! And as always, if you encounter any problems, let us know on the forums.


