What are you looking for?

Camunda BPM 7.0 on WebLogic 12c

By
  • Blog
  • >
  • Camunda BPM 7.0 on WebLogic 12c
If we go on tour together with Oracle I think we have to have Camunda BPM running on the Oracle WebLogic application server 12c (WLS in short). And one of our enterprise customers asked – so I invested a Sunday and got it running (okay – to be honest – I needed quite some help from our Java EE server guru Christian). In this blog post I give a step by step description how run Camunda BPM on WLS. Please note that this is not an official distribution (which would include a sophisticated QA, a comprehensive documentation and a proper distribution) – it was my personal hobby. And I did not fire the whole test suite again WLS – so there might be some issues. We will do the real productization as soon as we have a customer for it (let us know if this is interesting for you).

Update (March 31, 2014)

With Camunda BPM 7.1, WebLogic 12c is now officially supported. See our supported environments for more details. Some links below do no longer work.

Necessary steps

After installing and starting up WLS (I used the zip distribution of WLS 12c by the way) you have to do:
  1. Add a datasource
  2. Add shared libraries
  3. Add a resource adapter (for the Job Executor using a proper WorkManager from WLS)
  4. Add an EAR starting up one process engine
  5. Add a WAR file containing the REST API
  6. Add other WAR files (e.g. cockpit) and your own process applications
Actually that sounds more work to do than it is 😉 So let’s get started:

Add a datasource

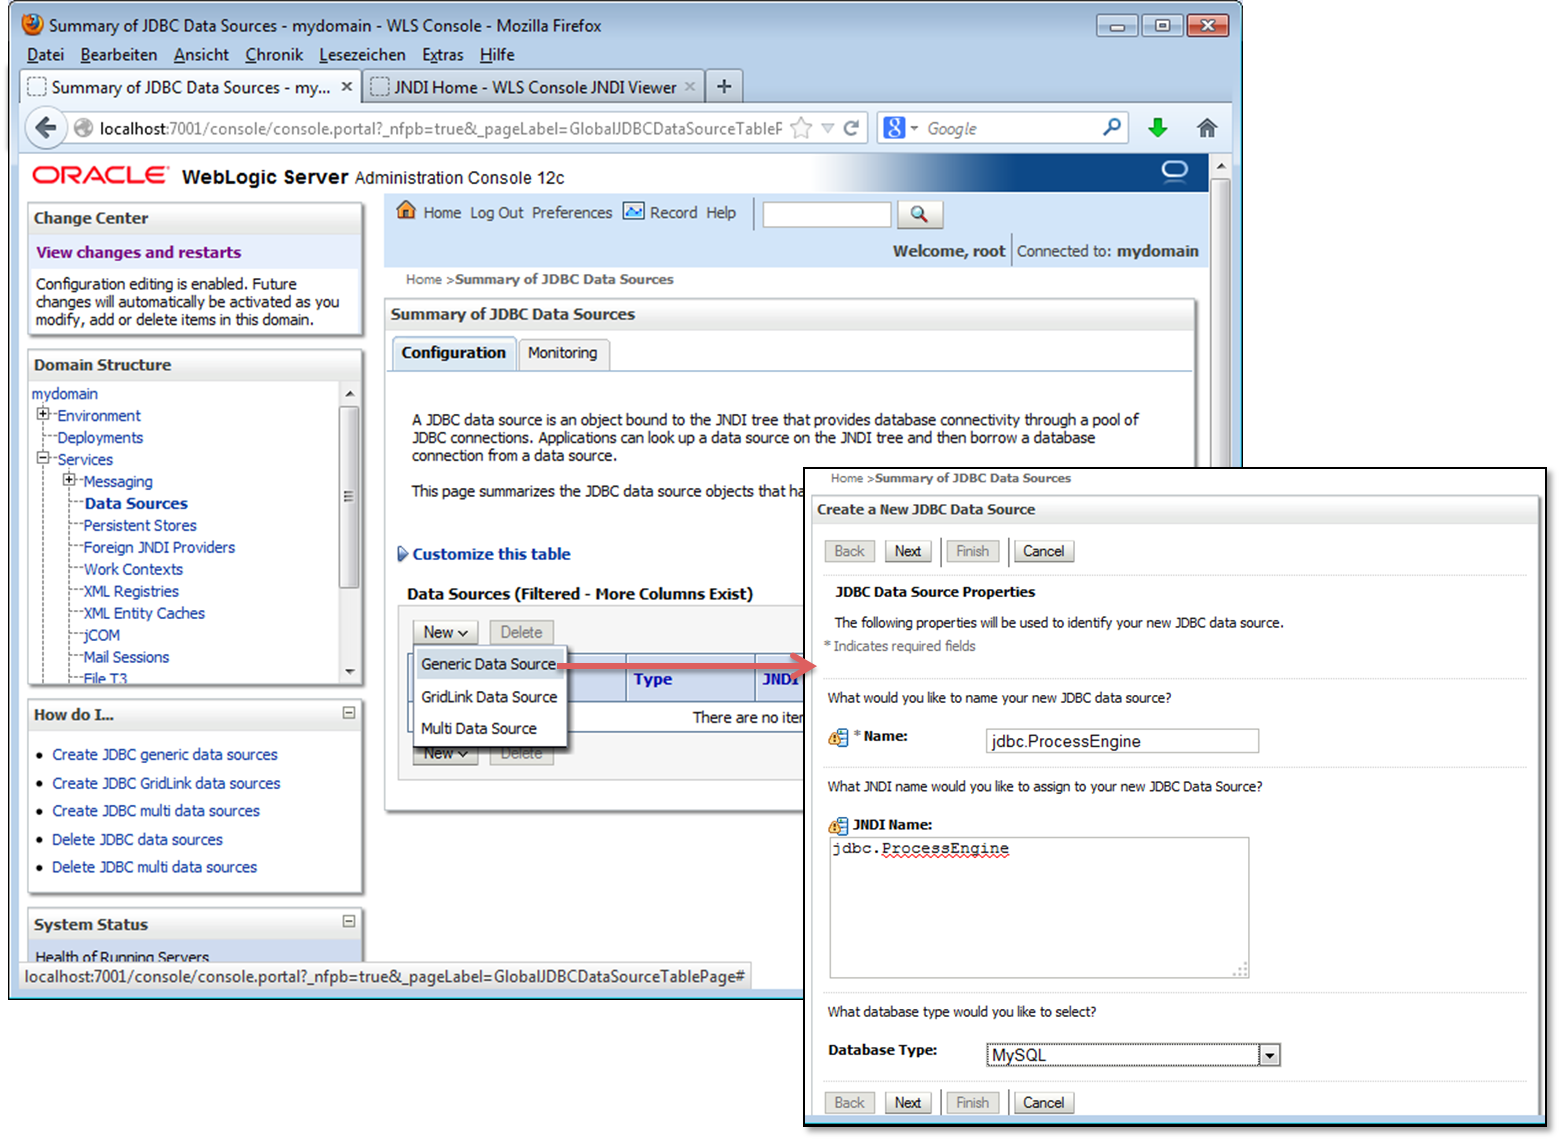
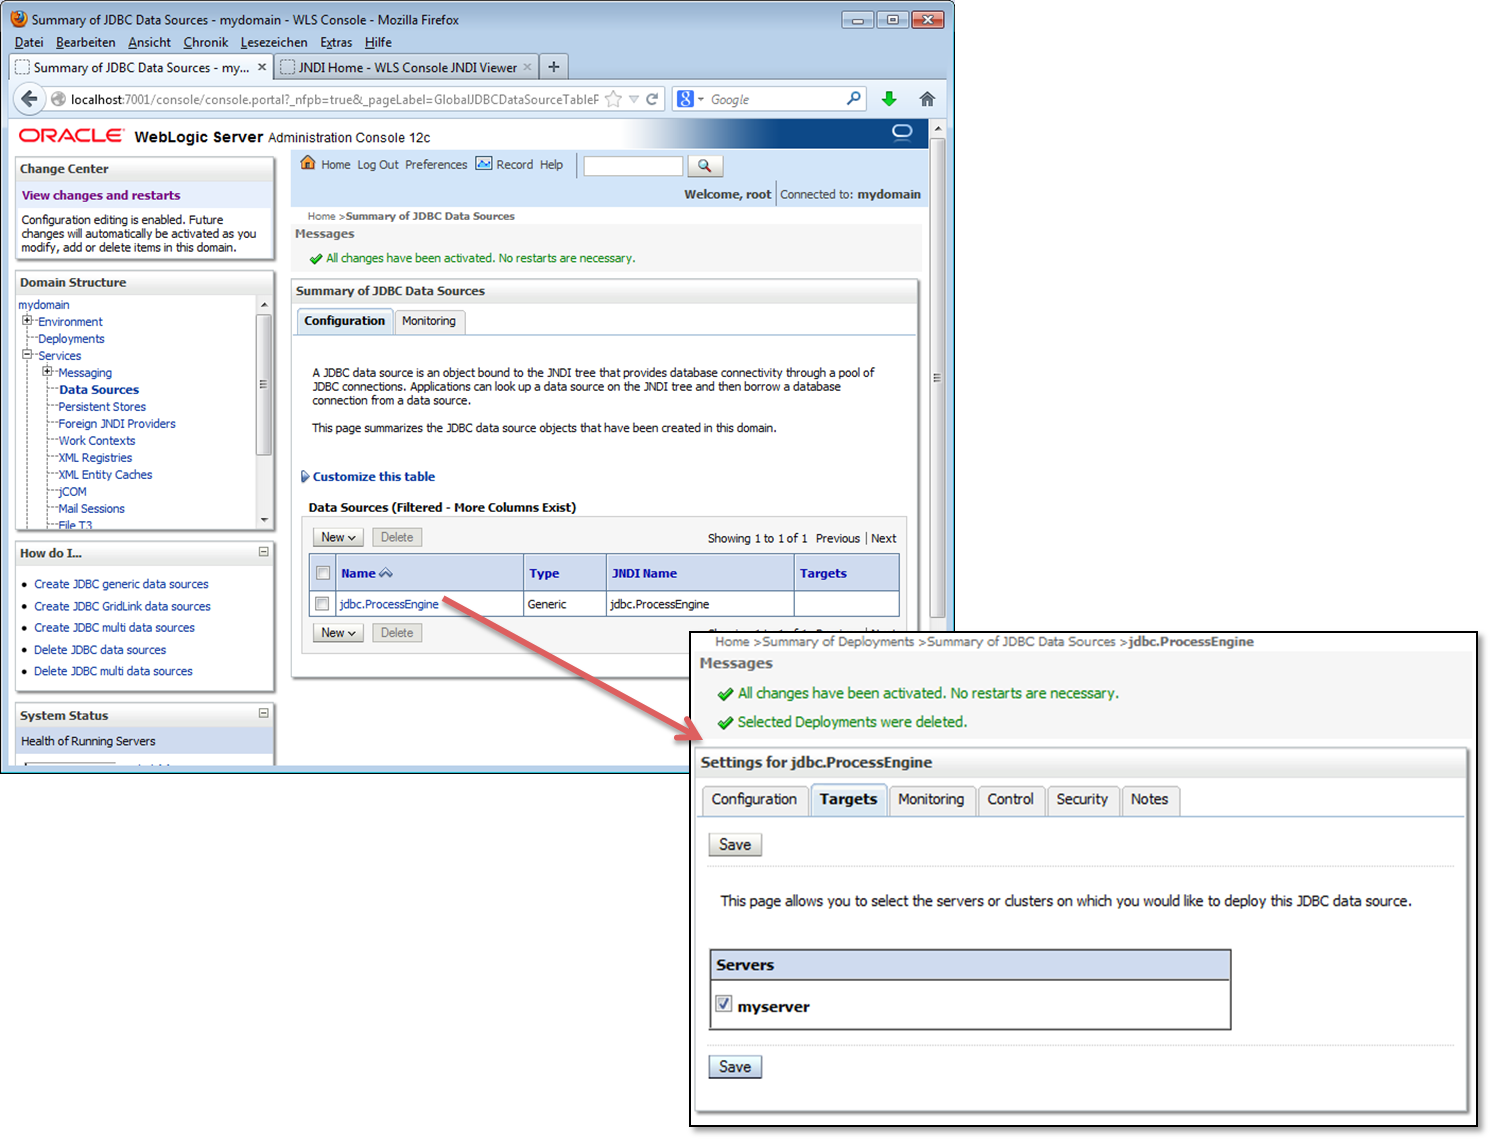
Add a datasource via the Administration Console (or any other convenient way on WLS – I should admit that personally I am not the WLS expert). Make sure that you target it on your server – this is not done by default:

screenshot of data source selection in weblogic service console

screenshot of target selection in weblogic service console

Which Camunda distribution do I use?

Before we can install the Camunda BPM platform on WLS we have to download it. But there is no WLS distribution yet. Hence we can leverage the existing distributions for other Java EE containers, I use the Glassfish distribution as it is technically pretty close to WLS.
Unfortunately I had small issues with the current alpha3 version on WLS – which I fixed on a branch and try to convince the team to apply them to alpha4. So for the moment you have to build a patched alpha3. If you do not want to build it by hand here is a ZIP file containing the relevant artifacts:
DOWNLOAD Camunda BPM for WLS (with Camunda BPM 7.1, WebLogic 12c is now officially supported. See our supported environments for more details. The link does no longer work.)
Now we will install the artifacts step by step.

Add shared libraries

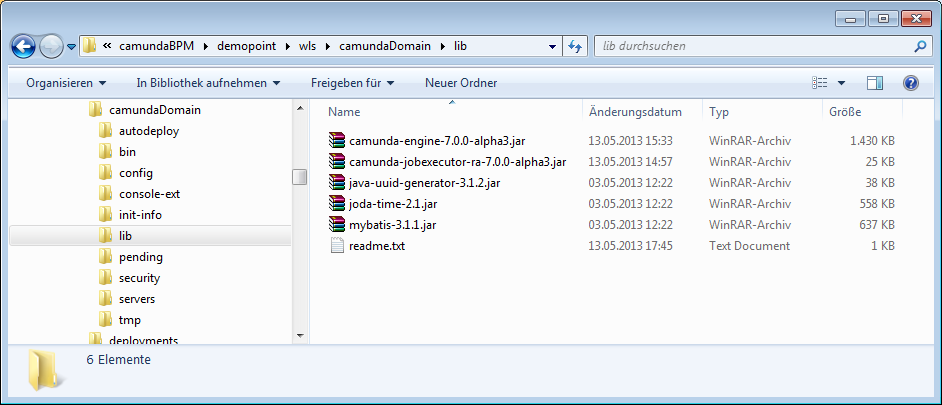
Just copy the provided libraries (the core engine, necessary dependencies like Apache MyBatis and interfaces for the Resource Adapter) into your domain “lib” folder:

Camunda library in file explorer

Add resource adapter

We use a JCA (Java EE Connector Architecture) resource adapter to be fully Java EE compliant. This component is basically responsible to do something we call Job handling. Basically we need a thread pool to query the database if any timers or the like are due. See more details in the Job Executor docs.

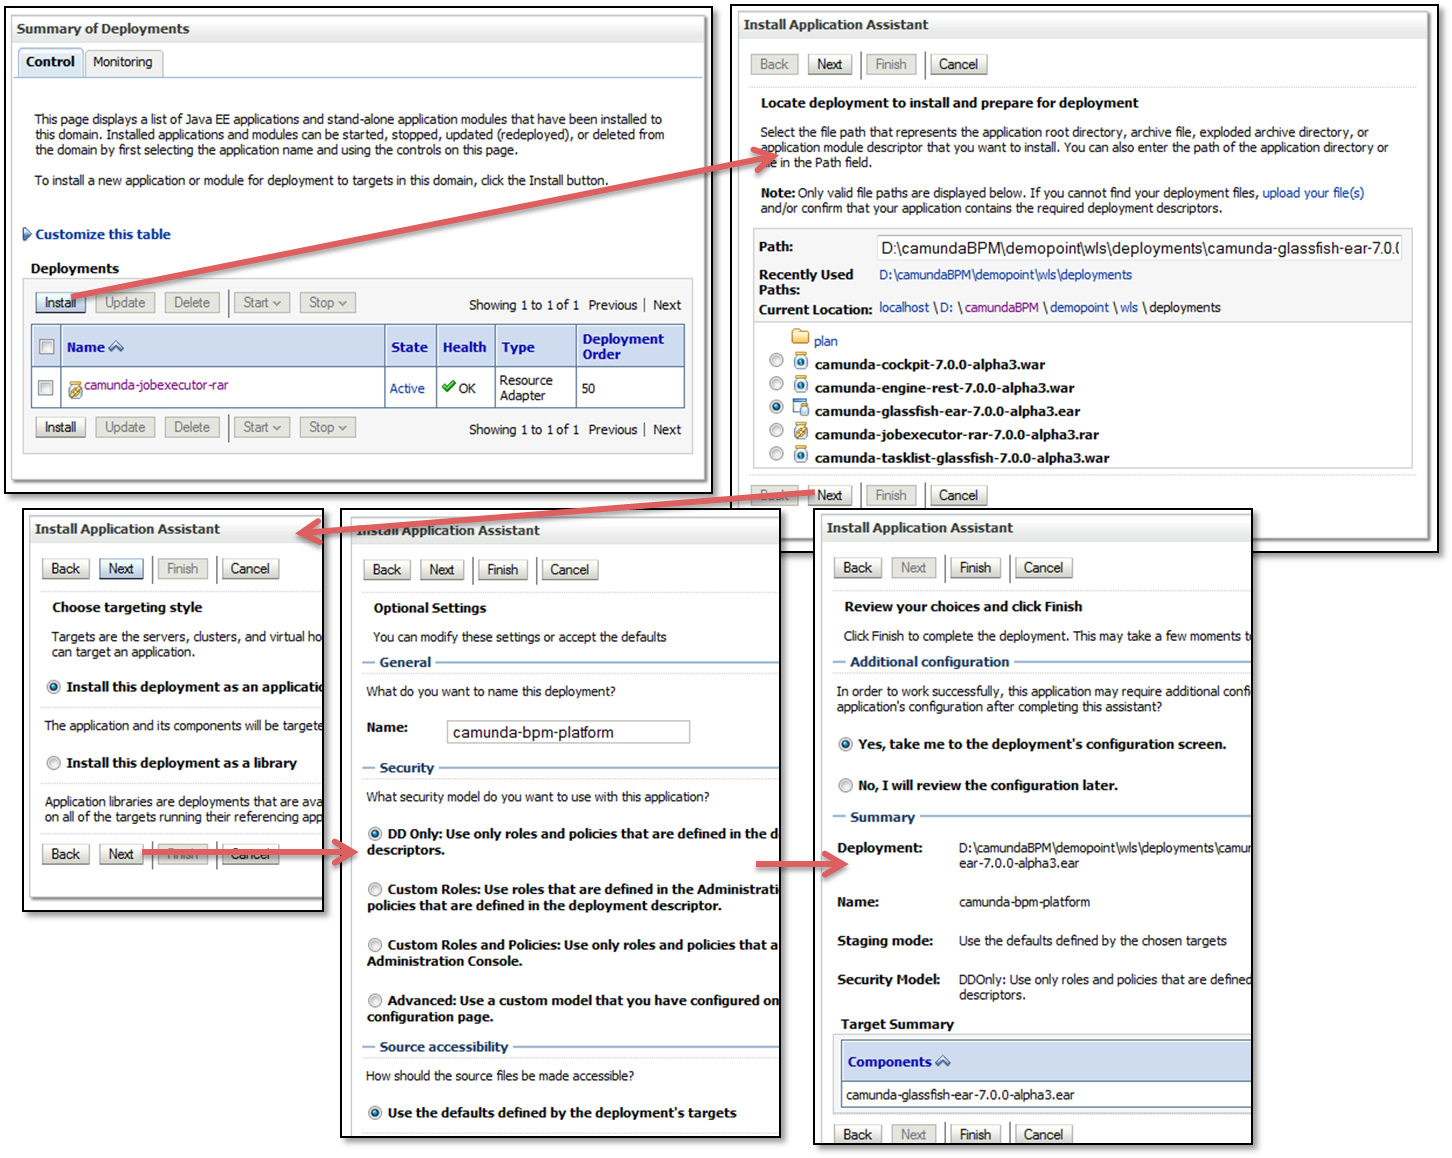
The resource adapter is deployed as RAR archive. I used the archive provided for Glassfish – as there are no changes necessary. You can deploy it via the Administration Console without problems:
screen captured steps of installing the the resource adapter in the console

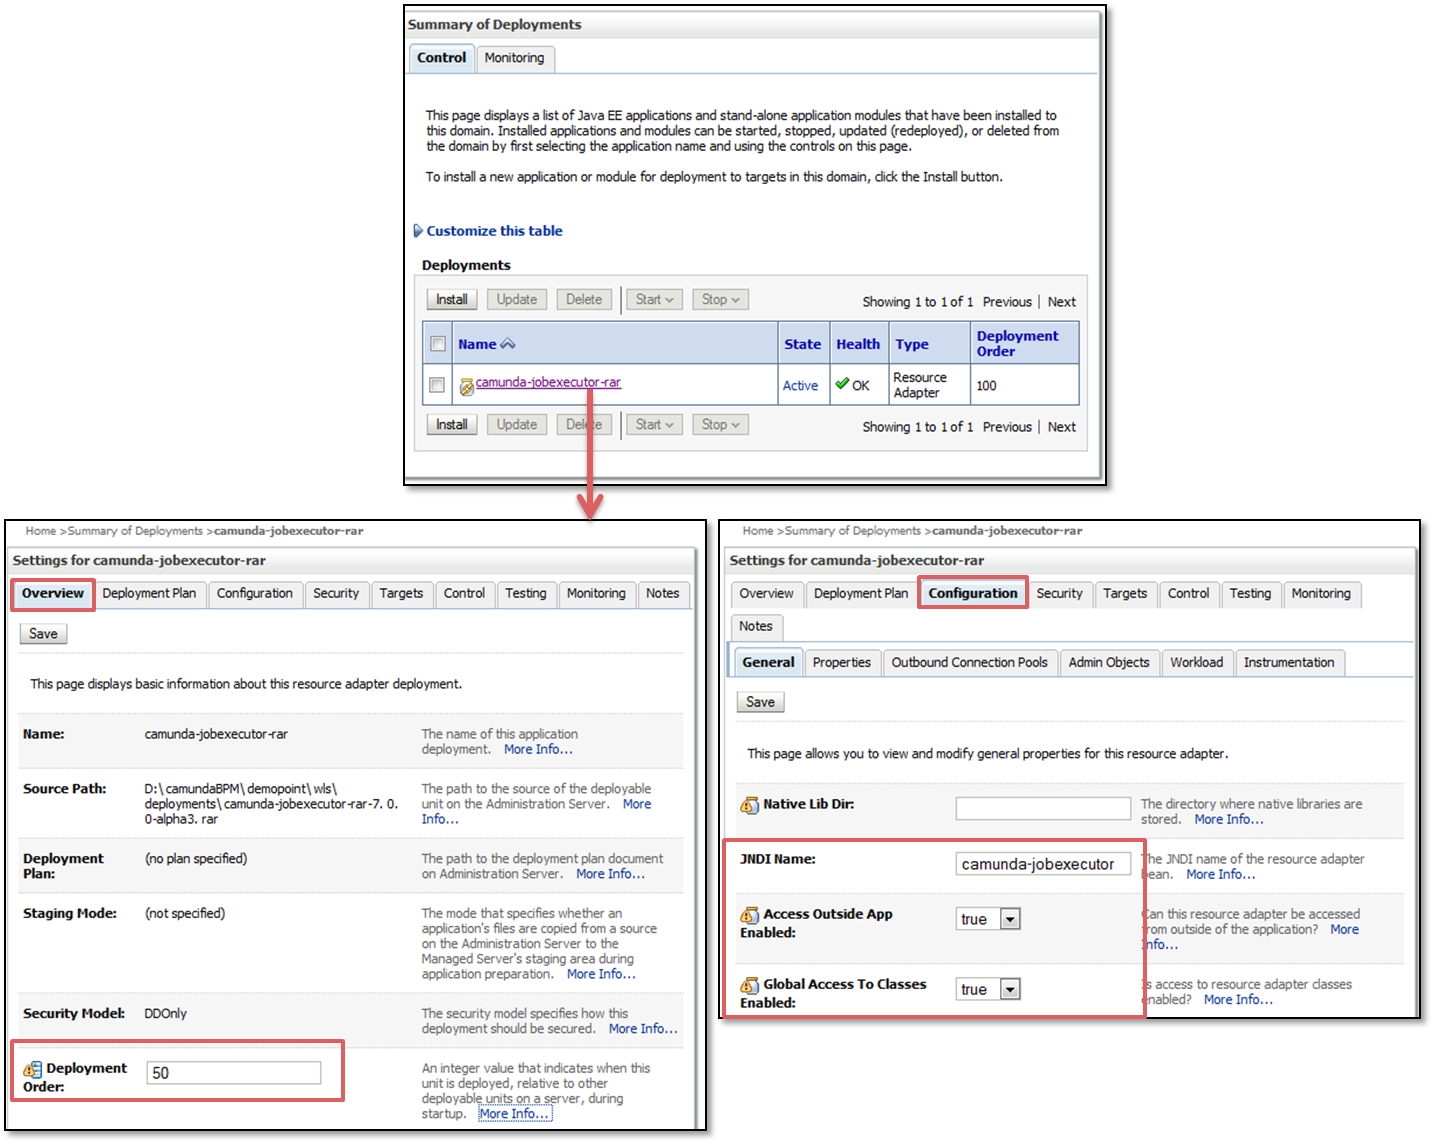
Important: You now have to adjust the configuration. Change the deployment order (the resource adapter should be deployed before other stuff), set a JNDI name and allow global access to classes (actually I still wonder how providing the RAR classes to EAR classloaders really works in WLS as defined in the JCA specs – I didn’t get it to work in the prototype so I added the stuff as shared libraries – any hints from WLS experts are welcome!):
screen captured steps showing the required configuration changes

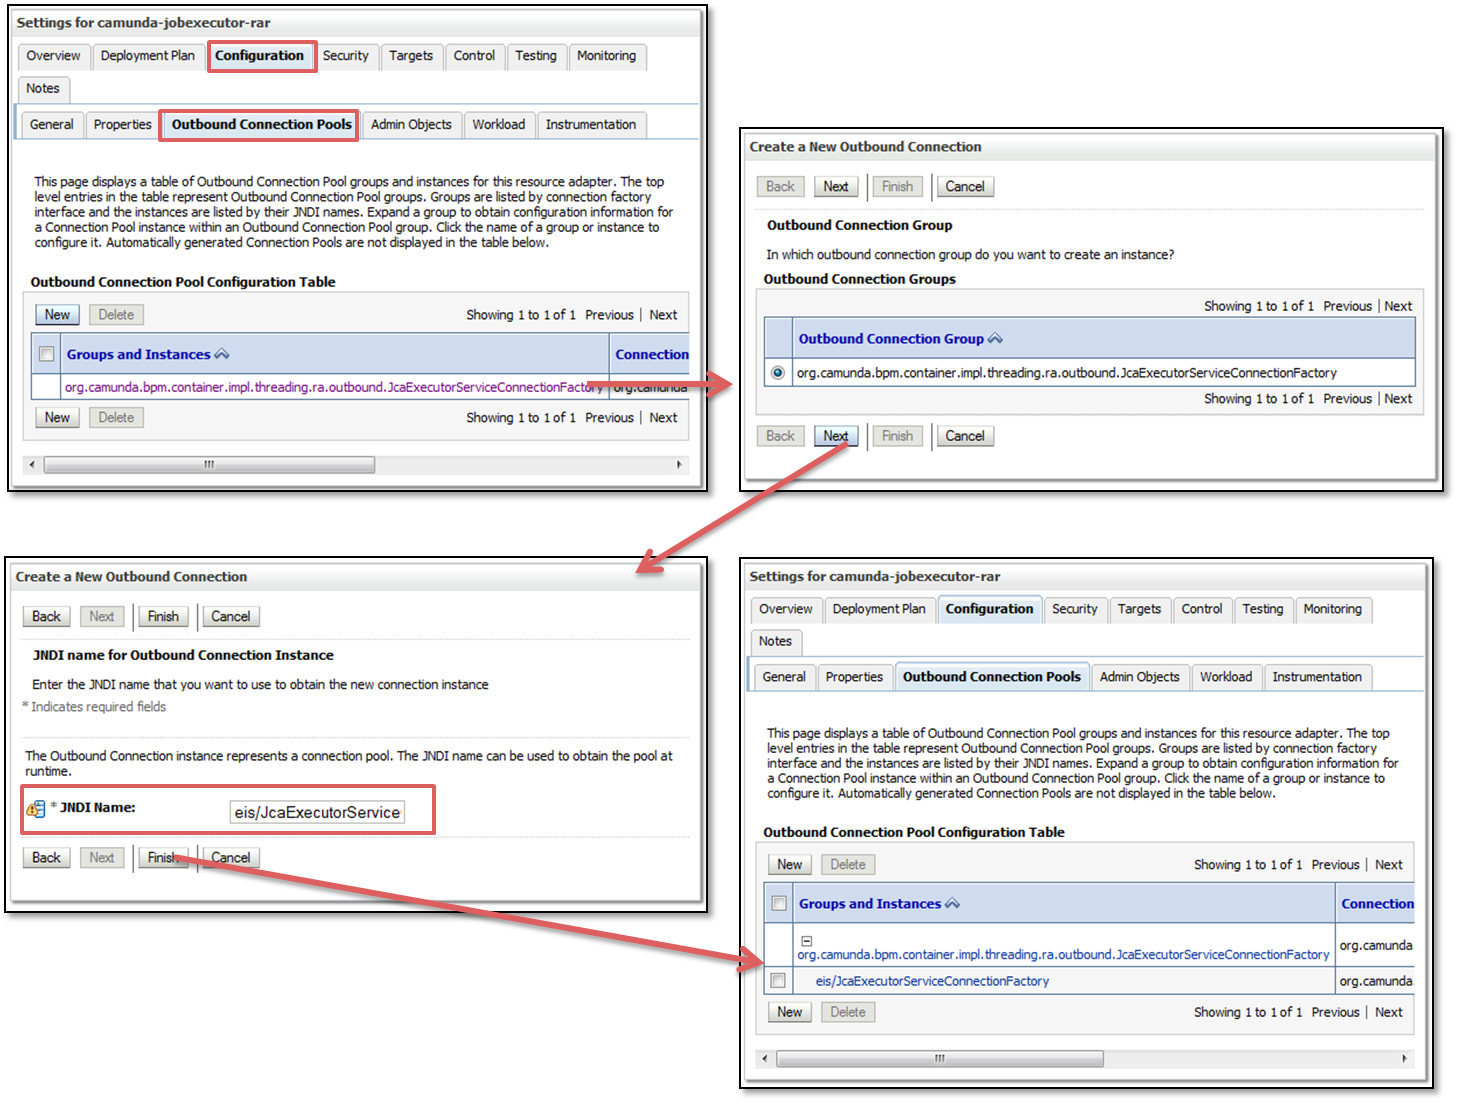
And you have to provide an outbound connection factory which later can be used via JNDI from our process engine:
screen captured steps for creating a new outbound connection
And last but not least we need a Weblogic WorkManager for our thread pool:
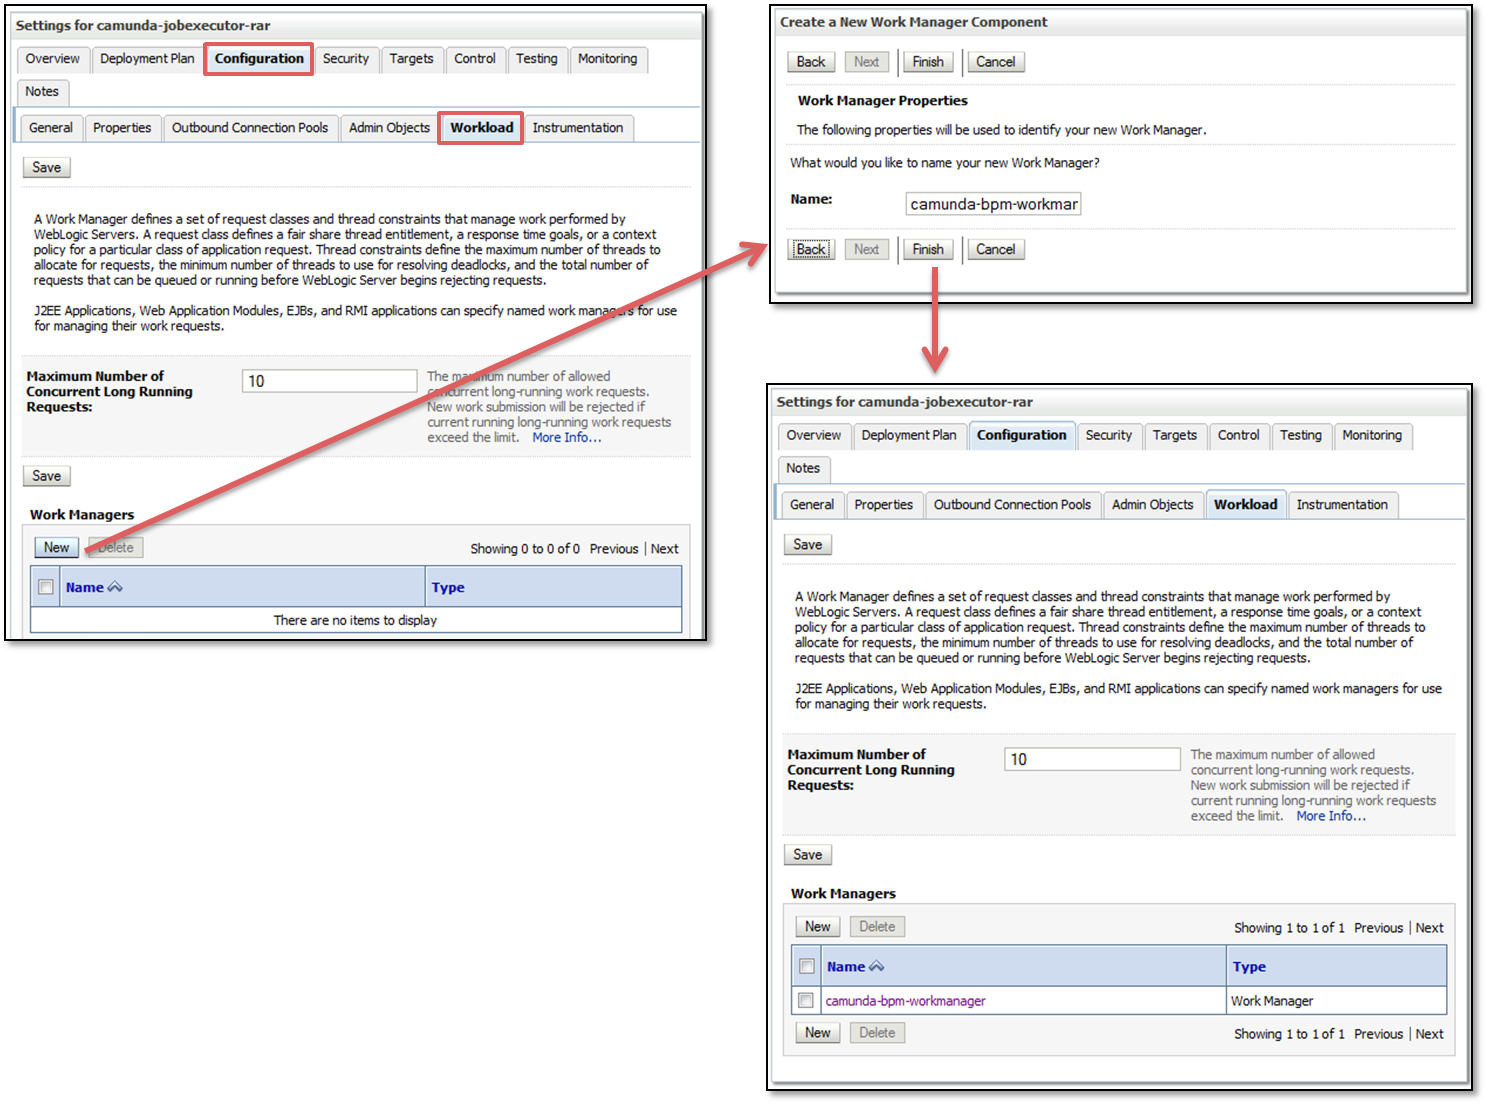
screen captured steps for creating a weblogic work manager

That’s it. Next step 🙂

Add EAR starting a process engine

I have build a custom EAR for WLS to provide a WLS specific deployment descriptor necessary to wire the EAR with the RAR correctly – but I will skip the details here. The EAR basically only does one thing: It starts up one engine – therefore it does not have more content than the deployment descriptor and a “bpm-platform.xml” file containing the configuration of that process engine. Deploy this with the wizard again:

screen captured steps for the install of EAR

This time there is not much to configure – I would suggest  that you change the deployment order to 75 – then it gets deployed after the RAR but before other applications.
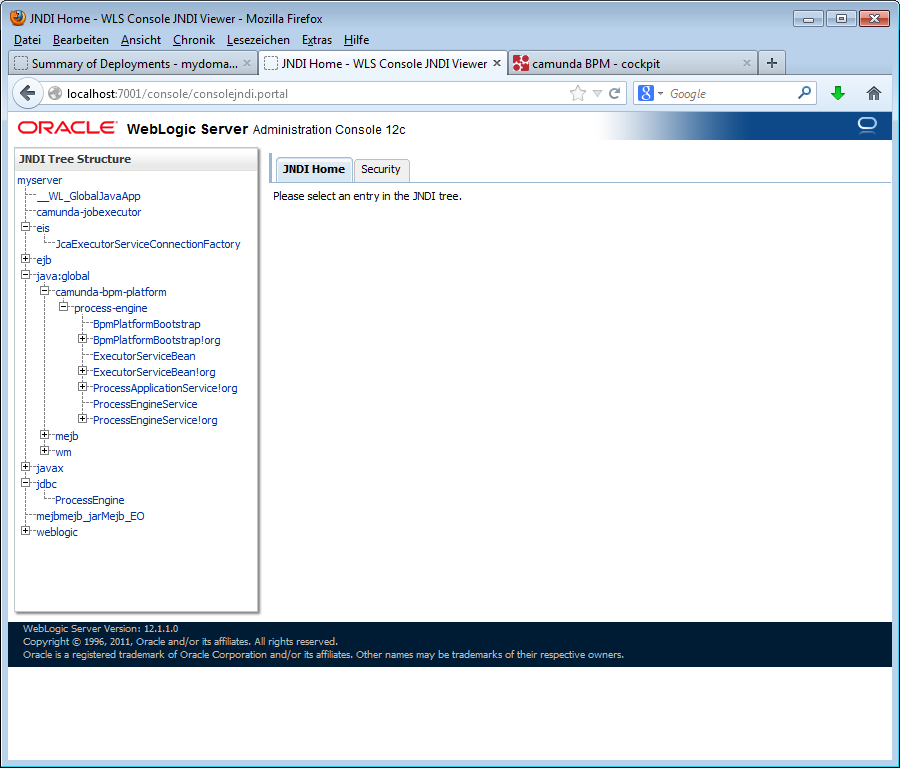
If you want – you can have a look in the JNDI tree – you should see the started process engine there:

screenshot of JNDI tree

Deploy REST API as WAR

Now we can deploy the REST API, this is a simple WAR (leveraging JAX-RS) providing a REST interface to the already running process engine of the server. To be precise it provides an interface to all running process engines of the current server – but that’s a story for a different post 🙂
You can deploy the WAR file (I again used the Glassfish one without modifications) with the wizard – I think you practiced that enough by now. Just make sure you deploy it as “application” – not as “library” as the wizard tried to trick me here.
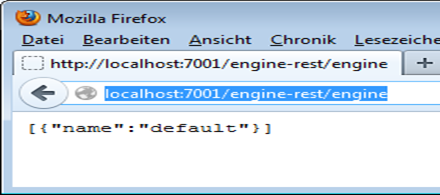
For example you can now query all existing process engines: https://localhost:7001/engine-rest/engine/. You can see get the one existing engine:

existing engine

Congratulations – now on you have a platform working correctly within WLS – fully Java EE 6 compliant – and without any hazzle for starting your process engine. Amazing – isn’t it?

Deploy cockpit and Tasklist

Since Tasklist and cockpit are HTML5 web applications using the REST API in the background you can easily deploy them as well as soon as you have the REST API running. Do that now (use the wizard again) and you can access them via the browser:

Deploy Process Applications

Now you can deploy normal process applications – as e.g. described in the Getting Started Guide. Enjoy!
Please note that there is one limitation with the current codebase on WLS: The classpath scanning we do in order to find process definition files automatically does not work on WLS. Hence you can not auto-discover your process definitions but have to configure them by hand in the META-INF/processes.xml:

<process-application
  xmlns="https://www.camunda.org/schema/1.0/ProcessApplication"
  xmlns:xsi="https://www.w3.org/2001/XMLSchema-instance">
 
  <process-archive name="pa">
    <process-engine>default</process-engine>
    <b><process>invoice.bpmn</process></b>   
    <properties>
      <property name="isDeleteUponUndeploy">false</property>
      <b><property name="isScanForProcessDefinitions">false</property></b>
    </properties>
  </process-archive>
 
</process-application>

Some Screenshots
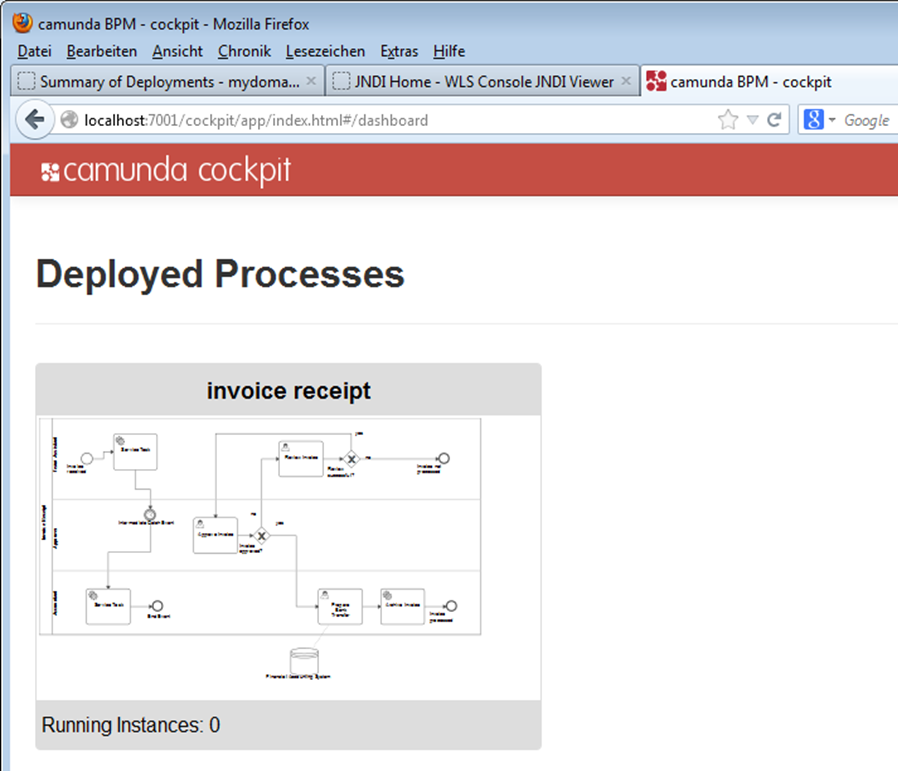
To prove that it was working 🙂 See cockpit showing the invoice example process application:

cockpit showing the invoice example process application
The Tasklist:
camunda tasklist
And starting a process instance via REST:
starting a process instance via REST

Feedback welcome

We welcome every feedback on this – best use our forum (https://camunda.org/community/forum.html, can be used by sending mails to it as well: [email protected]). Let us now if you want to use this in production – then we can place a proper enterprise distribution on our roadmap…

Try All Features of Camunda

Related Content

Improve customer satisfaction while transitioning to an entirely different energy system? Not a problem with Camunda's Self-Managed migrations.
How to avoid pitfalls and make the most of FEEL for a citizen developer.
How to avoid pitfalls and make the most of FEEL for a seasoned software developer.