Camunda Platform 8, powered by the cloud-native workflow engine called Zeebe, was released in April 2022. To run this distributed engine and its associated tools in your own cloud environment, we recommend a Kubernetes deployment.
From the moment we started recommending Kubernetes as the platform for running Camunda 8 Self-Managed in production, we also began working to establish an easy setup experience. Part of this effort includes supporting the corresponding Helm charts. Helm allows you to choose what chart (set of components) you want to install and how these components should be configured. Camunda’s support for Helm charts means they are continuously improved, updated, and tested. Another benefit of Helm is that you won’t be locked into a particular cloud environment since Helm is provider-agnostic. Nevertheless, keep in mind that we only test charts against the Google Kubernetes Engine (GKE).
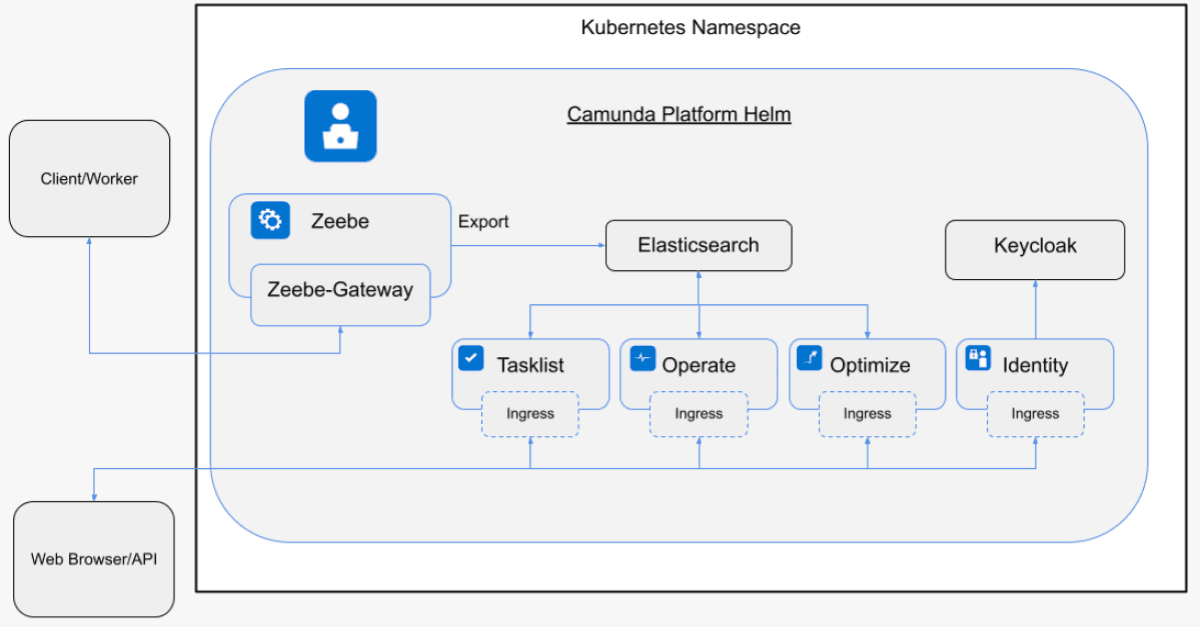
The Camunda Platform 8 Helm chart can be found in this repository. The chart comes with the following components:
- Zeebe: Deploys a Zeebe Cluster with three brokers using the camunda/zeebe docker image.
- Zeebe Gateway: Deploys the standalone Zeebe Gateway with two replicas.
- Operate: Deploys Operate, which is a tool designed for teams to manage, monitor, and troubleshoot running workflow instances.
- Tasklist: Deploys the Tasklist component to work with user tasks.
- Optimize: Deploys Optimize, which is a tool for analyzing business processes.
- Elasticsearch: Deploys an Elasticsearch cluster with two nodes.
- Identity: Deploys Identity and Keycloak with PostgreSQL as access management tools.

Prerequisites
Of course, we need a Kubernetes cluster to deploy to. Either a remote one, like GKE or Amazon EKS, or a local one using Kubernetes KIND or similar is needed. To use Kubernetes and install the Helm chart, you must have the following tools installed in your local environment as well:
kubectl: Kubernetes Control CLI tool, installed and connected to your clusterhelm: Kubernetes Helm CLI toolzbctl: Command line tool to interact with a Zeebe cluster
Adding and installing the Camunda Platform 8 Helm chart
After setting up the local environment and creating a Kubernetes cluster, you can add the Camunda Helm chart repository to your cluster using the following commands:
> helm repo add camunda https://helm.camunda.io
> helm repo update
Once this is done, Helm is able to fetch and install charts hosted on https://helm.camunda.io.
Now you are ready to install the official Helm chart from the linked repository.
If you are using Kubernetes KIND, make sure you install Camunda Platform 8 with some more lightweight configurations set. Usually, a local setup does not have enough hardware resources to run a full-fledged multi-node cluster. For more information on the Kubernetes KIND installation, check out this guide. Afterward, take a look at our documentation to learn how KIND differs from the usual installation.
If you are deploying to a remote cluster, you can normally just work with the default configuration. By default, all previously mentioned components of the chart will be installed with the following command:
> helm install <RELEASE NAME> camunda/camunda-platformHere, you can see the key strength of Helm. The installation is as easy as running the single line of code referenced above. Make sure to replace <RELEASE NAME> with a name of your choice–for example “c8”–to identify your Camunda Platform 8 services once they are installed. To review the progress of your deployment, run ‘kubectl get pods -w’. In the end, all pods should be in status ‘running’ as displayed in the image below.

If you are having problems with your installation, you can use the ‘kubectl describe’ command to check on messages from the Kubernetes scheduler. Another option is to check ‘kubectl logs’ to search for any errors in the deployed pods. More options on troubleshooting Kubernetes can be found in this cheat sheet.
Configuring Charts
If you are already familiar with Kubernetes and Helm charts, you might be curious about how you can configure the installation. There are certain configuration values which can be overwritten by using a separate ‘values.yaml’ file. There are also configuration options for each of the previously mentioned components.
An example of the available configuration parameters for Zeebe can be found in the image below. Find the full table on GitHub.

So, for example, your ‘values.yaml’ could look like this:
zeebe:
  clusterSize: 1
  partitionCount: 1
  replicationFactor: 1
  pvcSize: 10Gi

zeebe-gateway:
  replicas: 1
To install Camunda Platform 8 with this configuration, you will need to reference the .yaml file in the command. This will look like this:
> helm install <RELEASE NAME> camunda/camunda-platform -f values.yamlAccessing Operate and Tasklist
Congratulations! If you’ve made it this far, you have successfully installed Camunda Platform 8 in your own environment!
As part of the Helm charts, an ingress definition can be deployed. You will need to have an Ingress Controller for that Ingress to be exposed. In order to deploy the ingress manifest, set `<service>.ingress.enabled` to `true`.
If you don’t have an ingress controller (e.g. when using Kubernetes Kind), you can use `kubectl port-forward` to access the deployed web application from outside the cluster.
- Identity:
kubectl port-forward svc/<RELEASE NAME>-identity 8080:80 - Operate:
kubectl port-forward svc/<RELEASE NAME>-operate 8081:80 - Tasklist:
kubectl port-forward svc/<RELEASE NAME>-tasklist 8082:80 - Optimize:
kubectl port-forward svc/<RELEASE NAME>-optimize 8083:80
If you want to use different ports for the services, please adjust the related configurations in the values file since these ports are used as a redirect URL for Keycloak.
When you have the authentication via Identity/Keycloak enabled, port forward to Keycloak as well. Otherwise, a login will not be possible. Make sure you use `18080` as a port.
Done! Now you can access Operate by pointing your browser to http://<EXTERNAL-IP>:8081 and using the demo/demo credentials to log in.

Further reading and next steps
For further reading about this topic, our documentation is the recommended place to go. Another resource to visit is the officially supported GitHub repository.
To learn more about how we automated our tests for Helm charts, this blog post by Christopher Kujawa will be a very interesting read.


