

Introduction
When you’re orchestrating processes that stretch across your legacy APIs, custom-built processes, and home-grown services, you often begin with a handful of ad-hoc integrations or common tasks. That approach can work for a while, but often crumbles fast and cannot stand up to rapid changes across the enterprise or different skill levels throughout your organization. Camunda element templates turn those quick wins into standardized, reusable building blocks—giving you speed, consistency, and governance right out of the box.
This is exactly where element templates shine. By encapsulating reusable modeling logic into standardized components, element templates can prevent errors, enforce standards, reduce complexity, enforce enterprise-wide best practices while accelerating delivery across your organization. One click, zero guesswork, and the whole team—from citizen modelers to seasoned architects—follows the same rulebook every time.
Extend this to connector templates, a specific kind of element template that can be used when creating custom connectors, and you have everything you need to standardize your processes, simplify process design, and streamline your integrations.
In this blog, we’ll explore how element and connector templates simplify integration and standardize your processes with enterprise applications and the ease in generating these templates to quickly turn external API calls and other tasks into standardized building blocks within your process models—empowering teams to deliver faster with confidence.
Why element and connector templates matter
Many organizations are wrestling with a similar problem: too many moving parts and not enough consistency. Element templates can turn that chaos into calm.
- Standardization. You may have several teams that require the use of the same REST call or human task within their process orchestrations. However, each team may implement this call a little differently and then you have a maintenance nightmare on your hands. What if the protocol changes? What if your standard procedures change? What if you cancel a service and move forward with a different one? Having multiple elements in different areas that duplicate functionality is both inconsistent and hard to maintain.
With connector and element templates, you can standardize functionality once and then reuse it throughout your project or even your organization. You can configure your element templates to capture the approved configuration (such as, the headers, time-outs, SLA variables, etc.), and provide this as a pre-filled palette entry, so any modeler can drag in the same compliant building block into their process diagram. - Minimize learning curves. What if you could make modeling even faster for citizen developers and others? With element templates, you can hide the plumbing and only expose what is required, minimizing the learning curve and reinforcing reusability and standardization at the same time.
- Accelerate time to value. Without the time-consuming and error-prone requirement to re-enter information across tasks, element and connector templates are key accelerators that speed up every downstream project. Moreover, if there are multiple deployments of the same type of element across your organizations, you fall back into that maintenance nightmare.
- Enforced governance. Your governance teams may require proof that the right information is used in each outbound call, data is protected, and users-tasks need SLA times. With version controlled templates, you can push policy into each process orchestration because every new process can use the latest secure and updated settings.
- Centralized library. Templates can be published to a particular project or your entire organization, so they are easily accessible from the modeling canvas at all times, just like out-of-the-box connectors.
- Tools for agentic orchestration. Dynamic AI agents rely on a collection of tasks to accomplish their goals. Each template becomes an atomic, agent-ready work item that an AI planning loop can select at runtime—ideal for goal-driven, ad-hoc sub-processes in Camunda’s agentic orchestration patterns.
These template offerings from Camunda provide rich value to organizations across the enterprise. Whether it is custom integrations or standard tasks, everyone can benefit from using templates.
Camunda connector templates allow organizations to define how custom integrations behave in your process models. Developers and architects can package business logic, integration details, and connector configurations into modular templates that are reusable across multiple orchestration scenarios—streamlining implementation and fostering consistency throughout the enterprise.
Standardized patterns, simplified modeling, faster delivery, and built-in control—that’s the value of both Camunda element and connector templates.
Streamlining workflows across the enterprise
Every organization leans on a core collection of systems, like CRM, billing, and custom line-of-business apps, that multiple teams access for a variety of reasons. As your automation footprint expands, the same integration moves keep popping up: calling a REST endpoint, posting to an internal API, even requesting information from an expert.
This is where connector and element templates come in. These templates serve as a unifying mechanism that can translate scattered integration logic into a single, self-service language inside BPMN built for reuse. Need to pull a customer record? Drop in the Get Customer Data template. Once you’ve defined it, every modeler gets the exact same pre-tested, policy-compliant task with no manual configuration required. Element templates enable teams to define elements once and use them anywhere ensuring repeatability and reliability.
By leveraging Camunda’s custom element templates and connector templates, organizations can build a reusable connector library streamlining integration with both internal systems and external services. This eliminates redundant development work, accelerates time to integration, and ensures consistent implementation standards across teams.
Bottom line
With element templates, teams can stop reinventing integrations and start orchestrating value. Time can be spent on the process orchestration and less on what type of configurations have to be made. These building blocks give you confidence that every process model plays by the same enterprise rules. So go ahead: package your expertise once, reuse it everywhere, and watch your automation program hit the accelerator.
Build templates and take a test drive
Want to try out how this can help you streamline your orchestration? Let’s start by implementing a connector template and then an element template. We will finish up using both of these templates in a process.
Note: If you want to try this example, you may want to access this Github repository with sample code, forms and diagrams.
What we are going to build
Note: This example was prepared with Camunda v8.8-alpha7.
In this example, we will be building a simple BPMN process with Camunda Web Modeler that uses both a connector template and an element template. This process will obtain a random joke using a connector and display it to an end user with an element template for a user task (and the accompanying form).

Create your own connector template
Connectors with Camunda use connector templates to allow organizations to customize how a BPMN element is shown and configured by process developers. These are a specific type of element template. You can generate a custom connector template in Web Modeler starting from a blank template or importing an existing API definition.
Note: For this example, we will be using the Postman Public REST APIs to import for our connector template. You will want to export these public APIs from Postman using “Export” and saving the results in a JSON file.

Be sure to export a version 2.1.0. Click Export JSON to export and save the JSON.

Now let’s walk through the process of creating a connector template.
1. Create an element template from the Web Modeler Create new menu.
2. At this point, you can select if you want to create the template from scratch or to use an existing API definition, such as a Postman collection which we will use in this example. 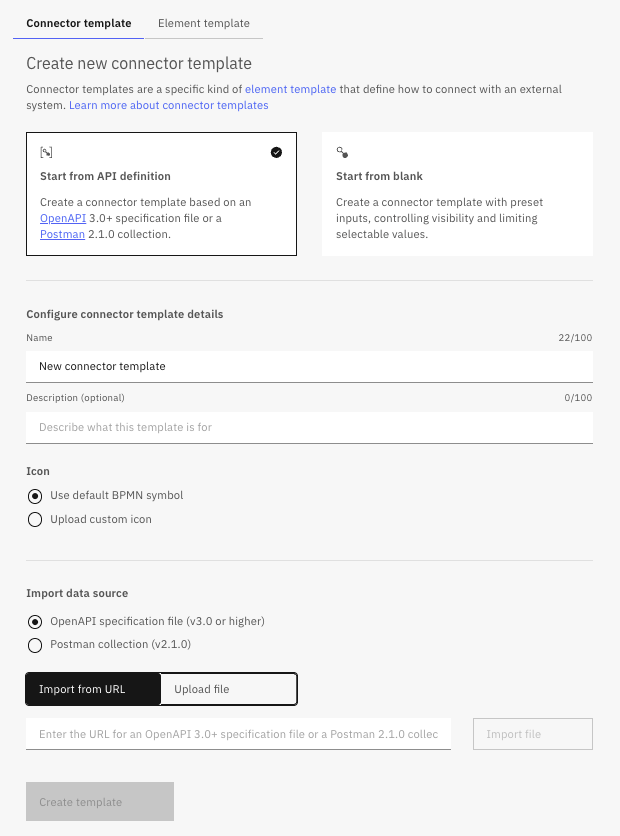
In this case, we will select “Start from API definition” to create our connector template.
3. Fill out the dialog naming your connector and providing a description (optional). You can upload a custom icon and be sure to select “Postman collection (v2.1.0)” and click on the Upload file button to upload the export Postman collection.
4. Once your collection is uploaded, you will be presented with all the methods in the file (56 in this case).
For this example, we will Deselect All and select just the “JOKES” three (3) GET methods (found just below the methods above, as pictured here).
5. Click on Create template to create your new connector template. This action will bring you to the code page of your new connector template.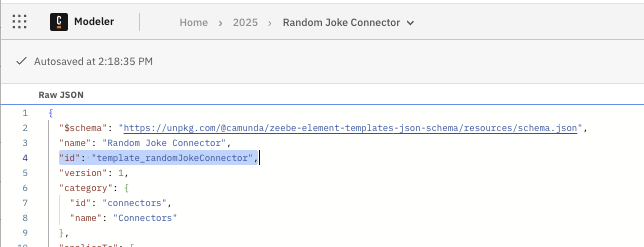
You can see here that we modified the id in the raw JSON.
6. Finally, you will want to modify the result expression to bring back variables to be used in your process. First you should review the results from the Postman API call for the Random Joke by sending the GET operation to the proper URL and reviewing the results.
As you can see, there are four (4) results, but we are really only interested in the setup and punchline reflected in the JSON body for this API call. We will add the parsing of the response to our connector template code so that these items are stored in process variables for use later in our process model.
7. Locate the resultExpression in the code to update the expression that will be used.
{
    "id": "resultExpression",
    "label": "Result expression",
    "description": "Expression to map the response into process variables",
    "feel": "required",
    "group": "output",
    "binding": {
      "key": "resultExpression",
      "type": "zeebe:taskHeader"
    },
    "type": "Text"
  },
You will want to add another line below the "type": "Text" to read:
"value": "={\n jokeType: response.body.type,\n jokeSetup: response.body.setup,\n jokePunchline: response.body.punchline\n}"So this code section will now look like this (don’t forget to add the comma after "type": "Text"):
 "type": "Text",    "value": "={\n  jokeType: response.body.type,\n  jokeSetup: response.body.setup,\n  jokePunchline: response.body.punchline\n}"
  },
Now you should be able to see the result expression in the properties area:
8. Now that all the code is properly updated, you can publish this new connector template to the organizational level or project level.
You will be prompted to add version information for the connector as shown below.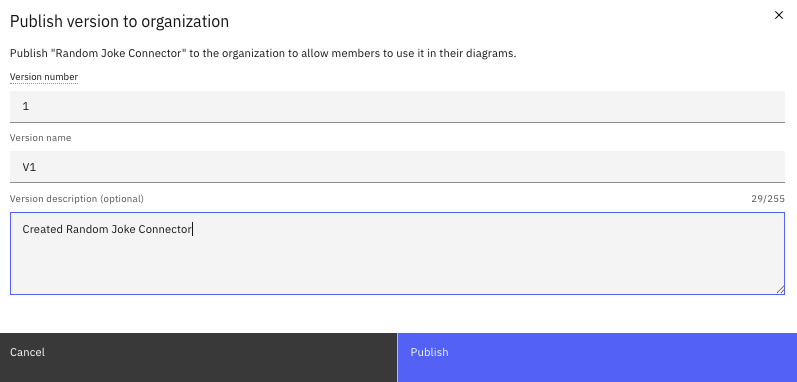
Taking this action provides the new Random Joke Connector to the proper area as a connector available off of the element menu while building processes in Web Modeler.
Note: You can also create a connector and modify the JSON to hide fields and sections, add an icon, and more and then elect to save that as a connector template.

Congratulations, you have successfully created a connector template. Let’s move on with the creation of an element template.
Create your own element template
As mentioned, connector templates are a special kind of element template. Element templates provide a way to extend the modeler with domain-specific diagram elements, such as user and service tasks—basically any BPMN element. For this example, we will be creating a user task with an associated form that can be accessed from the modeler as a single custom element.
With Camunda, you can create element templates from scratch or model an element and then save it as a new element template. We will show you both in this section. However, we will start with building the accompanying form because that will be required for both options.
Create the accompanying user interface
Now that you have created the element template to display the joke, it’s time for the form that will display the data.
- Create a new form within the Web Modeler using Create new->Form.

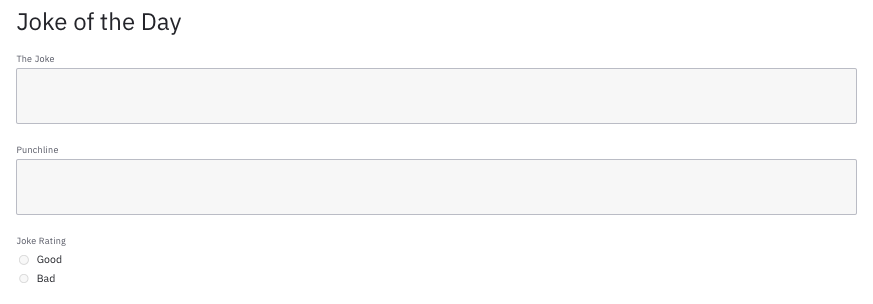
- You will be creating a title, a field for the joke, a field for the punchline and then, for fun, a rating (Good or Bad) for the joke.
| Component Type | Field label | Key/Text | Values |
| Text view | ## Joke of the Day | ||
| Text area | The Joke | jokeSetup | |
| Text area | Punchline | jokePunchline | |
| Radio group | Joke Rating | radio_jokeRating | Good / goodBad / bad |
Your form should look something like the one shown below.
The most important part of this form is to tie the values from the Random Joke Connector in the response expression to the proper fields on the form. If you recall, the fields were as follows:

Notice that we have put the Key for the joke field and the punchline to match these values.
- Finally, you will need to make sure that the form information matches the data in the JSON. As you remember, the following form data was entered into the JSON for your element template. The Form ID value of “form_JOTD” and version tag of “1.0.0”. This will be entered on the form General properties:

Creating from an existing element
This first option for creating an element template is a bit easier and faster, so we will start with this approach.
- Create a BPMN process and drag a new element to the diagram.

- Change this to a User Task and give it a name.

- Select the “link” icon to link your form.

- Select the form previously created and click Link to link it to this user task.

- Once this is complete, you will want to change the binding for the form to use “version tag” and enter the proper version for the form.

- Now select the task and choose the Save As in the properties area to save this element as a template.
- You will be prompted to enter information as shown below and click Save.

- You can now edit this template and add an icon.
- Once you have completed what you would like to do while editing, you can publish this out to your organization or project by using the Publish menu.

Now this element template can be used in any process by simply selecting it off the elements.

Optional/Informational: Creating from scratch
Alternatively, you can create this element template using JSON. In this section, we will show you how to create the same element template from scratch.
- You create an element template the same way you can create a connector template as shown below by selecting the element template off the Create new menu.

- You will be prompted to enter information about your element. Update with the name and determine if you want a custom icon for the element (the icon is optional).
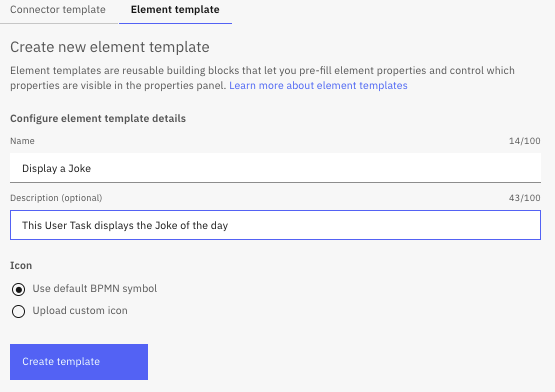
- Click Create template to generate your template. You will be brought to the code for the element template to update the
idand the name of the template.
- We want to make sure that this is associated as a User Task, so we must add that to the JSON code. First , find the code for
appliesToas shown below.
"appliesTo": [
"bpmn:Task"
],
"properties": []
And add the following before theappliesToso that the code looks like this:
"appliesTo": [
"bpmn:Task"
],
"elementType": {
"value": "bpmn:UserTask"
},
"properties": [] - OPTIONAL: You may want to include other information that typically appears in user tasks related to assignments, input and output variables, etc. If so, include a section of code similar to that shown below in your JSON right before the
propertiessection.
"groups": [ {
"id": "assignment",
"label": "Task Assignment",
"tooltip": "This task is always performed by the <TEAM_NAME> Team"
},
{
"id": "input",
"label": "Input Data",
"tooltip": "This form requires process data to work properly."
},
{
"id": "output",
"label": "Output Data",
"tooltip": "Decide where to put the resulting data in the process"
},
{
"id": "form",
"label": "Form",
"tooltip": "This user task uses a preset form ID and version tag. The user task template is coupled to the form's version tag."
}
],
Note: You can also create custom property fields. Custom fields can be dropdowns, check boxes, input and text areas. - OPTIONAL: You may want to assign properties to these additional property groups as well. If you elect to do this, you will need to add properties assignments to the
propertiessection of the JSON code similar to that shown below.
"properties": [
{
"label": "Assignment",
"type": "String",
"binding": {
"type": "zeebe:assignmentDefinition",
"property": "candidateGroups"
},
"value": "JokeTeam",
"editable": false,
"group": "assignment",
"tooltip": "The assignment is fixed, but shown for transparency" - Now we need to add the form that we will be creating into our code. You may have guessed it, the form will display our joke. We need to reference the form by ID and the fields that will be used on the form to display the joke.
"properties": [
{
"label": "Form ID",
"type": "String",
"binding": {
"type": "zeebe:formDefinition",
"property": "formId"
},
"group": "form",
"constraints": {
"notEmpty": true
},
"value": "form_JOTD",
"editable": false,
"bindingType": "deployment"
},
{
"label": "Binding Type",
"type": "Hidden",
"binding": {
"property": "bindingType",
"type": "zeebe:formDefinition"
},
"value": "versionTag"
},
{
"binding": {
"property": "versionTag",
"type": "zeebe:formDefinition"
},
"type": "String",
"editable": false,
"group": "form",
"label": "Version tag",
"value": "1.0.0"
},
{
"type": "Hidden",
"value": true,
"binding": {
"type": "zeebe:userTask"
},
"group": "form"
}
The important items to note in this section are theForm IDvalue and theVersionTagas we will need to match these values when we create the form to display our joke. - Don’t forget to publish your new element template to the organization or project as this will make it available as an element type within the modeler.
Note: The actual details on the template definition goes beyond a simple blog post, so consider checking out our in-depth element templates documentation.
Build the process
Now we need to build a process that takes advantage of our new element and connector templates. Here’s what we plan to build.
- Create a new BPMN diagram and label the start event as “Request Joke” as shown.
- The first element will be our connector template to request a random joke. So, create an element and label it “Obtain Joke” then change the element type to your Random Joke Connector template.

You will notice that all the information is already filled in just as defined in your connector template.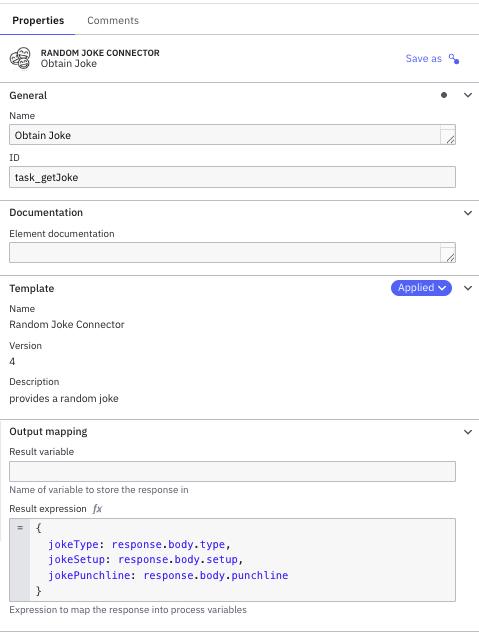
- Follow that with another element and change that element to your Display Joke element template.

You will also see that this element comes with all the configuration you defined, most importantly the right Form ID and version tag.
- End your process with an end event.
- Be sure to name your process.
And now you are ready to see the templates in action.
Run the process, see the results
Now you are ready to see how your templates perform in this simple workflow.
- Deploy your process.

You will see the deploy screen. Be sure to see that your form is also being deployed.
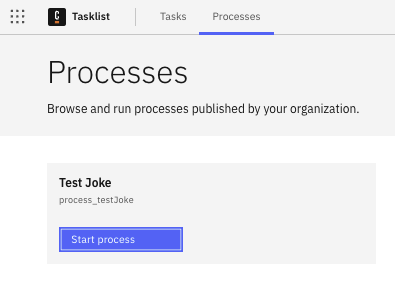
- Now you will want to run your process by clicking Start process, which we will do from the Tasklist.
- Let’s review the status by launching Operate. First, review the results of the connector to obtain the random joke. Check the variables for the process to review the joke information.

- The process instance will be at the “Display Joke” step, so you can open Tasklist to participate in this step.
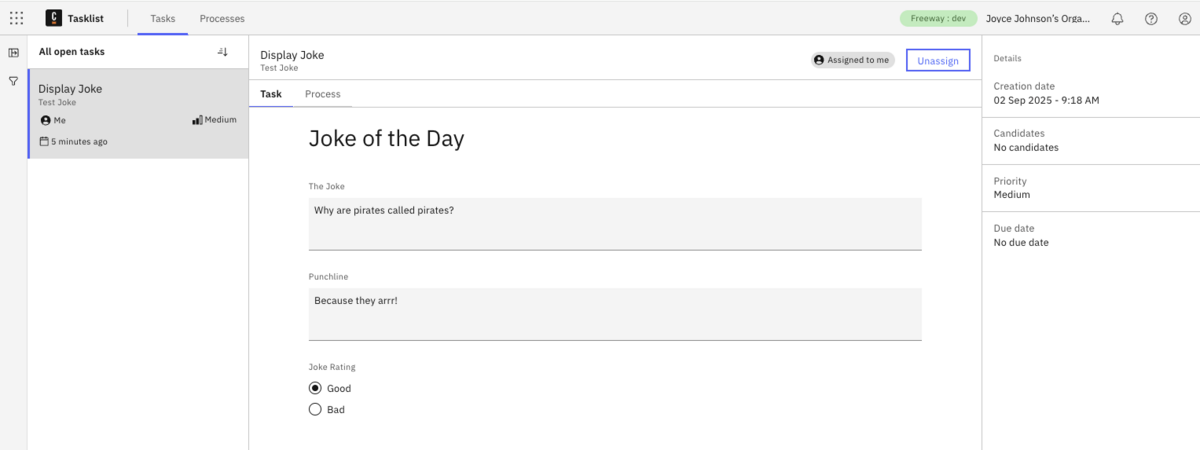
Here we see the results displayed.
That’s it. You created two reusable building blocks that can easily be used in processes throughout your operations.
Real-life applications
Although we showed a fun example with our joke of the day, let’s talk about real-life examples. Assume that you have several processes that access a custom application that manages customer information within your organization. You might create a customer connector template that returns customer information and an accompanying element template that displays this information to the end user with a form UI.
You may create an element template that is a script task to generate a customer ID and use a connector template that can be used to create a customer record. These are the types of tasks that can be used across the organization with a standard element.
Let’s imagine that your finance department needs to pull real-time exchange rates from an external API for international transactions. Instead of developers wiring up calls independently and often differently, they create a custom Fetch Exchange Rate service task using an element (or connector) template. This can incorporate the endpoint, authentication, headers, response, and error handling in a single configuration. This way every modeler can just drop the template into the process like a building block. Combine this with, say, a human reviewing tasks with a senior account manager to confirm the exchange rate information and approve the transaction, especially for those high-value transactions where an expert judgement is required. This combination provides both fast and accurate information while simplifying the creation of these specialty elements using the building blocks created with the element templates shared with the organization.
This same approach also works for any recurring integration or task that might be used across the project or organization including: updating a CRM system, kicking off a machine learning model, or invoking an internal risk-scoring service. Each custom task, defined by an element template, becomes a governed, reusable building block that enforces best practices while speeding delivery.
The options are endless. With element templates, you can provide a customer user interface and abstract the technical details from the modeler. By providing these building blocks to your process designers, you are providing more than just enablement, you are standardizing throughout the organization, refining your management of common tasks, and simplifying your process modeling.
How element templates support agentic orchestration
Element templates are foundational to dynamic, agent-driven automation patterns. With agentic orchestration, tasks are selected and sequenced based on runtime context—not rigidly defined control flows. The collection of possible tasks can be any BPMN element and by taking advantage of element templates, you are broadening the depth of options that an AI Agent can take to achieve its goal.
With templates, each custom task becomes a modular “tool” an agent can choose from. This aligns with AI planning loops, where the agent picks the best action (e.g., calling an API or requesting human input) based on current data.
Camunda’s support for event-driven orchestration, ad-hoc sub-processes, and connectors, makes element templates a critical link between deterministic process models and adaptive agent behavior.
Conclusion
When teams adopt the usage of these templates, automation scales faster and with fewer defects because everyone is using the same battle-tested components, and human expertise is applied where it adds the most value. With a centralized “library” of elements to use within your organization, you empower your staff to focus on process orchestration without getting bogged down in the detailed configuration.
Ready to get started? Explore the Camunda documentation and start building your own element template library today.
Start the discussion at forum.camunda.io