

A new chapter in agentic orchestration
You are a major P&C insurer facing the influx of claims from a significant weather incident. You need to validate documents, receipts, confirm policies are in effect, check deductibles and inclusions, and interface with several other systems to detect possible fraud. In the past, your organization addressed this by accessing multiple services using multiple APIs. It could be cumbersome, difficult to orchestrate, and a struggle to maintain.
Enter Model Context Protocol (MCP). You can build AI-powered claim agents that can expose all these APIs for your claims process. With MCP, you can ensure that your claims agent fully understands the purpose of each service, how to communicate with it using the proper input and output variables while minimizing the need for a developer. This dynamic and intelligent way to compose calls and route requests help to make a more consistent claims experience reducing manual handoffs and operational delays.
At Camunda, we’ve built native MCP support to transform these standalone AI agents into orchestrated process participants—ready to work securely and at scale.
Table of contents
What is MCP?
The Model Context Protocol (MCP) is an emerging open standard designed to make it easier for applications, such as ChatGPT, to securely connect with external data, tools, and processes. Essentially, MCP is a communication layer for exchanging context between AI models and external systems enabling applications, APIs, databases, and even internal company tools to communicate in a common language when interacting with AI assistants. Instead of requiring custom-built integrations for each system, MCP provides a standard way for models to retrieve data and trigger actions.
To learn more about this protocol, we encourage you to read our blog entitled MCP, ACP, and A2A, Oh My! The Growing World of Inter-agent Communication.
How does MCP work?
In short, MCP provides a standard for an LLM AI agent to interact with other programs. The MCP server has a set of registered tools with a description of what the tool can be used for as well as the input schema and output from the tool.
The way it works is pretty straightforward. Applications expose an MCP server that defines what data, functions, or actions are available when using that server. An MCP client, like that within your Camunda process, can then interact with the server, discover its capabilities, and safely use them.

This approach ensures consistent patterns for describing and working with available tools and datasets, requesting contexts, and enforcing permissions and access control.
Why is this helpful?
So why use MCP? Standardization means that there is no need to reinvent integrations for defined AI models or platforms. You may already have several standard ways to interact with systems within your organization. If you expose them as available tools within your MCP server, you can immediately take advantage of those tools to help your AI agents do better solving problems. You can also integrate that server (and its tools) into other processes to make sure all your resources have access to the right information.
Let’s go back to our insurance claims example. We need to verify that those submitting a claim have a policy in effect and the specifics of that policy. You may have a couple tools available through your MCP server such as Policy Lookup which fetches a policy number for a customer if they have an active policy and then Policy Coverage Summary which returns the coverages, limits and deductibles in plain terms.
You might not want to have to train your AI agent LLM how to take these actions, and why should you if the system integration already exists? Since these tools are already exposed in your MCP server, you can provide a method to your AI agent without having to teach it to do these things.
Understanding AI agents and Camunda
Before we jump into Camunda’s support of MCP, it is important to understand how Camunda implements AI agents. With Camunda, agentic AI is built on the proven foundation of BPMN using the ad-hoc sub-process construct. This approach allows tasks to be executed in any order, simultaneously, skipped, or repeated. This is all determined dynamically at runtime based on the context of the process instance.
The following process diagram depicts an example of how this can be modeled in BPMN with Camunda. Essentially, you define the tasks available to your AI Agent within a BPMN ad-hoc sub-process as highlighted below.

In the simplest terms, an AI Agent connector sends a prompt to an LLM which then uses that information to determine which “tools” in the toolbox might be useful to help resolve the request most accurately and efficiently. These tools can run simultaneously and independently, and the AI agent can run them multiple times in order to resolve the request.
For more information about Camunda’s approach to agentic AI, we recommend:
- Agentic Orchestration: Model, deploy & manage AI agents seamlessly into your end-to-end processes with Camunda
- AI Agents in our documentation
- Intelligent by Design: A Step-by-Step Guide to AI Task Agents in Camunda
How does Camunda support MCP?
With version 8.8 coming in October and currently available with our alpha7 and alpha8 releases, Camunda provides two MCP integrations so that your Camunda processes can auto-discover and invoke these enterprise tools for you with our MCP integration.
Using these MCP integrations, your Camunda AI agents can detect and use tools provided by MCP clients via activities within an ad-hoc sub-process. Keeping tool discovery and invocation inside an ad-hoc sub-process instead of the AI agent gives you cleaner governance and deployment flexibility.
- You can run the AI agent and each MCP client in separate deployments to keep boundaries clean and reduce risk. For example, host a filesystem-aware MCP client on‑premises for data locality while it connects to your Camunda 8 SaaS cluster.
- You can model more advanced scenarios with standard BPMN elements, like inserting a User Task to require approval for each MCP tool call (human-in-the-loop).
So, with Camunda, you can simply add the MCP connector to your process and you can invoke the right tool for the job. Camunda’s enterprise-grade transparency means every agent decision is logged, auditable, and interruptible, so operations, security, and compliance teams can trust what’s running in production–enabling you to confidently scale AI across your organization.
Camunda processes already give you short-term memory in the form of process variables and long-term memory through connectors to databases, object stores, or vector embeddings. Camunda’s MCP client gives you another way to integrate AI agents into your processes.
Under the hood
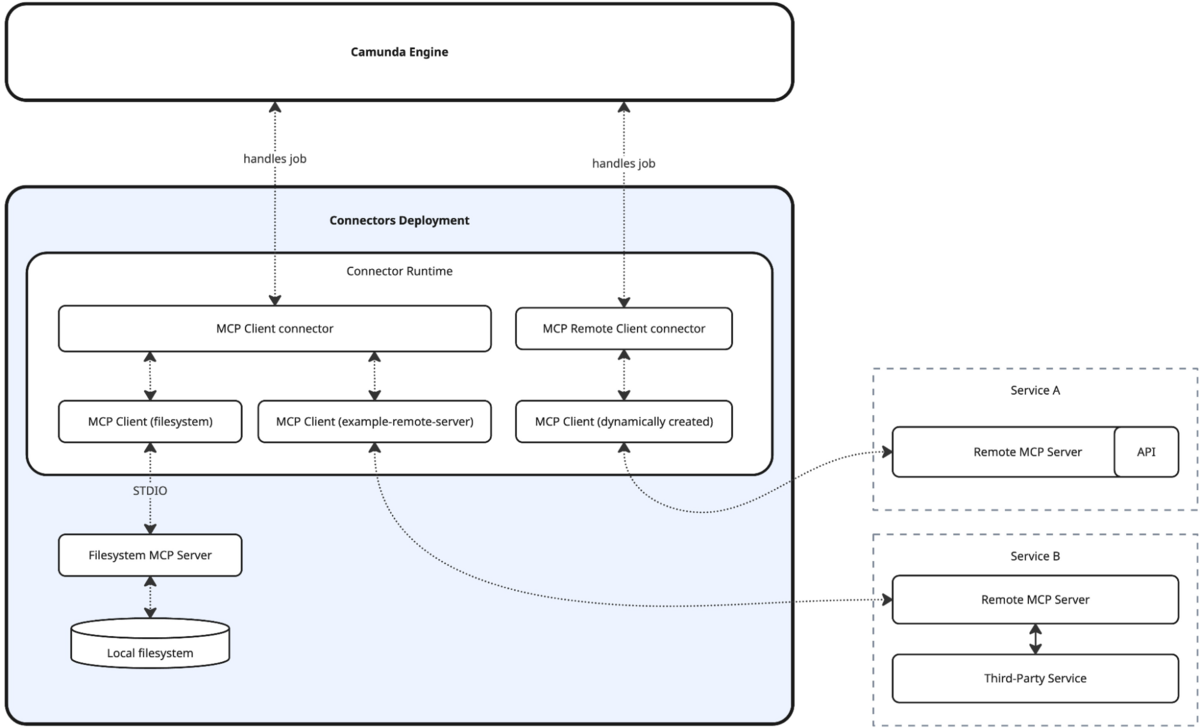
Camunda’s MCP client integration lets you connect the AI agent connector to MCP clients so that it can use tools exposed by MCP servers. MCP servers can run locally over STDIO or remotely over HTTP with Server-Sent Events (SSE), as depicted in the following diagram.
For more details on how to provide tool discovery and definitions, please check out the documentation on MCP.
The Camunda MCP connectors
As indicated, Camunda provides two (2) connectors that allow you to easily connect to an MCP server and they are not mutually exclusive—you can use them together if your cluster and environment are configured accordingly.
Note: These connectors are available in experimental mode only with Camunda 8.8.0-alpha7 and alpha8.
MCP Remote Client connector
You can connect to MCP over HTTP with servers and events through a back channel connection which is also supported by Camunda with the MCP Remote Client connector which uses the HTTP connection. These HTTP connections are opened on demand during execution instead of maintaining persistent connections.

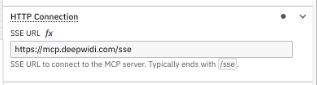
You simply enter the HTTP SSE URL in the designated location of the connector properties.
You can further filter the tools, as shown in the Tools section of the properties below. For example, you can indicate if you want to use a tool or list the available tools.
MCP client connector
You can also use an MCP client that connects to an MCP server. For example, you can define servers that can be started by a desktop application that does filesystem operations. This is a widely supported MCP integration at this time and the ecosystem is constantly evolving.
Camunda supports this way to connect with the MCP client connector that provides flexible MCP integration based on persistent connections managed by the connector runtime and supports STDIO MCP servers.

For this connector, you will need to define the Client ID in the properties which is the name of your MCP client being created at runtime.
The following example relies on an MCP client being configured as part of the connector runtime. To use the client IDs referenced in the example, add the following configuration to your connectors application config (application-local.yaml) file:
camunda:
 connector:
   agenticai:
     mcp:
       client:
         enabled: true
         clients:
           # STDIO filesystem server started via NPX
           # (make sure you have a Node.js environment available)
           # replace path to files to the directory you want the
           # model to have access to
           # you can also add multiple paths, see
           # https://github.com/modelcontextprotocol/servers/tree/main/src/filesystem
           filesystem:
             stdio:
               command: npx
               args:
                 - '-y'
                 - '@modelcontextprotocol/server-filesystem'
                 - '<path-to-files>'


           # STDIO servers can be started in any runtime/language,
           # e.g. as docker container
           time:
             stdio:
               command: docker
               args:
                 - 'run'
                 - '-i'
                 - '--rm'
                 - 'mcp/time'


           # Remote HTTP/SSE MCP server
           # start the OpenMemory MCP server first as documented on
           # https://mem0.ai/openmemory-mcp
           openmemory:
             sse:
               # replace with the URL returned by the OpenMemory MCP link UI
               url: http://localhost:8765/mcp/openmemory/sse/<your-client-id
You can see the time MCP client in this code which will enable it for use in your Camunda process.
Let’s take it for a test drive
Now that you have some background information about how Camunda supports MCP, let’s take it for a test drive and see it in action.
An explanation of using both MCP clients in an agentic process
In the following process model, we have an example of using both MCP connectors (highlighted with the red outline). This example will show you how these connectors work within a Camunda process.

In this flow, we have our standard AI agent which provides information about the incoming request (incoming from a starting form) and makes suggestions on how to resolve the request. This process showcases the ability to use MCP in conjunction with other standard tools. For example, here, we don’t want to allow the model to just do file system operations without confirming with a human.

When the process runs, it accesses the AI agent and then calls the tools in the ad-hoc sub-process to detect which tools are available from the MCP server by looking at various properties. When the tools are detected, a tool discovery is completed first without involving any models. Essentially, this is a gateway to multiple MCP tools for the AI agent.
The AI agent can run multiple times, so once the process instance knows the tools at its disposal, it takes the required steps to resolve the request. It’s really that simple.
An example to try on your own
Now that you understand what happens under the hood, let’s look at a very straightforward example that you can try on your own. In this example, we will only use the Remote MCP client connector, so you don’t have to create your own MCP server to see the functionality.
We are going to create a simple form to request something and based on the nature of that request, the AI agent in the process will either call to make a calculation or it will access the Deepwiki MCP server.

Note: This exercise requires that you have access to the following: an AWS region, an AWS access key for AWS Bedrock, and an AWS secret key for AWS Bedrock.
The steps to build this process and run it are as follows:
- A start form to enter a request
- A BPMN process with an AI Agent, and ad-hoc sub-process with three possible tools:
- Deepwiki – a Remote MCP Client connector to access https://mcp.deepwiki.com/ with HTTP SSE.
- Superflux Product Calculation – a script task that performs an arithmetic calculation on two provided numbers.
- Get More Information – a human task that will allow the AI agent to request additional clarification on the request being made and a simple associated form.
- An AI agent task with a system prompt to handle the request.
- A final human step to display the results of request resolution and associated form
Note: You can access this BPMN process and associated forms in this GitHub repository or you can create your own.
Create the forms
To start this exercise, we will create the required forms first so that we can simply link them when we create the BPMN model.
Start form
The first form we need to create is very simple and it is for the request being made to our AI agent.
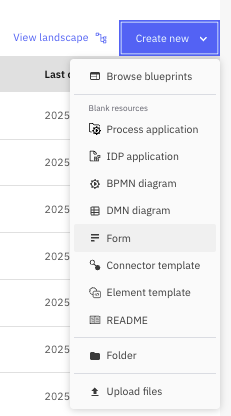
- Create a new form within the Web Modeler using Create new->Form.
- Name your form “Make a Request.”
- You will be creating a title for the form and a field for the user to enter the request for the AI agent.
| Component Type | Field label | Key/Text |
| Text view | ## Make a Request | |
| Text area | How can I help you? | inputText |
Your form should look something like the one shown below.

Get more information form
The next form will be the form in our AI toolbox that can be used to ask for more information about the request.
- Create another form and name it “Get More Information.”
- You will be creating a title for the form and a field for the user to enter the request for the AI agent.
| Component Type | Field label | Key/Text |
| Text view | ## Question from your AI Agent | |
| Text view | #### You asked the following question {{inputText}} | |
| Text area | AI Response | myResults |
Your form should look something like the one shown below.

Display response form
The last form to create is the one that will display the results of the request back to the user.
- Create the final form and name it “Display Results.”
- You will be creating a title for the form and a field for the user to enter the request for the AI agent.
| Component Type | Field label | Key/Text |
| Text view | ## Your Request has been Answered | |
| Text view | {{aiquestion}} | |
| Text area | Answer | humanAnswer |
Your form should look something like the one shown below.

Create the process
Now that you have the required forms for your process, let’s create a simple process to see how an AI agent using the MCP Remote Client connector might work.
Let’s start building the process.
- Create a new BPMN diagram.

- You can name it whatever you might want. In our example, we named the process “AI Agent Chat With MCP” and an ID of
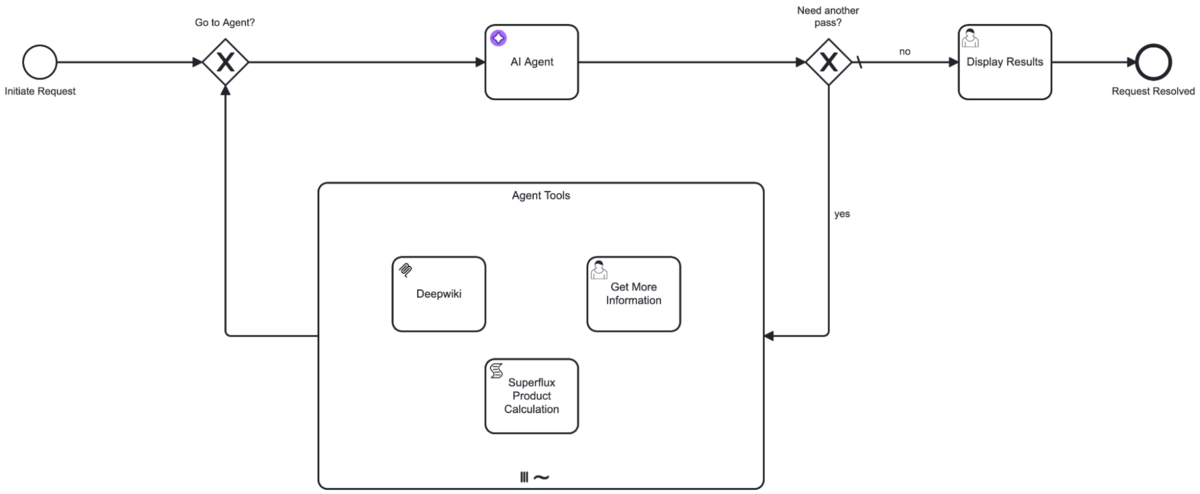
process_MCPAIChat. - You will need to create a start event, followed by an exclusive gateway, connected to a task, another exclusive gateway, another task and then an end event as shown below.

- Label these elements as follows:
| Element Type | Name | ID |
| Start event | Initiate Request | start_initiateRequest |
| Exclusive gateway (1) | Go to Agent? | gateway_goToAgent |
| Task (1) | AI Agent | aiAgent |
| Exclusive gateway (2) | Need another pass? | gateway_anotherPass |
| Task (2) | Display Results | task_displayResults |
| End event | Request Resolved | end_requestResolved |
Your process should now look like this:

- Now we want to draw the “loop” for our AI Agent toolbox. Create an expanded sub-process below the AI Agent on the diagram.
- Remove the start event from within the process.
- Change it to an ad-hoc sub-process.
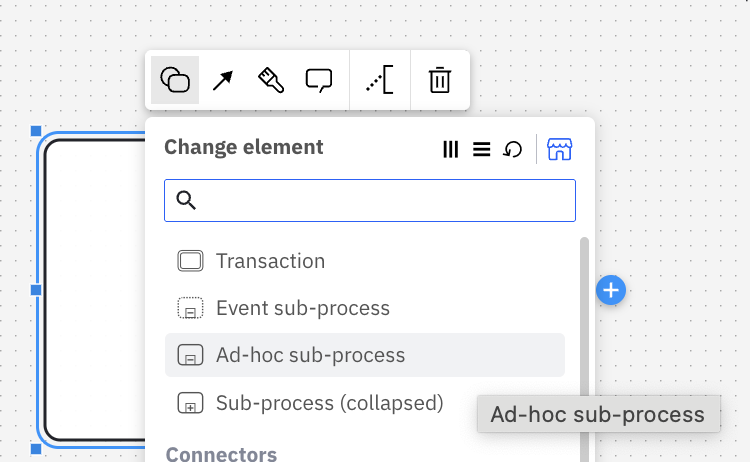
- Change it to a parallel multi-instance ad-hoc subprocess.

- Name it “Agent Tools” with an ID of
agentTools. - Connect this ad-hoc sub-process to the gateways as shown.

- Now it is time to add the tools into your Agent Tools ad-hoc sub-process. Drag and drop three (3) tasks into the ad-hoc sub-process. You can put these anywhere you want.
- Label one element “Deepwiki” and use an ID of
mcp_DeepwikiThis will be the MCP Remote Client that will access the Deepwiki MCP server. - Label another element “Get More Information” with an ID of
task_getMoreInfowhich will be a human task to request additional information from the requestor. - Label the final element in the ad-hoc sub-process “Superflux Product Calculation” with an ID of
task_superfluxProductwhich will be a script task to do a calculation on numbers provided.
Your process should now look like this.

Implement the process
Now we need to add the details on each step so that we can implement, deploy, and run the process. So let’s get started.
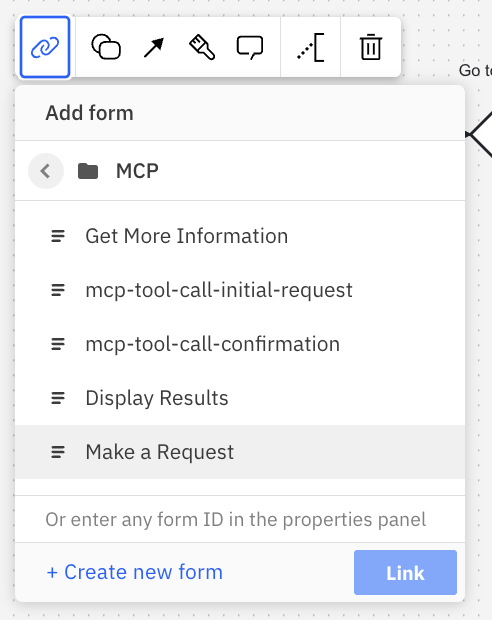
- First you need to connect your starting form to the start event. Select the start event and click on the chain links, select the “Make a Request” form and click the Link button.
- For the AI Agent, there are several things to update so that the agent will execute correctly.
- Change the element type to “AI Agent.”

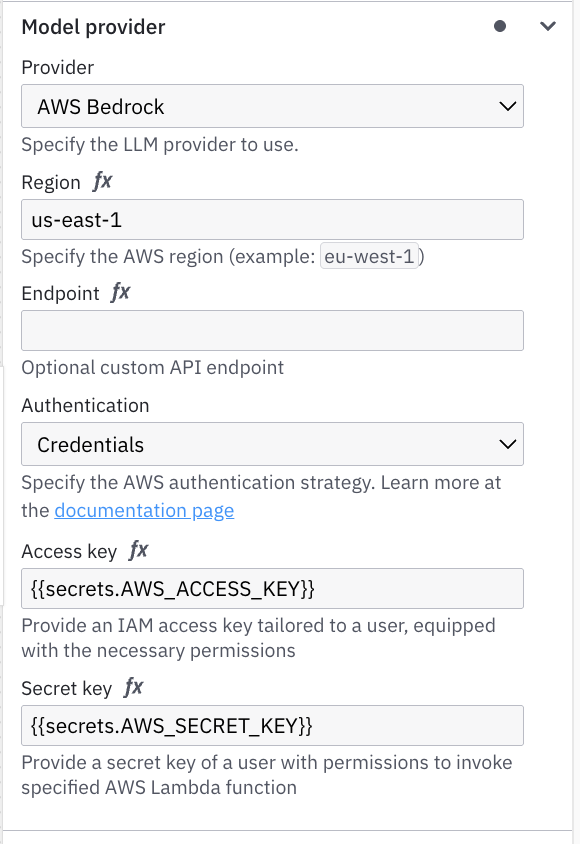
- Select “AWS Bedrock” as the Model Provider.
- Enter the AWS region that you will be using into the Region field.
- Select “Credentials” for the Authentication field and then enter your AWS access key and secret key in the proper field. It should now look something like this.
- You can use the default Model (anthropic).
- Now you need to enter the System prompt. You can use the one below:
- Change the element type to “AI Agent.”
"You are a helpful, generic chat agent which can answer a wide amount of questions based on your knowledge and an optional set of available tools.
If tools are provided, you should prefer them instead of guessing an answer. You can call the same tool multiple times by providing different input values. Don't guess any tools which were not explicitly configured. If no tool matches the request, try to generate an answer. If you're not able to find a good answer, return with a message stating why you're not able to.
If you are prompted to interact with a person, never guess contact details, but use available user/person lookup tools instead and return with an error if you're not able to look up appropriate data.
Thinking, step by step, before you execute your tools, you think using the template `<thinking><context></context><reflection></reflection></thinking>`"
- For the User prompt, use this FEEL expression.
if (is defined(followUpInput)) then followUpInput else inputText
- For the Tools section, you will want to provide the ID that was assigned to the ad-hoc sub-process,
agentToolsand then set the Tool call results to justtoolCallResultsto store the results returned from the ad-hoc sub-process (the AI toolbox).

You can use the defaults for the remaining properties.
- Moving to the ad-hoc sub-process, Agent Tools, we need to properly configure the sub-process (the toolbox) to take information from the AI Agent and use that to make the proper tool invocations as a result.
- Select the ad-hoc sub-process to access the properties. The first thing to assign is the Input collection for the multi-instance sub-process. We will use the following:
| Property | Name |
| Input collection | agent.toolCalls |
| Input element | toolCall |
| Output collection | toolCallResults |
| Output Element | { id: toolCall._meta.id, name: toolCall._meta.name, content: toolCallResult} |

- Now you need to define the active elements collection that will be used, so enter
toolCall._meta_namein this field.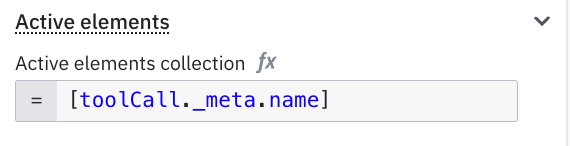
- Now we need to implement the tools (tasks) available to our AI Agent in the ad-hoc sub-process.
- Select the “Deepwiki” task in the sub-process and change the element type to the MCP Remote Client type
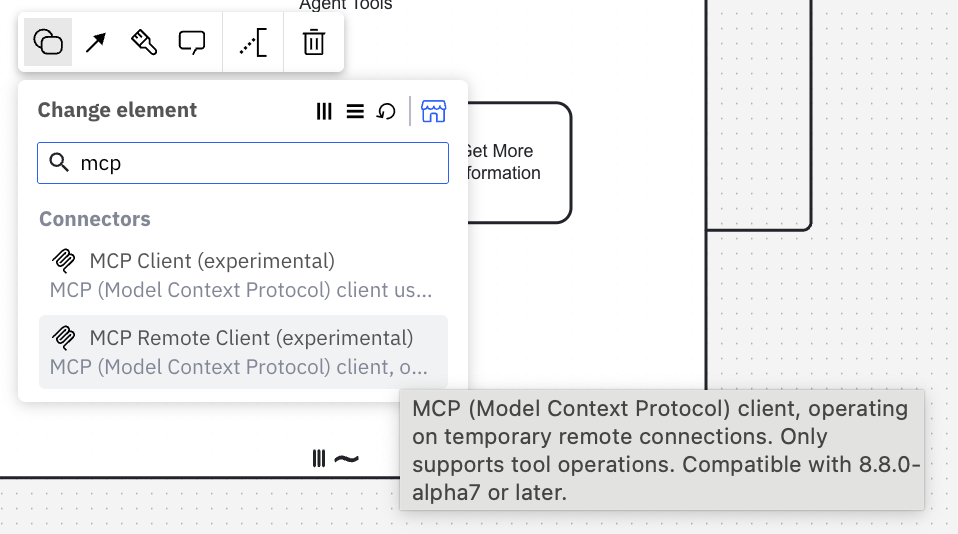
- Update the HTTP Connection to use this SSE
https://mcp.deepwiki.com/sse.
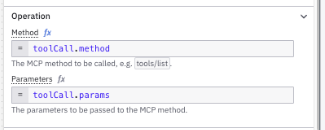
- You can use the defaults for the other sections including Operation and Output mapping.

- Select the “Get More Information” task and change it to a user task. Then link the “Get More Information” form.
- Finally, select the “Superflux Product Calculation” task and change it to a script task.
- For the Implementation, select “FEEL expression.”
- Update the Script Result variable to
toolCallResultand use the FEEL expression3 * (inputA = inputB)which is the calculation that will be done if two variables are provided in the request.
- You will need to make sure that the AI Agent provides the proper inputs to this tool, so you will need to create two input variables to match those used in the previous FEEL expression (
inputAandinputB). These variables will use thefromAifunction to defineaandbwhich are defined as number types for the first and second numbers, respectively.
Use the following FEEL expression forinputA:fromAi(toolCall.a, "The first number to be superflux calculated.", "number")
Use the following FEEL expression forinputB:fromAi(toolCall.b, "The second number to be superflux calculated.", "number")
- Select the “Deepwiki” task in the sub-process and change the element type to the MCP Remote Client type
- Almost done. Select the arrow from the “Need another pass?” gateway to the ad-hoc sub-process and label the route “yes” and with an ID of
flow_yes. You will also need to add the condition for this flow using a FEEL expression.not(agent.toolCalls = null) and count(agent.toolCalls) > 0
- Select the outgoing flow from the same gateway and name it “no” with an ID of
flow_no. You can either provide a conditional FEEL expression like that below, or choose to make this the default flow.(agent.toolCalls = null) or count(agent.toolCalls) > 0 - Select the last task in the process, “Display Results,” and make this a user task and link the “Display Results” form.
You did it! Now the process should look like this and be ready for deployment and execution.
Deploy and run the process
Time to deploy this and check it out.
- With Modeler, select “Deploy” and select an 8.8.0-alpha7 or higher cluster.

Click the Deploy button to deploy your process. - Now, open the Tasklist application and go to the Processes tab. You should be able to locate your process and start it from here.

- Once the process is started, you will see your initial form. We suggest something like this for the first request.

Request:I would like a very high-level description of this deepwiki repo: <a href="https://deepwiki.com/expressjs/express">https://deepwiki.com/expressjs/express</a>
This request should access the MCP Remote Client to determine what tools are accessible with the Deepwiki MCP server. Those tools are the following:read_wiki_structure,read_wiki_contents, andask_question. These tools along with our Get More Information and Superflux Product Calculation tools will all then be available for the AI Agent to solve the request. - Now we need to open Operate and see what is happening. Find your process and let’s review it. The first thing you want to do is toggle the “Hide Execution Count” in the Instance History title bar so that you can see how many times certain elements have been executed.

- If you select the first execution of the Agent Tools, you can see that a list of the available MCP tools has been made by calling the
toolsListfor the Deepwiki MCP server.
If you open the variabletoolCallResults, you can see the names of each tool as well as the description and required input variables.
- If you select the second execution through the Agent Tools sub-process, you will see that it executed the Deepwiki MCP Remote Client (there is a “2” on this element) and the results show that it has used the
ask_questiontool to provide the requested high-level summary.
- The process will be at the Display Results human task, open this in Tasklist to see the results of your request.

You are encouraged to try using just a request for a Superflux product calculation as well as asking for both the summary of a repository as well as a product calculation and review the results.
What does this mean?
With Camunda, you don’t have to choose between “AI magic” and enterprise-grade process orchestration. You can model with standard BPMN building blocks (connectors, script tasks, human tasks, and more) and blend them with Model Context Protocol (MCP) tools. Then you can expose that toolkit directly to your AI agent. The payoff: your agent can reuse existing APIs or tap into new ones without you rewriting core processes.
And because this isn’t a black box, you also get governance out of the box. The MCP server shows which tools exist, which ones your AI agent actually picked, and the full execution history. In other words, you can trace every decision—what happened, when, and why—so experimentation doesn’t come at the cost of compliance.
Fraud detection—a day in the life
Let’s return to our insurance claims department and consider fraud detection. Your AI agent looks at the documents submitted for a claim and that is offered to your claims AI agent for processing. This process has access to an MCP server (or servers) with tools that reviews the information and claim pattern so that it can trigger each suspicious claim, for example:
- cross-policy fraud signals from the last 90 days,
- the claimant’s historic ratio of disputed or reversed claims, and
- a chain-of-thought excerpt from an LLM that reviewed the claimant’s social media and prior claim narratives.
Based on that context, the task agent can require further checks, possibly using additional MCP tools, or send the suspicious claim to a fraud agent for further investigation.
Everything—from the variable deltas to the LLM’s rationale—is persisted in Zeebe’s immutable log. Operations and compliance teams can replay the saga to answer auditors without combing through siloed fraud-detection systems or ML notebooks.
What’s the business impact?
By marrying MCP with Camunda, enterprises close the chasm between data-science playgrounds and operational front lines. Contextual intelligence that used to live in an experiment tracker now sits inside the workflow where value is earned:
- Agility. Agents tailor their next step to live business signals, not pre-baked rules, cutting false positives and rework.
- Collaboration. Humans see an agent’s full memory stack and can intervene or coach models in plain language.
- Compliance. Every field change is versioned and replayable, satisfying audit and AI governance mandates.
Put differently, MCP turns orchestration from a command-and-control diagram into a conversation that never loses its train of thought.
Ready to Bring Your Agents Up to Speed?
Using this tutorial as a baseline, create your own agents using MCP and see what you can do.
Learn more about agentic orchestration
Curious to learn more about how you can use enterprise-grade AI agents from Camunda to enhance your business processes? Find out more about agentic orchestration.
Start the discussion at forum.camunda.io