

Artificial intelligence is at its most powerful when it doesn’t work in isolation. The real magic happens when AI agents are orchestrated alongside humans and digital systems—bridging REST endpoints, user interactions, and large language models (LLMs) into a single, seamless workflow. That’s exactly what Camunda makes possible.
In this blog, we’ll explore how to create an AI process agent using Camunda that brings together the intelligence of an LLM, the structure of a business process, and the flexibility of external tools. By the end, you’ll see how simple it can be to connect a REST endpoint, orchestrate an LLM, and even incorporate human decision-making into the same flow.
To guide you through the journey, we will walk step by step through the process of building, configuring, and running your very first AI process agent process with our most recent functionality provided in Camunda 8.8-alpha8. You’ll learn how to design the workflow, connect the model, set up the tooling, and finally deploy and test the end-to-end process. Our own Niall Deehan has also provided a video to accompany this tutorial and a GitHub repository with the finished assets.
The outcome? An orchestration where humans and AI work together—not just coexisting, but actively complementing one another to solve real user requests.
Let’s dive in.
Table of contents
Getting to know our AI-powered customer support system
This example demonstrates how to integrate Camunda’s AI features into a Camunda process using AWS Bedrock and Claude Sonnet. The process creates a basic technology agent that can answer various queries related to technology topics and provide interactive responses to the requestor via a simple AI-powered customer support system.

It is important to note that the box in the center, the ad-hoc sub-process, is our AI process agent that connects to the LLM and provides the tools for use by the agent to resolve inquiries.
The process flow
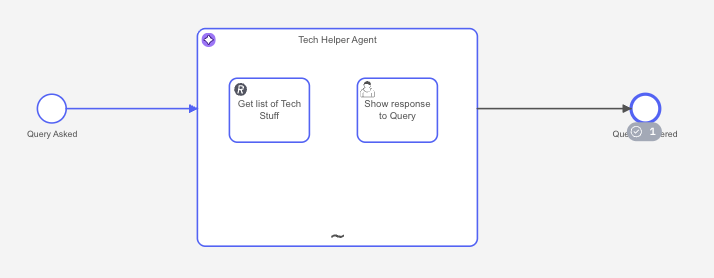
The process is quite simple, but here’s the flow:
- Query Asked: This is the start event that initiates the process when the user submits a technical question from an input form.
- Tech Helper Agent: Our AI agent (Claude Sonnet via AWS Bedrock) processes the query using the following:
- Built-in AI Knowledge: The agent has extensive domain knowledge about various technology topics.
- External Tools: In this case, access to REST APIs for real-time data retrieval to help resolve the query.
- Interactive Forms: The user task that provides formatted displays of the responses to interact with the requestor.
- Query Answered: The process completes after providing a comprehensive response to the requestor.
Understanding the AI agent
Let’s take a look at some of the properties we will be defining for the AI process agent in this exercise.
- Provider: AWS Bedrock with Claude Sonnet 4 model (
us.anthropic.claude-sonnet-4-20250514-v1:0) - Memory: In-process storage with 20-message context window
- Limits: Maximum 10 model calls per process instance
- Tool Integration: Two integrated tools for enhanced functionality
- Get List of Tech Stuff: This is a REST API call using an HTTP endpoint that retrieves technology product data from
https://api.restful-api.dev/objects. - Show Response to Query: This is a user task that formats and displays the AI response in Markdown format to the requestor.
- Get List of Tech Stuff: This is a REST API call using an HTTP endpoint that retrieves technology product data from
What can our agent do?
Our agent isn’t just smart—it’s practical. It knows how to:
- Tackle all sorts of technical customer requests without breaking a sweat.
- Lean on the tools you’ve given it instead of making wild guesses.
- Reuse the same tool as often as needed, tweaking parameters each time to get the job done.
- Share its reasoning clearly, neatly wrapped in structured XML <thinking> tags.
- Remember the conversation so every response is grounded in context.
- Deliver answers that look clean and approachable, formatted in user-friendly markdown.
Building our AI agent in Camunda
Now that you have an understanding of what we are planning for our agent, let’s get down to building it.
Note: As mentioned, this process was built using Camunda 8.8-alpha8. In addition, it assumes that you have an AWS secret key and access key associated with an AWS user with the policies in place to access AWS Bedrock. You may use any available LLM and use the same steps, but results may vary.
Create the process
Let’s create the project and build it out so we can see it in action.
- Create a new BPMN diagram and name it “Tech Helper Agent” with an ID of
process_techHelperAgent.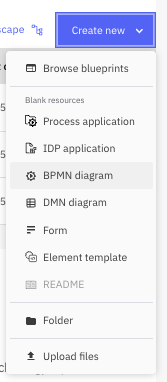
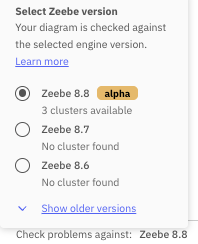
- Make sure you are modeling using Zeebe 8.8-alpha8 or later before you begin modeling by updating that at the bottom of your Modeler screen.
- Create your start and end event and make them a good distance apart.

- Label the start and end event as follows:
| Element type | Name | ID |
| Start event | Query Asked | start_queryAsked |
| End event | Query Answered | end_queryAnswered |
- Drag an expanded sub-process in between your start and end events.

Now your process should look something like this.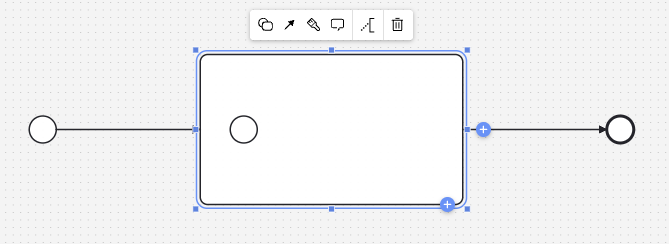
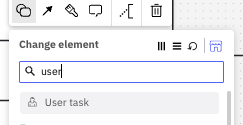
- Now you want to make sure that your sub-process is changed to the element type “AI Agent.”

This is the key to configuring this process. By creating this sub-process, we are defining the AI process agent and connecting to the proper Large Language Model (LLM). Inside this sub-process will be all the tools available to our agent for resolving the request. - After changing the element type for the sub-process, remove the start event within the sub-process as this will not be necessary.
- Now you need to name your agent. In this case, we have used the name of “Tech Helper Agent” with an ID of
agent_techHelper.
Configure your AI process agent
Now you need to configure your agent so it has access to the LLM, the tools and runs as expected.
- Open the properties panel on the right and the first thing we need to do is to enter the information for the LLM (Model Provider). In this case, select “AWS Bedrock” from the dropdown for the provider.

Once you make this selection, several additional fields will be displayed for configuration of this provider.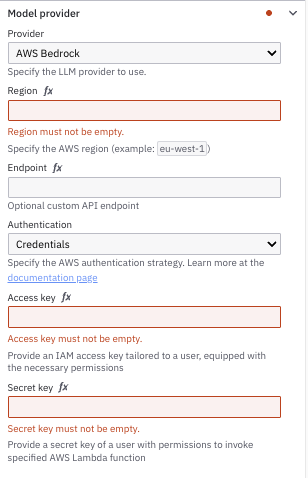
- You will need to fill in the following:
- Region
- Access key
- Secret key
In our case, we have these saved in secrets, but you will need to have the proper AWS account with the correct policy to grant AWS Bedrock access. The properties for the Model Provider now look like this for our process.

- Now you need to add the model to use. We have used
us.anthropic.claude-sonnet-4-20250514-v1:0which you will add to the “Model” property in the Model section.
- We will leave the System Prompt with the default for now and move to the User Prompt. We will be using the input from the user that will be entered on an initiating form using the variable
request.
- Under the Response section, check off “Include assistant message” and “Include agent context” as this will provide us additional information about what is happening with the agent.
- For this example, we are just going to use the default System prompt; however, you can fine tune this prompt if you want the agent to do some specific things or you want to give it some more definitive instructions.
Add tools to your AI process agent
The next step is to add tools for your AI process agent to use to respond with the best information possible. Let’s get started.
- Drag a task into your AI agent to be the first tool, a REST API, for the agent.
- Change the element type to be the REST API Connector.

- You will need to name your task. In our example, we used the name of “Get list of Tech Stuff” and an ID of
task_listofTechStuff. - It is important to add context for the agent in the element documentation field so that the agent knows the purpose of this tool. For example, you may want to enter something similar to this:
This tool is used to get the list of all available technology stuff. - You now need to confirm the REST API connector with the following:
| Field | Value |
| Authentication | None |
| Method | GET |
| URL | http://api.restful-api.dev/objects |
| Output mapping/Result variable | toolCallResult |
The AI agent is always looking for a specific output variable, toolCallResult. So, we need to make sure that we assign the result variable from this particular task to this variable name.
Note: We will be using this https://restful-api.dev API for this exercise.

- Now we need to create the user task that will provide the results to the user and allow interaction with the agent. Drag another task into the agent and change it to a user task.
- You will want to name this task as well. In our example, we used the name of “Show response to Query” with an ID of
task_showResponse. - As before, we want to make sure that we provide the agent with some information on when this task should be accessed, so in the element documentation, add something like:
Use this tool in order to display data to the user who made the request. - Now in this situation, we need the agent to create some data and then display it to the user in a formatted manner. For example, we want the agent to generate a list from the JSON object,
toolCallResult, returned from the REST call for us. So, let’s go to the Inputs section and create an input local variable calledresultOfQuery. - Camunda provides a function that we provide called
fromAiwhich can be used when we want to ask the agent to create a variable for us. In this case, we want to expand the FEEL editor to enter a FEEL expression for the variable assignment value.fromAi(toolCall.resultOfQuery, "This is the result of the query made by the user, format this in markdown")
This function tells the agent to create a variable calledresultOfQueryinside oftoolCalland a description of what we want to put in that variable. The default variable type isstring, so we did not add that to the query, but it also use:fromAi(toolCall.resultOfQuery, "This is the result of the query made by the user, format this in markdown", “string”) - Just as we did for the REST API connector task, we need to create the output variable
toolCallResultand then specify what that is:{"responseFromUser“: responseFromUser}
Now the inputs and outputs section should look like this: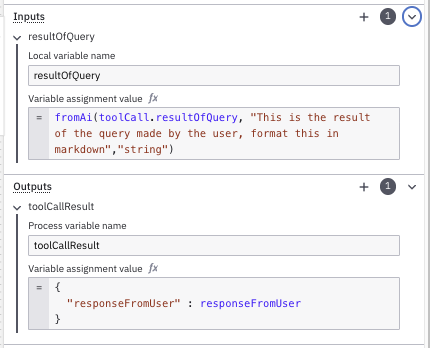
Forms for user tasks
Now we need to make sure that all the user tasks have the required forms to interact with the requestor.
- You need to add a form to the start event so that the AI process agent will know what query it has received so that it can respond accordingly. Select the start event and click the chain link icon and select +create new form. This will take you to the form editor.
- Create a simple form called “Query Asked” with an ID of
form_queryAsked. - Create the following on your form.
| Component Type | Field label | Key/Text |
| Text view | ## Query the Agent | |
| Text field | Request | request |
The request is the user prompt that will be provided to the agent.

- Click Go to diagram to return to the diagram.
- Select the “Show response to Query” task and select the chain link icon to link it to a form. You will need to select “Create new form” to create a new form that will display the details of the response to the request.
- Name your form “Show response to Query” with an ID of
form_showResponsetoQuery. - Create the following on your form.
| Component Type | Field label | Key/Text |
| Text view | ## Your Request Response | |
| Text view | resultOfQuery | |
| Text field | Follow Up Question | responseFromUser |
The resultOfQuery is the response that the agent defined previously and the responseFromUser is the output defined in the agent in case the user wants to provide a refinement to the original request.

- Click Go to diagram to return to the diagram.
You made it! Your very first AI Agent process is built, configured, connected, and ready to roll. Nicely done. Now comes the fun part: seeing it in action, but first let’s deploy it.
Deploying your process
Before you can run your process, it needs to be deployed. You can do this directly from your Web Modeler.
- From within Web Modeler, select the down arrow the Deploy & run button at the upper right corner of your screen, and select “Deploy” from the dropdown.

- Make sure you select to deploy your process to a Camunda 8.8-alpha8 cluster (or later). Notice that the deployment will also deploy the forms that you have linked to the user steps in your process.

- Select Deploy to deploy the process.
Run your process
Now that your process is deployed, let’s see what it can do.
- Open Tasklist and select the “Processes” tab to find your newly deployed “Tech Helper Agent.”

- Click Start process -> to open the initial form where you can enter your request for the agent.
- Enter the following in the request when prompted.
What are the latest mobile phones available?
Then click the Start process button. - Open Camunda Operate and review the process. It will likely be at the AI agent process step deciding what tools should be called.

- After a few seconds, it will call the REST API tool to obtain the list of items and then the user task to display what it found.

- Now access Tasklist and select “Tasks” from the tabs at the top. When you open the “Show response to Query” step, you should see something like this.

- Be sure to assign the task to yourself and enter the following in the field at the bottom of the form.

- The agent doesn’t need to query the API again as it has all the information from the previous query. It just needs to compare the models and provide a response. You will likely get something like this.

- You can continue to keep providing additional feedback at the end of the form, but if you don’t, the process will finish.
And there you have it. You have a working technology support agent.
Some more things to try
You might want to look at some of the information provided in the agent.Context variable when in Operate. This information will show what the agent asked, the response it received and more details about what the agent is doing.
You also might want to try asking different questions such as:
- What is the best monitor over 24” on the market?
- What are the types of flat screen TVs over 32”?
- Which mobile phone is the best?
Have fun and see what your agent recommends.
Learn more about Camunda and AI agents
This process showcases the power of combining Camunda’s workflow orchestration with AI agents for intelligent, tool-enabled automation. If you want to learn more about how Camunda supports AI agents, please see the following references:
- Agentic Orchestration: Automation’s Next Big Shift
- Camunda Releases Agentic Orchestration for the Enterprise
- Camunda and the Model Context Protocol: A Practical Overview
- The Power of Camunda Copilots
- The Benefits of BPMN AI Agents
- Guide to Adding a Tool for an AI Agent
- What is BPMN?
- Why agentic process orchestration belongs in your strategy
And don’t forget to get started today with Camunda.
Start the discussion at forum.camunda.io