

So you want to dive into process automation with Camunda 8 but don’t know where to start? Good news! Camunda’s Developer Portal, and our new Starter Package, have you covered!
Camunda 8 is a process orchestration platform that lets you design workflows visually and have them executed step-by-step on an engine. In plain terms, you design a process (BPMN diagram) and Camunda’s engine, Zeebe, executes all the tasks, services, and rules in that workflow. As a software developer, you’ll be happy to know you can get everything running locally in just a few minutes – before your coffee gets cold.
Different ways to run Camunda 8
Before we dive into getting a local development environment running, let’s take a brief moment to review all the options available to develop and test with Camunda.
Camunda 8 can run in various environments, so you can choose the option that fits your needs – whether you’re spinning up a quick test on your laptop or deploying to a production cluster.
For production deployments, the easiest option is Camunda’s SaaS service (there’s a free trial tier to try it out). This is great for getting started quickly or running reliable production workflows without managing infrastructure. You can also deploy Camunda on your own infrastructure. Typically, this means deploying the Camunda 8 components with Docker or on a Kubernetes cluster.
But what about local development and testing? You have a few different options:
- Camunda 8 Run: C8 Run is an all-in-one distribution that you can download and start with a simple script. This is what we will be using in this post. It is great for local development and demos because you can get Camunda running on your machine in minutes. Keep in mind, Camunda 8 Run is not supported for production – it’s meant for local development environments only.
- Docker Compose (Self-Managed Dev Setup): For an easy local setup, Camunda provides a Docker Compose configuration that spins up all the core components (Zeebe engine, Operate, Tasklist, Optimize, Identity, etc.) on your machine with one command: `docker compose up -d`.
- Camunda 8 SaaS (30 day free trial): Yes, you can use the Camunda 8 SaaS cloud for development, too! If you want to experiment with Camunda 8 without installing anything, just sign up for the free Camunda 8 SaaS developer tier and deploy models there. It’s perfect for a quick PoC or tutorial since you get an instant Camunda cluster in the cloud.
If you need something more advanced, you can run Camunda in a local Kubernetes cluster, or, if you are feeling more ambitious, you can build from source. For most local development and testing purposes, C8 Run should provide everything you need.
But enough of this, your coffee is getting cold, let’s get Camunda up and running with C8 Run!
Step 1: Setting up – Grab the Camunda 8 Starter Package
Your first stop is the Camunda Developers Portal. This portal is a new developer-focused hub for all things Camunda – from downloads and quickstarts to use-case examples and advanced tutorials. If you click on “Get Camunda 8”, you’ll find the Camunda 8 Starter Package, with downloads for Windows, Mac, or Linux. This starter bundle contains everything needed to set up a local Camunda environment in one shot.
Before downloading, make sure your system already has Java installed: Camunda 8 runs on Java 21–23 (LTS versions), so have a JDK 21, 22, or 23 installed and on your PATH. (JDK 24+ isn’t supported yet as of this writing, so stick to the recommended versions for now.) With Java installed, go ahead and download the starter package for your OS. The portal also offers individual downloads of the Camunda Desktop Modeler and C8 Run distribution if you ever need them separately, but for now the all-in-one starter is easiest.
Once the download is finished, unzip the Camunda 8 Starter Package to a convenient location. Inside, you’ll find a folder containing a few scripts and subfolders:
- `1-camunda-starter` (Windows Batch file or Unix .sh script) – this is your one-click (or one-command) start script for the whole Camunda 8 stack.
- `2-Camunda Modeler` – the Camunda Modeler application for designing processes.
- `ai-agent-example` – a pre-designed AI agent example built with Camunda
- `c8run` – the directory containing the C8 Run engine and its configs.
- `camunda-8-get-started` – an example project with a ready-made BPMN process and code (in Java and NodeJS) for service tasks. This is the project we will be testing today!
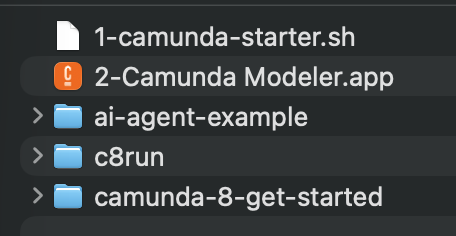
(This screenshot is from a Macbook running macOS. If you are using Windows or Linux, your directory listing or files may look slightly different.)
Step 2: Launch Camunda 8 Run
With the starter package unzipped, it’s time to fire up your C8 Run instance. C8 Run is essentially a single application that launches an orchestration cluster (the workflow engine and related services) along with out-of-the-box connectors and an Elasticsearch instance. (Learn more about Camunda 8’s architecture and components here!)
To start Camunda 8 Run, follow these simple steps:
- Open a terminal (or command prompt) and navigate to the unzipped starter folder.
- Run the start script. If you’re on Windows, execute `1-camunda-starter.bat`; on Mac/Linux, run `./1-camunda-starter.sh`.
- Watch the logs in the terminal. You’ll see the engine and components starting up. Within a minute or so, you should see messages indicating that web interfaces are available at `http://localhost:8080` for various tools (Operate, Tasklist, etc.).
If all goes well, your default browser will pop open with a “Camunda 8 successfully started” message. 🎉 Congrats! You now have a local Camunda 8 cluster running.

Step 3: Deploying your first workflow with Desktop Modeler
Now that the engine is running, we need a process to deploy and run. Camunda workflows are defined in BPMN diagrams. Don’t worry – you don’t have to create one from scratch for this first run. The starter package conveniently includes an example BPMN diagram representing a simple business process. We’ll use the Camunda Modeler (included in the starter bundle) to deploy this process to our engine.
First, launch the Camunda Modeler application. Open one of the example BPMN diagrams from the `camunda-8-get-started/bpmn` folder. You should now see the process diagram rendered in the Modeler canvas. (When you’re ready, open both models and compare the difference – they perform the same tasks, but handle errors differently.)
Now for the fun part: deploying the process to the engine. In Camunda Modeler, click the little rocket icon 🚀to deploy. Choose “Camunda 8 Self-Managed” as the target, and set the “Cluster Endpoint” to “http://localhost:26500”. Hit “Deploy” – and boom, your process is deployed to the engine.

To test it out, click the “Play” icon (▶️) to start a new process instance. Add optional input variables if you like, and start the instance. Congrats – you’ve kicked off your first Camunda 8 process instance!
Step 4: Monitoring the process in Operate
Head over to http://localhost:8080/operate and log in with the default credentials (`demo / demo`). There you’ll see your running process instance in the Operate dashboard. Click into it to watch the tokens flow through your BPMN diagram. Operate gives you a real-time view of the process execution.
You may notice that the process is waiting on the first task, “Check Inventory.” This is a service task, and it is waiting for a job worker to pick up the job and complete it. So let’s do that!
Step 5: Completing the service tasks with job workers
Job workers are pieces of code that connect to your Camunda cluster and pick up active jobs. Each job worker is assigned a type of task that it can execute. You can activate and complete jobs with the API, but Camunda has released Java and JavaScript clients to make building job workers easier. The starter package includes example workers in both Java (Spring Boot) and Node.js.
The next step is to start the job worker. Because you already have Java installed, the Java example is sure to work on your system. If you are JavaScript developer and have Node.js installed on your system already, you can use that example if you prefer.
For Java:
“`
cd camunda-8-get-started/java
mvn spring-boot:run
“`
For Node.js:
“`
cd camunda-8-get-started/nodejs
npm install
npm start
“`
These workers will automatically pick up and execute the jobs from your process, logging each completed step. Once done, head back to Operate to confirm the process is complete.
Wrapping Up: Next Steps
You just experienced the full Camunda dev loop: model, deploy, run, and monitor. 🎉What next?
- Learn more about BPMN modeling!
- Learn about job workers and connectors!
- Dive into agentic orchestration!
- Join other Camunda users in the community Forum!
The Developer Portal is your hub for all these options and more – guides, examples, and tutorials are just a click away.
Conclusion
Today you went from zero to orchestrating a process on your laptop. You set up Camunda 8 Run, deployed an example process, ran it with workers, and monitored it in Operate. That’s the essence of Camunda development – simple steps with powerful outcomes. Next stop? Model your own processes, plug in real business logic, and take orchestration to the next level!
Start the discussion at forum.camunda.io