

Camunda 8’s new AI Agent connector makes it easy to integrate large language models (LLMs) into your process workflows. It even lets the model decide which tasks (or tools) to execute next. In this post, we’ll walk through setting up a local LLM with Camunda 8, so you can get all the AI goodness without calling cloud services.
Running an open‑source LLM locally has two big perks: your data never leaves your machine (great for privacy), and you avoid API costs altogether. By the end of this guide, you’ll have:
- A Camunda 8 Run engine running locally
- A BPMN process modeled with an agentic feedback loop (using the AI Agent connector.
- A local LLM (GPT-OSS 20B) served via an OpenAI-compatible API using Ollama
- The Camunda AI Agent connector configured to call your local LLM’s API endpoint
- A successful test of the full setup
Follow along with the video!
Running a local LLM via Ollama or vLLM
Before you get Camunda 8 running locally,you first need to configure a local LLM for it to use.
Camunda can communicate with any LLM that exposes an OpenAI‑compatible API. One of the most popular options for running a local OpenAI-compatible API is Ollama. The example in this post uses it with the open source GPT-OSS 20B LLM model.
Important note! LLMs require a significant amount of available disk space and memory! GPT-OSS:20b requires more than 20GB of RAM to function and 14GB of free disk space to download. If you have only half of that available, you can run the example with qwen2.5:7b-instruct-q4_K_M, but this model can’t handle complex scenarios that well. Not all computers can run an LLM locally, so double-checking your system specs is always a good idea!
Installing and setting up Ollama is straightforward.
- Download and install Ollama: Open https://ollama.com/download and download the installer for your operating system and install it like you would any other application.
- Confirm the installation: Start the application, then open a new terminal or command prompt and run the following command:
ollama --version - Pull GPT-OSS 20B: From the same terminal or command prompt, run the following command:
ollama pull gpt-oss:20b. This downloads the model, which may take a while depending on your internet connection speed. - Start the local server: Run the following command to start the API:
ollama serve. It may take some time to load the model into memory. - Test it: Ollama serves an API by default at
http://localhost:11434. To test it, use a tool like Postman or run this curl command from your terminal:
curl -X POST http://localhost:11434/v1/chat/completions
    -H "Content-Type: application/json"
    -d '{"model":"gpt-oss:20b","messages":[{"role":"user","content":"Hello!"}]}'
You should get a JSON reply from the model. If you don’t, I recommend looking at the Ollama documentation for troubleshooting steps.
Setting up Camunda 8 Run locally
First, get Camunda 8 running locally with connectors enabled. Camunda provides Camunda 8 Run (C8 Run), a lightweight Java distribution that includes Zeebe, Operate, Tasklist, and Connectors.
For a more detailed guide for getting started with C8 Run, check out this blog post!
1. Install Java 21-23
Camunda 8 requires Java 21, 22, or 23. You should first verify your version:
java -versionIf it’s older, install a supported JDK, then run java -version again to ensure the most recent version is being used. Be sure to also verify that the JAVA_HOME environment variable is set correctly.
2. Download and unpack Camunda 8 Run
Download Camunda 8 Starter Package from the Camunda Developer Portal. Unzip it into a directory of your choice.
3. Start the engine
Open a terminal or command prompt and run the startup script from the c8run folder:
# Linux/macOS

./start.sh

# Windows

.c8run.exe start
This launches the entire Camunda platform with all its dependencies, such as Elasticsearch. Once it’s up, open http://localhost:8080/operate and log in with demo/demo to confirm everything is running.
Designing an agentic BPMN process from scratch
Now it’s time to build a simple agentic workflow using the AI Agent connector in the Camunda Modeler.
If you downloaded the Starter Package from the Developer Portal, Camunda Modeler was included in the zip file. If you didn’t, you can download Camunda Modeler from the Developer Portal just like you did with C8 Run!
Camunda’s agentic solutions are extremely powerful and flexible, allowing you to design agents that can perform any task your business requires. Covering everything it is capable of, and how the ad-hoc sub-process works with the AI Agent connectors, is outside the scope of this post, so I encourage you to dive deeper with the links at the bottom!
In Camunda Modeler, create a new Camunda 8 BPMN Diagram and add the following BPMN elements:
- A start event
- An ad-hoc sub-process (expanded)
- Two or three different empty tasks inside the ad-hoc sub-process
- An end event
Your model should look similar to this:

First, configure the tools inside the ad-hoc sub-process. For the AI agent to discover what tools are available and how to use them, each tool (in this case, represented by BPMN symbols) needs to have a unique name, ID, and a description that describes what the tool does and is used for.
Learn more about tool definitions in our documentation!
For this simple test, set all of the tasks to a user task with no form. Give each a unique name and ID. Finally, add a description to each that describes what the agent should invoke that tool for. One of the tasks should have a description similar to Sends an email to the specified user.

Configuring the AI agent
The next step is to configure the AI agent itself. With Camunda, your AI agent is attached to the ad-hoc sub-process. Start by adding the AI Agent Sub-process connector to the ad-hoc sub-process

Click here to learn about the AI Agent connectors!
There are several configuration options for the AI agent, but let’s keep things as basic as possible for this demonstration. You’re only going to configure the Model provider, Model, and User prompt sections.
In a production-ready process, the user prompt would likely be set as a variable and built from a previous set of inputs. For this example, keep it very simple: The user needs to send an email with the subject 'Testing local LLMs'.
While true that this prompt doesn’t leave much room for interpretation, the agent should still understand that you need to send an email and invoke the tool with that description. (If you chose different descriptions for the tools in your ad-hoc sub-process, be sure to alter this prompt accordingly!)
The Model provider and Model sections are the important parts for this demonstration. This is where you point Camunda to your local Ollama API that is serving the GPT-OSS:20b LLM.
In the Model provider section, select OpenAI Compatible from the Provider dropdown. The default Ollama API is served from http://localhost:11434/v1, so enter that value into the API endpoint field. No authentication or additional headers are required for the local Ollama API, so you can leave the rest blank.
The last property to configure is under the Model section. Almost every API serving an LLM requires the name of the model you want to use, and Ollama is no different. The model name is case-sensitive, so make sure you enter gpt-oss:20b in all lower-case.
Yes, it really is that simple! Now let’s run it!
Deploy and run your process
At this point, all the necessary pieces are in place:
- Camunda 8 Run has been successfully started
- GPT-OSS:20b has been downloaded and is available with the Ollama API
- An agentic process has been modeled
It’s time to deploy and run the process!
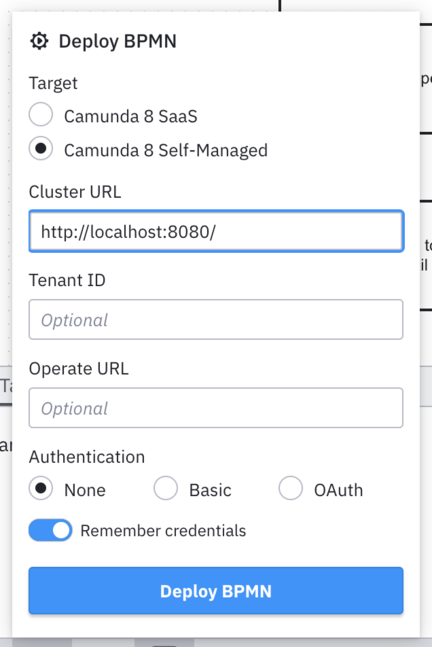
Naturally, if C8 Run isn’t running anymore, go ahead and start it again by following the same steps as before. Then click Deploy in Desktop Modeler (it’s the button that looks like a rocket 🚀). Make sure Camunda 8 Self-Managed is selected at the top and enter http://localhost:8080 as the Cluster URL. Leave Authentication set to None (C8 Run has no authentication configured by default). Then click Deploy.
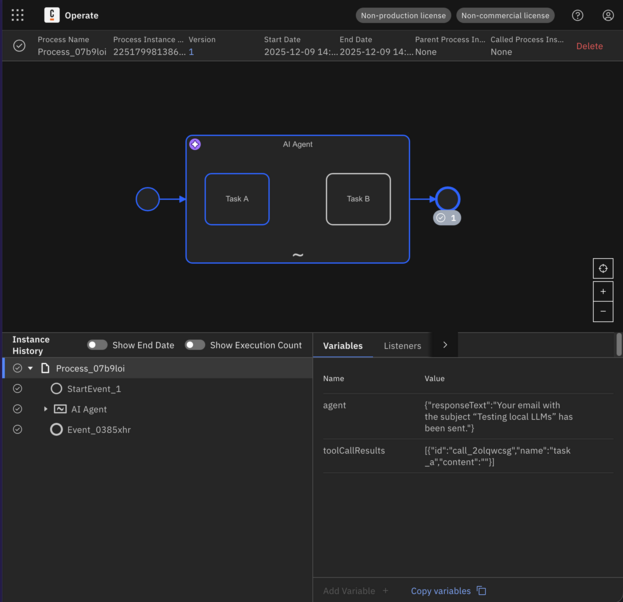
Finally, click Start Instance (which looks like a play button ▶️). Open Operate again (http://localhost:8080), and after a moment you should see the process appear. If everything is working correctly, you should see a completed process!
Wrapping up
You’ve now built an agentic workflow with Camunda using a locally hosted LLM. Next, look at the AI Agent Chat example that is available in Camunda’s Starter Package and try to get that working! Here are some other ideas to experiment with:
- Add REST or script tasks as tools
- Try other models in Ollama (Llama 3, Mistral, etc.)
- Containerize your setup for local dev clusters
With Camunda 8, agentic orchestration and local AI can work hand-in-hand—all while keeping your data under your control.
Start the discussion at forum.camunda.io