
We’re extremely excited to announce the release of Camunda Platform 8.1.
In this post, we will go into the highlights of this release including Web Modeler, Connectors, Zeebe, Operate, Optimize, and more.
Here’s the highlights of what’s included in this release:
- Easier Installation and maintenance for Camunda Platform Self-managed
- Hot backups for Self-Managed
- Token-Based authentication
- Modeler updates
- Process Templates
- FEEL Expression Editor
- Inline Annotations
- Changes to Camunda forms
- Connectors updates
- Workflow engine updates
- Operate updates
- Optimize updates
Let’s get started!
Easier installation and maintenance for Camunda Platform Self-Managed
Improved Guides and Support for OpenShift and Amazon EKS (AWS)
With this release, we are introducing official support for deploying and running Camunda Platform 8 Self-Managed on OpenShift and Amazon EKS (AWS).
As a rule of thumb, our platform should work seamlessly on any Kubernetes distribution. However, each provider is a bit different, so we published platform-oriented guides to avoid any pitfalls in the supported platforms.
You can find the installation guides for Red Hat OpenShift and Amazon EKS (AWS) in our documentation.
Do you want to install the platform on a local Kubernetes cluster? Maybe accessing the platform components without Ingress? Or accessing all platform web applications on a single domain? We have all of that and more added in our new use case guides that will make it easier for users to configure our platform for certain common scenarios.
For the full guides list, please visit our Self-Managed documentation.
Combined and separated Ingress setup
Camunda Platform 8 Self-Managed has multiple web applications and gRPC services with components accessed externally using Ingress. In the previous version, each component had its own Ingress (sub-domain), now it’s possible to combine all web components under a single domain with sub-paths. There are no significant differences between the two setups. Rather, they both offer flexibility for different workflows.
Combined Ingress setup
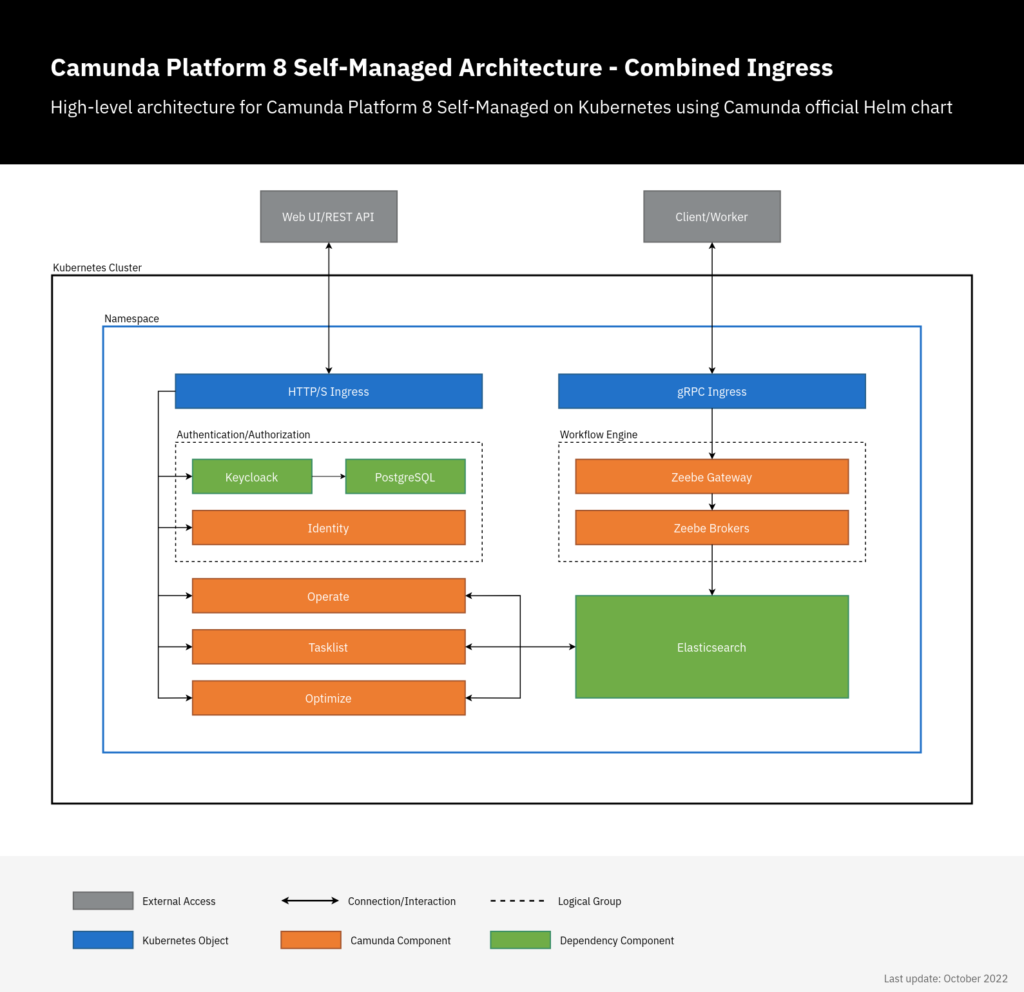
In this setup, there are two Ingress objects. An Ingress with HTTP(S) protocol for all web applications using a single domain and another Ingress with gRPC protocol for Zeebe workflow engine.
Once deployed, you can access the Camunda Platform 8 components on:
- Web applications: https://camunda.example.com/[identity|operate|optimize|tasklist]
- Keycloak authentication: https://camunda.example.com/auth
- Zeebe Gateway: grpc://zeebe.camunda.example.com
Separated Ingress setup
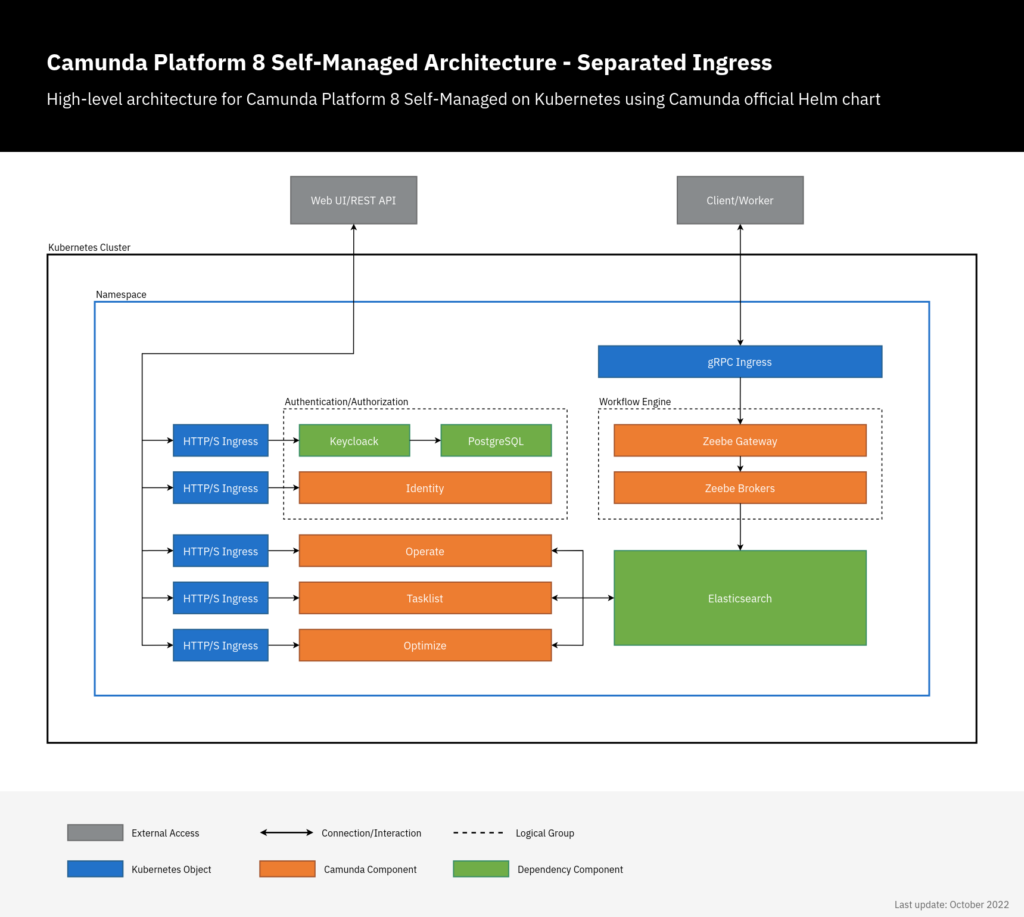
In this setup, each component has its own Ingress. An ingress with HTTP(S) protocol for each web application in addition to an Ingress with gRPC protocol for Zeebe workflow engine.
Once deployed, you can access the Camunda Platform 8 components on:
- Web applications: https://[identity|operate|optimize|tasklist].camunda.example.com
- Keycloak authentication: https://keycloak.camunda.example.com
- Zeebe Gateway: grpc://zeebe.camunda.example.com
For more detailed information, visit the hands-on user guide: Camunda Platform 8 Self-Managed combined and separated Ingress setup
Hot Backups for Self-Managed
With the Camunda Platform 8.1 release, we introduced support for hot-backups in self-managed. Previously, only cold backups were supported which required the user to shut down the whole system before taking a backup and therefore will inflict a downtime of the system.
With the new feature, it is now possible to create a consistent backup of the whole system without shutting down the system, reducing the impact on the normal processing of events. As taking a backup involves consistently snapshotting data in multiple systems the procedure is more complex, find more details about it in our documentation.
For now, we mark the APIs of this feature as experimental. This means APIs might change with the next version of this feature. We are also disabling it by default, we would like to get your feedback on it and the feature set it provides to improve it in the next version.
Token-Based Authentication for our APIs, existing Keycloak and support for public OAuth Clients
Token-Based Authentication for Operate and Tasklist in Self-Managed
Secure access to Operate and Tasklist API in your Self-Managed Camunda environment with token-based authentication. M2M token is meant to be used by applications to gain access to other applications, e.g. a custom user-facing frontend application will need to obtain an M2M token to access Tasklist GraphQL to fetch active tasks of a specific user.
To make use of it, you need to:
- Add an application in Identity
- Add permissions to an application for Operate or Tasklist
- Obtain a token to access REST API
Support for existing Keycloak realms
Identity and, by extension, Camunda Platform 8 Self-Managed can now be configured to use an existing Keycloak instance and realm. This allows users who already use Keycloak for Identity and Access Management to grant and manage access to C8 applications for all of their existing users. More information can be found in the documentation.
Camunda Modeler
What follows is a summary of the updates in Desktop and Web Modeler from the release of Camunda Platform 8.0 through today. The recent version of Desktop Modeler is 5.4, while Web Modeler SaaS is released continuously. Additionally, we released the first version of Web Modeler for self-managed as a beta.
Web Modeler Self-Managed Beta Edition
With Camunda Platform 8.1, Web Modeler is now available for self-managed environments for non-production use cases. It serves as a way to evaluate Web Modeler in a self-managed Camunda Platform 8.x setting, and is available for enterprise customers only. It can be accessed via a docker image from Camunda’s private registry. Enterprise customers can request access to this registry through their customer success manager at Camunda.
Please refer to the installation documentation for more details on how to access Web Modeler Self-Managed Beta.
The beta version of Web Modeler Self-Managed supports all the features of Web Modeler SaaS except for the following differences:
- It does not come with Console, and it uses Identity for access control
- Deployments happen in a similar fashion to Desktop Modeler
- Out-of-the-box Connectors must be installed separately
- No default Optimize dashboard creation
- No process templates
We welcome any feedback on Web Modeler Self-Managed so that we can continue to make improvements in future versions. A general availability (GA) version, suitable for production use, will be released with Camunda Platform 8.2.
Modeling Actions
Both Web and Desktop Modeler come with improved modeling actions, to increase the productivity of developers, as well as for strategic modeling.
Multi-Select Context Pad


As an added convenience, you can now perform actions for multiple selected elements. We have unified the user experience by making the context pad available for multiple selections. From here, you can now align and distribute model nodes with ease. We also improved the Align and Distribute actions to work more intuitively in the context of BPMN and DMN diagrams. You can read more about this in the Desktop Modeler 5.1 release post.
Process Template Picker
With the revamped process template picker, you can quickly get started using one of the process templates we’ve created. These templates serve as a starting point for your process modeling as well as for getting to know new functions or advanced workflow patterns. The new design allows you to browse the templates before choosing one. You can browse available templates and the details of a particular template which includes the diagram.
We continuously provide more templates to the template picker as well as curated templates from partners and the community.
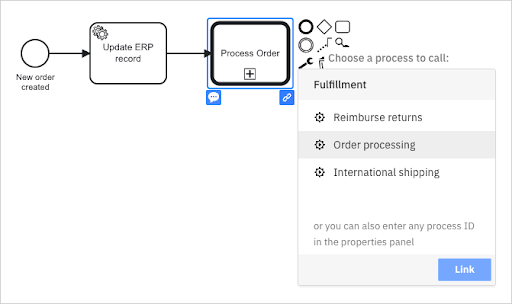
Asset Linking
A great pattern for improving the readability and reusability of your diagrams is to use call activities. Call activities allow you to link processes to be called during the execution of the process diagram without expanding the implementation and diagram details into your parent process diagram.
With this release, processes can be easily linked to call activities using a new link dialog. Likewise, DMN decisions can now be linked to a business rule task in a similar way. Instead of browsing your files manually and copy-pasting IDs, you can use the link dialog to conveniently select a linkable asset from the current project. For more information on how to use this linking feature and how to safely deploy your linked diagrams, see the call activity linking documentation.
FEEL Expression Editor
The FEEL expression editor provides support for writing and validating FEEL expressions. This allows you to conveniently map data between elements in your diagram. It reduces the time spent writing expressions, looking up variables and functions, and helps writing syntactically correct expressions, regardless of prior experience with FEEL expressions.
The editor not only offers syntax highlighting and validation but also code completion. While typing, it provides suggestions for known variables in the diagram, as well as for built-in functions of the FEEL language. It shows contextual information on the go, such as the origin of a variable, documentation of available functions, and parameter information. The code completion pops up as you type, but you can also trigger it in any expression editor field by typing Ctrl+Space. With the FEEL Expression Editor, you’ll be able to write FEEL expressions faster than before and with greater accuracy.
Read more on our blog on how you benefit from the recently released features, how you can leverage the FEEL expression language in Camunda 8, or try it out in the FEEL tutorial.
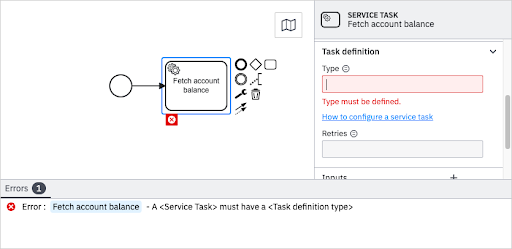
Inline Annotations

Inline annotations let you identify errors in your process implementation immediately, as you are modeling. This way, you can fix problems without having to browse the error panel.
You can toggle the visibility of the annotations by toggling the error panel.
Camunda Forms
Form Field Data Population
With this release, forms can be used to work with process data on a large scale. You can now provide process variable data as a context for selection fields. This way, selection options on forms can be populated at runtime based on global and local input process variables. This enables dynamic orchestration of human tasks with variable data.
Read more on how to configure your forms to use dynamic option sources in the Camunda Forms documentation.
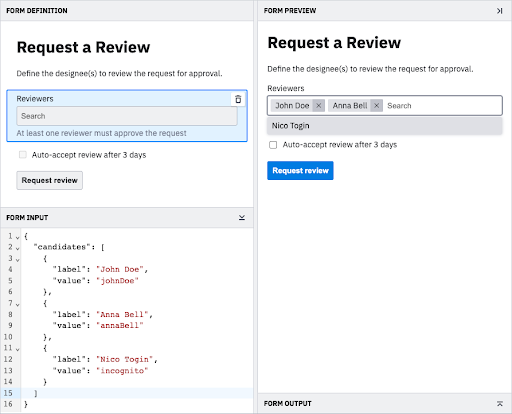
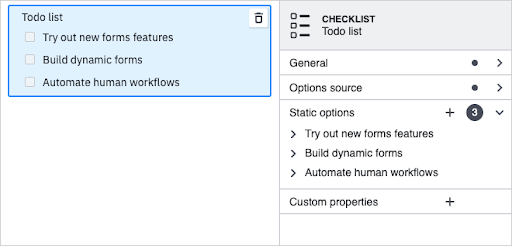
New Multi-Select Form Components
The form field data population can be used with two new multi-select form fields: the checklist and the taglist components. While the checklist is suitable for smaller lists with up to 7 items, the taglist is designed for scalability and supports search and selection from thousands of options. Read more about the current form component portfolio in the Camunda Forms documentation.
Connectors
With the Camunda Platform 8.1 release, we added four new out-of-the-box Connectors, a Connector SDK to develop your own custom Connectors, as well as the option to run out-of-the-box Connectors in self-managed environments.
New out-of-the-box Connectors
Out-of-the-box Connectors allow you to solve everyday use cases in process automation without the need to implement a single line of code. With this release we added four additional out-of-the-box Connectors:
- Slack: The Slack Connector lets you send messages to channels or users in your Slack workspace.
- Google Drive: The Google Drive Connector allows you to create empty folders or files on Google Drive.
- Amazon SQS: The Amazon SQS Connector lets you send messages to Amazon SQS queues.
- AWS Lambda: The AWS Lambda Connector enables you to invoke AWS Lambda functions.
To learn more about available out-of-the-box Connectors and how to use them, refer to our documentation.
Connector SDK
The Connector SDK allows you to develop custom Connectors using Java code. You can focus on the logic of the Connector, test it locally, and reuse its runtime logic in multiple environments. The SDK achieves this by abstracting from Camunda Platform 8 internals that usually come with job workers.
In order to set-up a custom Connector with the Connector SDK, you will need two things: a runtime behavior, and a Connector Template configuration, which defines the reusable modeling element which is later visible on the Modeling canvas. To get started setting up these two basic components, you can use the Custom Connector Template repository on GitHub. If you are using Web Modeler, read the docs to learn about how to write and manage Connector Templates.
The Connector runtime behavior is implemented using the SDK, which provides various APIs for common Connector operations:
Since the Connector SDK abstracts the Camunda Platform 8 internals from the Connector runtime behavior, it also allows you to easily test and deploy your Connector implementation in your specific environment:
- For testing, the SDK provides utility classes that help you set-up the context for your testing scenarios. At the same time the SDK does not enforce any testing libraries, so you can easily integrate it into your existing development flow.
- The Connector runtime behaviors developed with the SDK are runtime-agnostic. This means you can run your custom Connectors in an environment of your choice. The SDK ships with a pre-packaged runtime environment, which will run the runtime behavior as a job worker. If you want to run your custom Connector in another environment (e.g., your custom cloud environment), you can easily implement your own custom Connector job handler.
Running out-of-the-box Connectors in self-managed environments
You can easily run out-of-the-box Connectors in self-managed environments. If you simply want to spin-up all existing out-of-the-box Camunda Connectors in your local or kubernetes environment, you can get started with the Connectors Bundle Dockerfile which will run the Connectors using the job worker runtime in a Docker container. Alternatively, you can run the Connectors individually using the Job Worker runtime provided by the Connector SDK or by creating your own individual runtime environment. You can find the respective Connector sources linked from the Camunda-8-Connectors list on the Camunda Community Hub.
Once you have the Connector behavior running (either via the Dockerfile or individually), you need to provide the Connector Template to the Modeling tool of your choice (Web or Desktop Modeler). This will make the Connector appear in the respective Modeling palette for Process Developers.
Looking forward
To find out more about Connectors, please refer to our documentation. If you want to be the first to learn about new Connectors, feel free to watch the Awesome Camunda Platform 8 Connectors repository collection on the Camunda Community Hub, where you can not only discover Camunda-built or Partner-built Connectors, but also provide Pull Requests to add your own custom Connectors, which you would like to contribute.
Workflow Engine
Support for new BPMN Symbols: Inclusive Gateway (Forking) + Terminate Event
With Camunda Platform 8.1, we are introducing support for the Inclusive Gateway (Forking) as well as the Terminate Event.
The BPMN Terminate Event allows you to terminate a process instance immediately without having to wait for any other active tokens in the process instance. This is especially useful if you have multiple tokens in your process that are running at the same time, e.g. because of a Parallel or Inclusive Gateway.
The Inclusive Gateway – also known as the OR Gateway – allows you to continue the process in one or multiplier paths. Using the Inclusive Gateway can make many BPMN processes simpler as you can often replace multiple chained Exclusive Gateways just by one symbol.
At this stage, we want to thank our community and in particular skayliu who has contributed to Zeebe and implemented the Forking Inclusive Gateway!
If you are interested in contributing to Zeebe, we marked multiple Issues (including additional BPMN symbols) in our Zeebe repository with the label “hacktoberfest”. Learn more about this initiative here.
Start Process Instance Anywhere
Some advanced use cases might require users to not instantiate a new process instance at the default start event of a business process, but require control over at which element a process instance is created and with which data. Use cases can include testing procedures to simplify specific case testing, or process instance migration cases, where an existing process instance has to be migrated to a new version. With the latest release of the platform, this is now possible by providing start instructions, which describe how and where to start a single element.
By default, the instruction starts before the given element. This means input mappings of that element are applied as usual.
Multiple instructions can be provided to start the process instance at more than one element. You can activate the same element multiple times inside the created process instance by referring to the same element id in more than one instruction. For more information refer to the corresponding section in our documentation.
Multi-instance Properties in Completion Condition Expression
A CompletionCondition defines whether the multi-instance body can be completed immediately when the condition is satisfied. It is a boolean expression that will be evaluated each time the instance of the multi-instance body completes. Any instances that are still active are terminated, and the multi-instance body is completed when the expression evaluates to true.
Special multi-instance properties are now available for use in the completion condition expression. From now on, you can use numberOfInstances, numberOfActiveInstances, numberOfCompletedInstances, and numberOfTerminatedInstances in this expression. Although they are available for use in that expression, they do not exist as process variables. These properties take precedence over process variables with the same name.
This feature is a community contribution by 李 銍.
Clients Can Set an Optional Backoff Time to the Failed Jobs
When a client activates a job to work on, but fails to complete the task, the client sends back a command to the broker to mark the job as failed. The default behavior is that the job is immediately available again for activation. There might be scenarios where this is not desired, for example in case there is a service outage, where immediate retries will not lead to a resolution of the problem or a rate-limiting where immediate retries might even worsen the change to complete the job successfully. With this new feature, it is now possible to set a backoff time for the retry in the fail job command, instructing the broker not to make the job activatable again until the timeout passes.
This feature is a community contribution by Alexey Vinogradov.
Support ISO8601 for Start Events with a Timer Cycle
Some use cases require that processes start on a specific date, which is unrelated to when the process was deployed to the system. An example is regular reporting or clean-up jobs which should run at a specific time during the day or week.
With this new feature, it is now possible to specify the exact time of a timer start event cycle using the ISO8601 format.
The following is a complete example of the timer definition, which starts the process on October 2th at 08:09:40 Berlin Time and repeats every day.
<bpmn:timerEventDefinition>
<bpmn:timeCycle>R/2022-10-02T08:09:40+02:00[Europe/Berlin]/P1D</bpmn:timeCycle>
</bpmn:timerEventDefinition>
This feature is a community contribution by 李 銍.
CRON expression for timer cycle
Thanks to a contribution from lzgabel, you can now use CRON Expressions when defining timer cycle events. This enables you to very easily define timer cycles by using the power of CRON. Learn more about this topic in our documentation.
Operate
Process Instance Modification
There are situations when you need to modify an active process instance to repair the execution. With Camunda 8.1 you can continue the execution that got stuck, on a different activity (e.g. skip or repeat activities) or test the isolated process segments.
Zeebe modifies a process instance by terminating an active element instance and activating a new element instance.
The termination of an element instance includes:
- writing a terminating and terminated event
- deleting event subscriptions
- resolving incidents
- canceling jobs
The activation of an element instance includes:
- writing an activate command
- create variables if defined
- if no element instance of the flow scope exists, then activate the flow scope by writing an activating and activated event
By default, the new element instance is created within an existing element instance of the flow scope. For example, when activating an element inside an embedded subprocess and the subprocess is already active.
If an element instance is terminated and the element is a container (i.e. an embedded/event subprocess, multi-instance, call activity) then the engine terminates also the child instances (recursively). The termination is also propagated to higher scopes.
With Process Instance Modification, you can move running flow nodes, add new or cancel existing ones in a process instance easily via the Operate UI.
Optimize
Process Onboarding UX
Whenever the first process instance of a new process definition is deployed, the user will receive an email with an invitation to create their first default dashboard in Optimize.
For more details visit: Camunda Optimize 3.9.0 alpha4 Released – Camunda
Process Digest
Alerts are useful if you want to monitor critical KPIs for immediate intervention. However, how do you track all your KPIs and share them with stakeholders? The new process digest feature gives you a weekly email.
For more details visit: Camunda Optimize 3.9.0-preview1 Released – Camunda
KPI Overview
Optimize 3.8 introduced the ability to set business goals on a limited number of metrics. This release renames business goals to KPIs and lets you create a KPI based on almost any report.
For more details visit: Camunda Optimize 3.9.0-alpha2 Released – Camunda
Management Dashboard
When you have 15 different processes, where do you focus your efforts? How do you gain a holistic picture? Do you look at 15 different dashboards, or do you create and manage a full set of multi-process dashboards?
We’re offering a solution for this problem with the Management Dashboard. It’s a standard dashboard that integrates data from all your processes.
For more details visit: Camunda Optimize 3.9.0-alpha2 Released – Camunda
Restrict report and dashboard creation to collections
Optimize is structured with entities like reports and dashboards that are created inside and outside of collections. With more and more users creating these entities, this can get messy and hard to govern. With this release, it is now possible to limit “entity-authorized-editors”. These users are the only ones which are authorized to Create, Edit, Copy and Delete Optimize entities, outside of a collection. You can find out more about how to configure this here.
For more details visit: Optimize 3.9.0 alpha4 Release Blog Post
Limiting who can export
Prior to this release, all users have been able to export Reports and Outlier Analyses as CSV files. Now Optimize allows you to restrict this option, or to only allow this for superusers, giving you full control over which users can export data from Optimize. You can find out more about how to configure this here.
For more details visit: Optimize 3.9.0 alpha4 Release Blog post
Multi-arch Docker image of Optimize
There is a trend of new computer hardware on desks and for the cloud shifting to ARM architectures. Running Non-ARM docker images on these ARM architectures is possible with emulators, but it is very resource expensive, slow, and some docker images do not run at all. Starting with this release we will provide Multi-Arch images, providing one image offering the same great Optimize experience on ARM and Non-ARM based systems.
For more details visit: Optimize 3.9.0 alpha3 Release Blog Post
Spring Boot Migration
Developers rejoice! Optimize has upgraded from a Spring to a Spring Boot application! For those business-minded stakeholders, here are the differences you need to know. Even more importantly, you can now benefit from simpler configuration, metrics, and faster development speed.
For more details visit: Camunda Optimize 3.9.0-alpha2 Released – Camunda
Optimize Helm Charts
For users of Camunda 8 – Self-Managed – Enterprise, you can get started with Optimize faster than before now that it’s included in our Helm Charts.
For more details visit: Camunda Optimize 3.9.0-alpha1 Released – Camunda
Sample incident data
We upgraded the sample data that came pre-installed with Camunda Optimize 3.8. Now, you can visualize incident-related KPIs and see how Optimize lets you pinpoint technical errors on a heatmap. This can help you identify which errors to fix first.
For more details visit: Camunda Optimize 3.9.0-alpha1 Released – Camunda
Updating to Camunda Platform 8.1
Updating from Camunda Platform 8.0 to Camunda Platform 8.1 is straightforward:
You can keep your existing running and completed process instances, existing process diagrams, and worker integrations. For most of the API and client-side, we’re keeping our backward compatibility.
You can read more about these updates in our update guide.
Try Camunda Platform 8
You can sign up now for a free 30-day trial of Camunda Platform 8.
We’ve also merged our Camunda Community Forums, so you can ask all your technical questions there.
Finally, there are other community extensions available for Camunda Platform 8 users that you can find in our Community Hub on GitHub.
Start the discussion at forum.camunda.io